Creating speaker notes
- You can write your speaker's notes while you work on your slides.
- Go to Note Page View and write your notes for the slide in the text box provided.
- Once you've written these notes, they can only be seen in Note Page View.
- They will not be displayed during the Slide Show.
Follow
these steps to create speaker's notes:
- 1.
In Slide View, display the slide you want to create notes for.
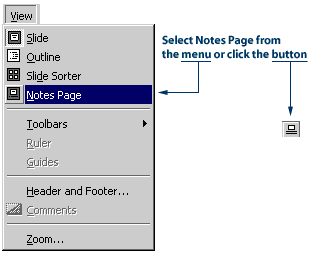
2. Click the View menu, then click Notes Page. You can also click the Notes Page View button in the lower-left hand corner of the PowerPoint window. A page will appear containing the slide and a text box.
- 3.
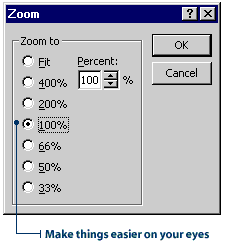
Adjust the Zoom to 100% on the Standard toolbar. This will make your text
easier to see.
- 4.
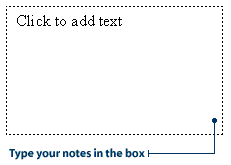
Click in the text box and type your notes.
Printing your speaker notes
The best way to use your speaker's notes is to print them out and have a copy handy while you give your presentation. When you print your notes, you have the option of printing both the slide and the notes, or just the notes.
The following steps show you how to print just the speaker's notes.
- 1.
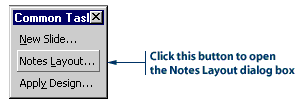
On the Common Tasks toolbar, click the Notes Layout button. The
Notes Layout dialog box will appear.
- 2.
Click the check box next to Slide image to remove the check mark.
Then click OK to close the Notes Layout dialog box.
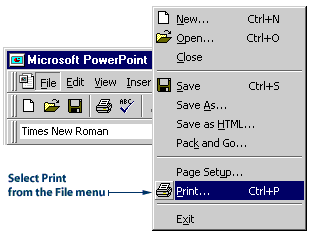
3. Click the File menu, then click Print. The Print dialog box will appear.
- 4.
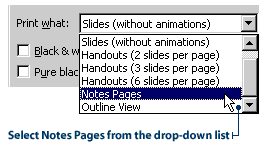
In the 'Print what' drop-down list, click Notes Pages.
- 5.
Click OK to print the notes. You now have speaker's notes to refer to when
you give your presentation.
Timing your presentation
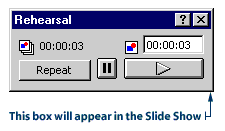
When you select Rehearse Timings, your Slide Show starts running, and PowerPoint starts timing it. The timing is displayed in the Rehearsal dialog box. When the Slide Show comes to an end, PowerPoint will give you the final running time.
Follow these steps to time your presentation:
- 1.
Click the Slide Show menu, and then click Rehearse Timings.
The Slide Show begins and a Rehearsal dialog box appears in the lower-right-hand
corner of the screen.
- 2.
Begin speaking and presenting your show.
3. If you want to repeat your rehearsal of a slide, click the Repeat button on the Rehearsal dialog box. The current slide repeats and the timing for it starts over.
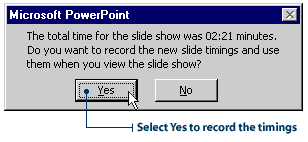
4. Rehearse your presentation until it's finished. After you're done, a message box appears. It tells you the final running time and it asks you if you want to record the timings to use for viewing the presentation.
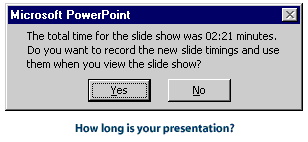
- 5.
Click No. You are returned to the PowerPoint window.
Automating your presentation
An automated presentation is one where you don't have to use the mouse or the keyboard to advance the slides. In other words, the slides advance by themselves.
To automate your presentation, you must set timings for each slide. A good way to set the timings is to use the Rehearse Timings feature.
Follow these steps to add timings to your slides and automate your presentation:
- 1.
Click the Slide Show menu, then click Rehearse Timings.
2. Rehearse your Slide Show as you did in the previous section. When your presentation is done, a message box appears, asking you if you want to record the timings.
3. Click Yes. PowerPoint will record the time you spend on each slide and apply this to your presentation. Your Slide Show will now run automatically.
Note: Remember, you can also set timings for your slides using the Slide Transition dialog box. A disadvantage of this method, though, is that you're only guessing at how long each slide should run.
Creating a self-run kiosk presentation
If you're not going to be available to run your Slide Show, create a self-running kiosk presentation. This sort of presentation is often used at trade shows or conventions. Once the show is started, it runs in a continuous loop until someone presses the ESC key on the keyboard.
When designing a self-running presentation, you can set up the Slide Show to run with automatic timings, or you can set it up so the viewer can move through the show with mouse clicks.
The following steps show you how to create a self-running kiosk presentation with automatic timings.
- 1.
Automate your presentation using the three steps shown above.
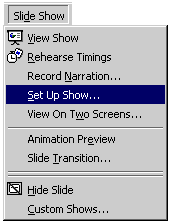
2. Click the Slide Show menu, then click Set Up Show. The Set Up Show dialog box will appear.
- 3.
Under Show type, click Browsed at a kiosk (full screen).
4. Under Advance slides, click Using timings, if present.
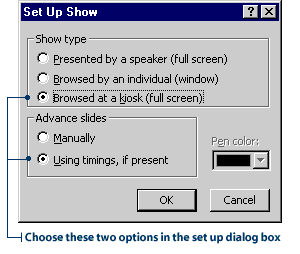
- 5.
Click OK.
Letting the viewer run the show
Follow these steps to set up a viewer-run show.
- 1.
Click the Slide Show menu, the click Set Up Show.
2. Under Show type, click the option Presented by a speaker (full screen).
3. Under Advance slides, click the option Manually.
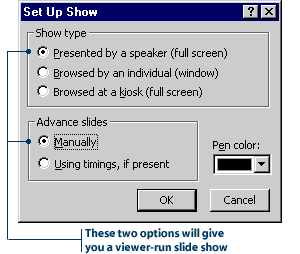
Now,
the viewer can advance through the slide show using the mouse or the keyboard.
Adding your own buttons
When you set up a viewer-run show, the viewer must move through the slides by clicking the mouse or using the keyboard. However, not all viewers will know how to advance slides this way.
Make your presentation easier to view by adding action buttons. When you add an action button to a slide, you give the viewer an obvious place to click the mouse.
The following steps show you how to add a Forward action button to your slides. When viewers click the Forward button they will advance to the next slide.
- 1.
In Slide Show View, display the slide you want to add the action button
to.
2. Click the Slide Show menu, point to Action Buttons, then click the Forward Action button. The pointer changes into a cross.
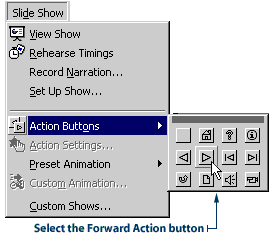
- 3.
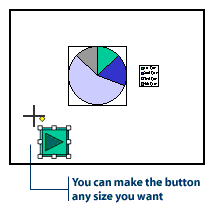
Click on the slide and drag, until the action button is the size you want.
The Action settings dialog box will appear.
- 4.
Notice
the option next to Hyperlink to Next Slide is already selected.
Click OK to close the Action Settings dialog box.
Note: The Forward action button advances slides, but it does not start animations. If you have animations in a viewer-run show, set a timing for the animation with these steps: Open the Custom Animation dialog box. Click the Timings tab, then select the option to Animate Automatically.
Experiment
on your own with adding other action buttons to your slides. For instance,
try adding the Beginning action button to the last slide of your presentation.
When viewers click this button, they will return to the first slide in
the show.
PowerPoint: Not Just for Presentations
By using PowerPoint, you can run presentations automatically, giving you time to cruise around and interact with the viewers. You can feature work by teachers and students on any subject. It is even adaptable as a means of administering tests.