
I just wanted to re-do the bottom paint........RUDDER FAIRING
The rudder was allowed to dry out for a week prior to the sanding marathon. The intent was just to sand off the bottom paint to a stable structure but as most boat projects go, the project grew when a previous patch fell off when I sanded through the paint. The sanding project became a fairing project. I used a belt sander with 120 grit to remove the top layers of bottom paint and sanded down to the previous layer of sealer primer. I knew that I would have to sand down to the bare glass shell or to the fairing compound if it was used. The important feature of the rudder is to maintain a NACA profile for maximum lift and minimum drag.
Theory:
Shad Turner has designed the 525's rudder and keel to have minimum
thickness to reduce drag at 0 Degrees apparent angle. As the Apparent Angle
increases there is a critical point where the laminar water flow over the
foil breaks and becomes turbulent. This is the apparent angle that drag
starts to increase dramatically while lift decreases.
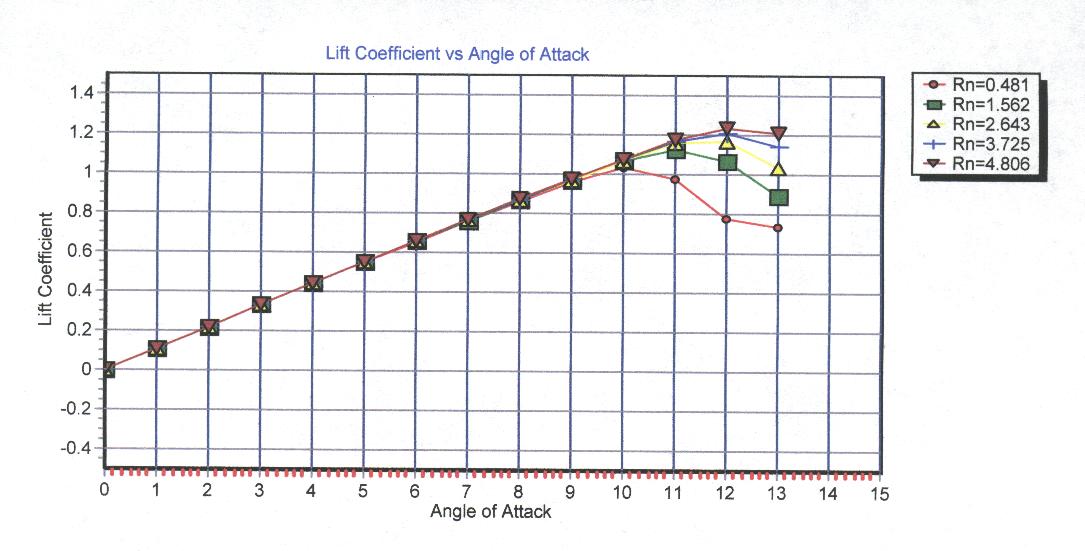
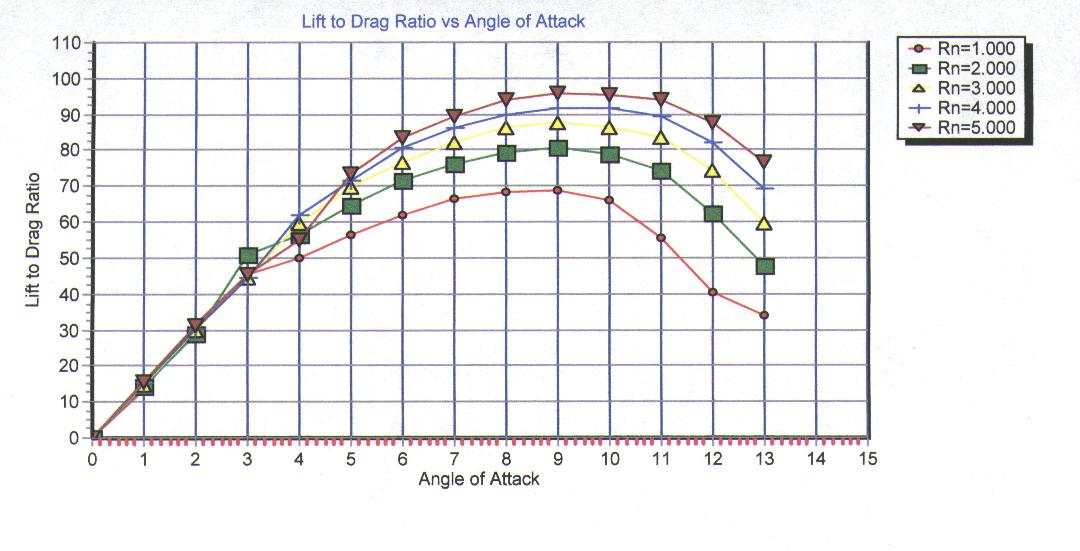
The loss of performance becomes nore evident when you review the lift-drag graph.
The apex is the best then it starts
to decrease in performance. There are numerous sites with software packages available for purchase on this subject.
Shad had designed an eliptical rudder as a design option for the 525. The advantages that it was to offer was an increase of the aspect ratio, (length to width) that by theory increases lift while decreasing drag. The tip is also important due to the interface where the high pressure wants to combine by flowing to the low pressure side. Careful design in this area minimizes the turbulance vortacies that form. Small winglets have been added to keels to modify the fluid flow to contol this parasitic drag. The British Spitfires used eliptical wings as the main contributor to their increadible performance. Eliptical rudders can be found on many of the modern light weight sleds. If you are racing PHRF, you could use them, but for One Design 525 racing, the stock rudder would be required. I was not trying to re-invent the rudder, but I wanted to add enough tech-know to explain the theory.
If the foil section is thicker, the angle of attack can increase further
before the lift is reduced and drag increases. Again the trade off is more
drag all of the time, just from being thicker. The NACA 0006 is a nice
compromise due to low initial drag and low drag up to 10 degrees apparent.
Even with the amount of weather helm I have from inducing 14" mast rake,
I can trim the sails so that the rudder trim is about 10 degrees max. There
are many sources for foils, you can even buy faring templates if you want
to go that way.(http://www.computerkeels.com )
FOIL SHAPE AND LEADING EDGE
Research indicated that the leading edge profile makes a huge effect
on the laminar flow. When you fair the rudder/ keel spend extra time getting
the correct profile in this area. Note that the best leading edge
is a Parabolic shape for lowest drag.

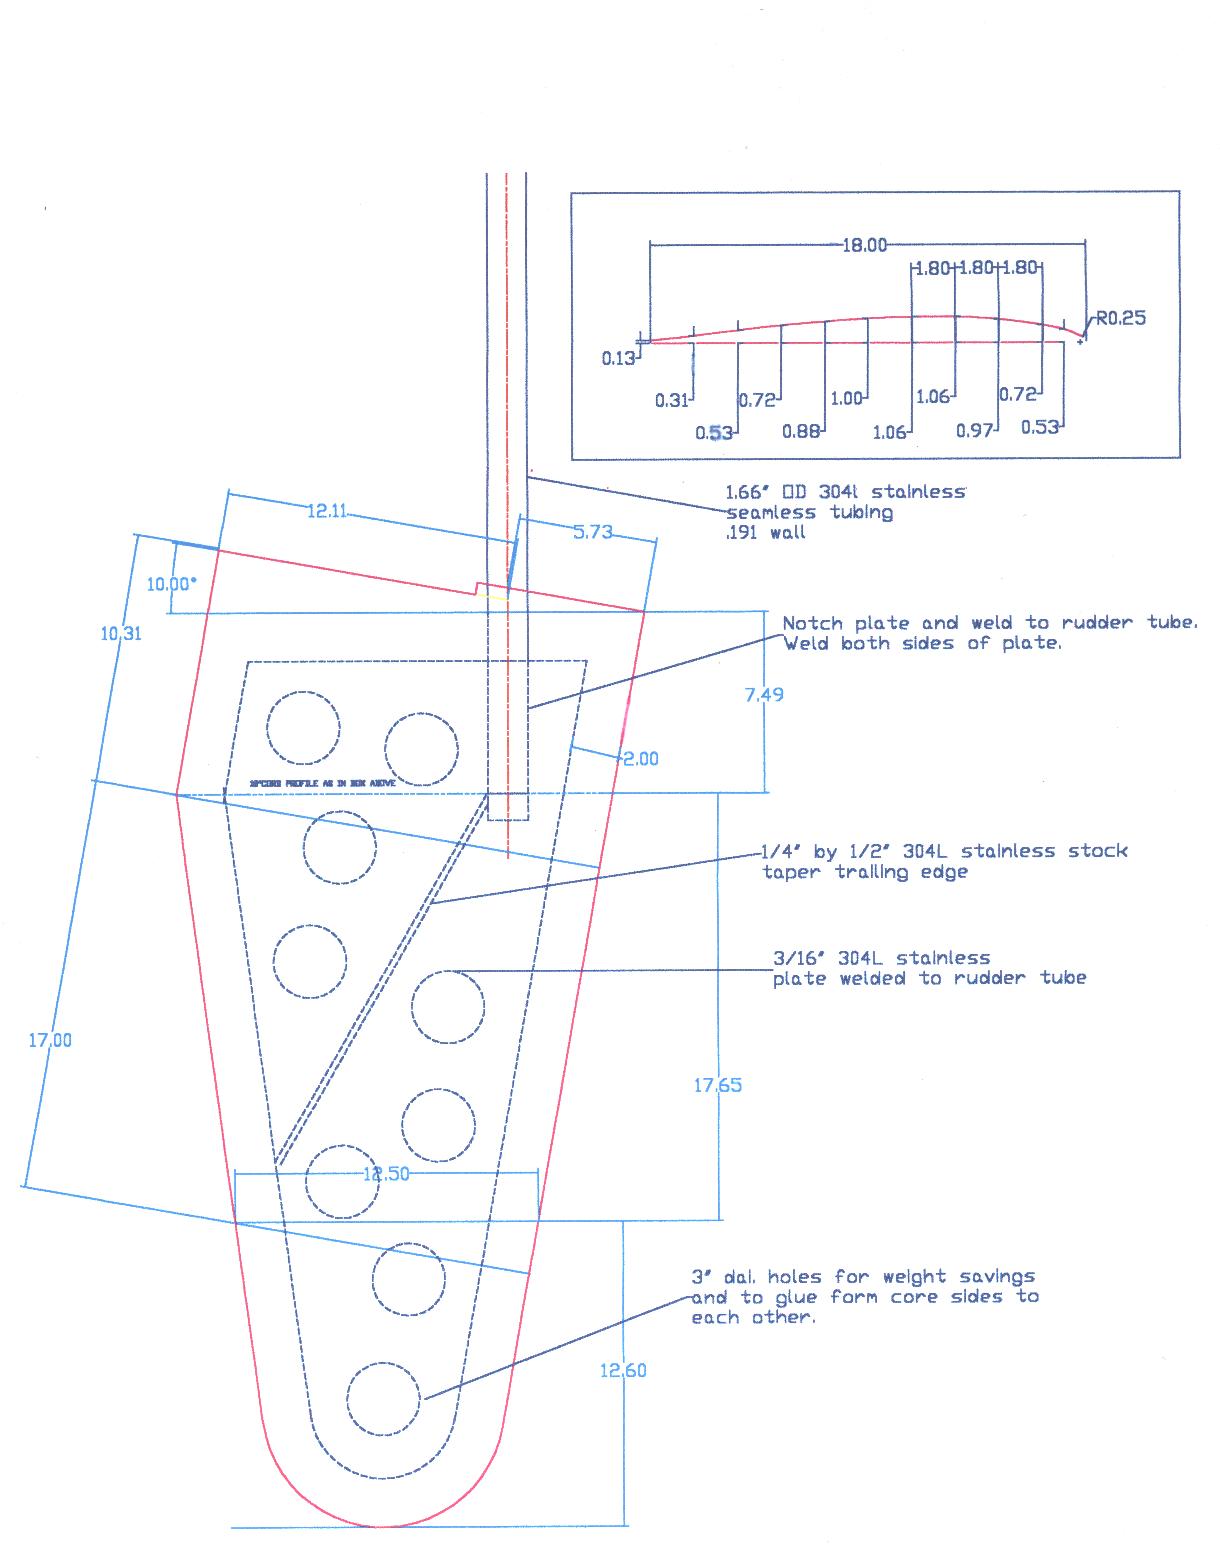
Shad had decided on a NACA 0006 profile. That stands for a symmetrical
shape with a 6% thickness. I used AutoCad to plot the profiles on B sized
paper and then glued them to 1/4 " thick foam cored board available
from the local office supply store.
The material is light and easy to cut with an Exact knife.
The proper way is to trasfer the shape to a 1/2" thick plywood section and to carefully
cut it out with a little meat left to the line.
Then take your time and sand the template to the line. Seal the edges and both sides
close to the edges with epoxy and then final sand. Apply several coats of mold release wax
to all surfaces to prevent fairing epoxy sticking to it.
This method is to place two strips of thick epoxy across the rudder profile, one at the top and another at the bottom. Place the template directly on the band of thick epoxy to squish out the extra material, scrape off the extra on both sides.Do not move the template untill the epoxy has curred. Then wiggle the template untill you can remove it. sand down any of the flash on the impression. Do this at both the top and bottom of the rudder. Now all you have to do is fill in between the two bands and use a straight edge to remove the extra material. Allow to cure and sand smooth.

This method works best if you can not get close to the NACA profile with simple sanding. A very similar way is to use release paper between the templates and the epoxy. I highly recommend getting the reference material prior to starting the fairing job.
For reference material on this method contact Gougeon Brothers Inc. (989) 684-7286 or visit them at their web site www.westsystem.com ask for publication 002-740 The scanned illustrations are from their publication with their permission.

Grinding
The foil shape left lots to be desired, so out with the belt sander
and with 45 degrees angle on it, I started to work the high spots. It took
a couple hours of sanding on each side to achieve the shape that
was the closest to the NACA006. Having sanded the original shell as much
as I did, I knew that I would have to strengthen the shell structure with
the glass cloth. There were several areas that were indented and they were
filled with thickened epoxy ( WEST SYSTEM 105, 206 with
Microlite 410) and then faired. When the overall shape was the
closest that I could achieve to the NACA0006, I glassed both sides with
6oz cloth. This was scrubbed with soapy water to remove the amine blush,
sanded lightly and then coated with thickened epoxy to fill in all cloth
roughness and any remaining shallow areas. This was sanded down with the
templates as guides until most of the glass was visible again. The
top fairing coat left a smooth straight foil.
Finishing
I used a 2 part sealer ( Interlux 200E) over
the glass as a sealer and primer coat for the bottom paint. I let it cure
for a couple days prior to lightly sanding to remove brush marks and maintain
a straight foil section. ( Epoxy also acts as a sealer)
The boat had Interlux
FiberGlass Bottom Coat on it for the last 12 yrs and when I
purchased her 6 yrs ago, and it held up quite well except for the rudder.
I put 3 coats of the Black on and allowed to dry for 2 days. I wanted to
try something a little different by putting a couple coats of ablative
over top. I used Interlux Micron Extra
gray shark color so I will know when it is gone. I scrub the moss off
before each season but would like it to be a little easier. The advantages
to the ablative are that the Micron Extra is
an excellent slime growth inhibitor as well as being self polishing. It
does wash off with time so I anticipate that it will brush off with a little
effort.( Update 9 months in the water and the latest scrubbing went real easy on the rudder. The bottom was a pain, rudder was easy, a bit of a cloud of white with the slime.)
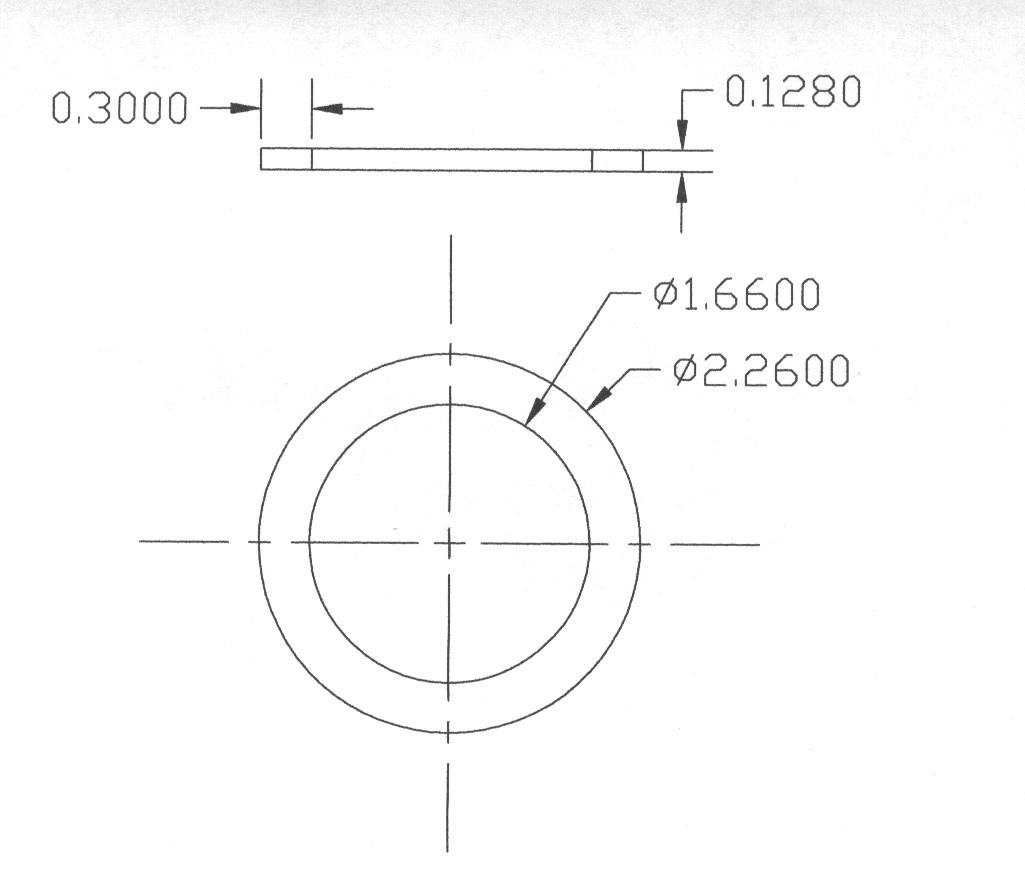
I forgot to mention reworking the rudder shaft just a little. I used a scotchbrite pad and MEK to clean the surface and then applied 5 coats of a dry lube moly disulfide coating. ( MoS2) The rudder exhibited two bright wear bands where it is in contact with lower fiberglass bearing and the upper PVC bearing. The theory was that the moly would be a sacrificial wear material as well as a lubricant.
Installation
Reinstalling the rudder was not too bad. I made a rudder bag that fits
over the rudder and has a loop for a rope to go through. The idea was to
use the rope to raise the rudder in place and secure it while the upper
bearing spacer and the rudder head were being installed. The rudder head
has a bit of excessive slop so I decided to try to place shim material
between the post and the head. I used .002" plastic shim material so that
I could trim out the holes for the bolt to go through. I had to file a
few burrs on the top of the rudder shaft as well as inside the rudder head.
Scotch tape held the shim stock in place while fitting the rudder head
back on. Added the bolts, tightened, removed the rudder bag and ropes and
it was done.
REFLECTION
I have had the boat out a couple times since the rudder was completed.
The most noticeable improvement is that the high speed rudder shimmy is
gone. It would have a nasty vibration when hull speed was over 5 knots.
The squeak is also gone when the rudder is rotated. Delrin is a great bearing
material and also can be found as scheeves in blocks. PRESTO has only been
out for a couple races this season so I can't tell if there was noticle
improvement in overall performance.
I raced PRESTO for the Spring 03 season, and took 1'st with a low handicap. For the Fall season the handicap was lowered again by 4% making PRESTO non-competitive. I was invited to sail with Jim on his Catalina 27 and we took the Fall season and the Schrader Cup. He is one happy camper!
IF YOU HAVE FAIRING PROJECTS, JUST SUBMIT THEM FOR THE SITE.
2-04-04 Eric Roline PRESTO 169
