
 PRESTO's insides had been done once where the flakes
were chipped out and repainted. This may have been a good fix, but the
base problem was still present. I spent over three months of weekends with
a 4" random orbital sander and a 4.5" angle grinder with 80 grit paper.
The orbital did a nicer job but was slow. You can hook a wet vacuum to
it to get the dust outside. The 4.5" grinder is fast, very fast and thus
the problem, you must have a very delicate touch to prevent from sanding
into the fiberglass. This is a major concern that can lead to weakening
the structure. It also left the inside covered with 1/2 inch of dust, me
included. Eye protection and major quality dust mask are required.
PRESTO's insides had been done once where the flakes
were chipped out and repainted. This may have been a good fix, but the
base problem was still present. I spent over three months of weekends with
a 4" random orbital sander and a 4.5" angle grinder with 80 grit paper.
The orbital did a nicer job but was slow. You can hook a wet vacuum to
it to get the dust outside. The 4.5" grinder is fast, very fast and thus
the problem, you must have a very delicate touch to prevent from sanding
into the fiberglass. This is a major concern that can lead to weakening
the structure. It also left the inside covered with 1/2 inch of dust, me
included. Eye protection and major quality dust mask are required.
WOOD
 The wood was stripped with a solvent based gel stripper prior to refinishing.
You can get quite a buzz with this stuff with out realizing it so use plenty
of ventalation. We rubbed down the area lightly with fine sandpaper and cleaned
the area with a tac rag and a solvent soaked rag to check out the color prior
to coating with Cetol. We put 3 coats of Cetol on all of the interior wood.
I love this stuff. The UV pigment inhibitors are a little opaque which helps
to hide any small blemishes. A little expensive at $25/can, but I used it
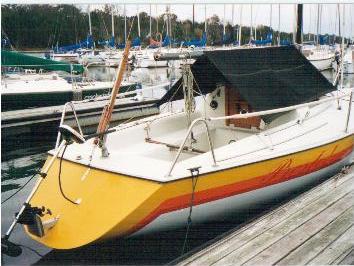
on a Thistle and loved the results. The pic to the right is the after photo
of the port locker. This side looked worse than the starboard side that is
below. You can tell that the photo below does look bad as it was prior to
refinishing.
The wood was stripped with a solvent based gel stripper prior to refinishing.
You can get quite a buzz with this stuff with out realizing it so use plenty
of ventalation. We rubbed down the area lightly with fine sandpaper and cleaned
the area with a tac rag and a solvent soaked rag to check out the color prior
to coating with Cetol. We put 3 coats of Cetol on all of the interior wood.
I love this stuff. The UV pigment inhibitors are a little opaque which helps
to hide any small blemishes. A little expensive at $25/can, but I used it
on a Thistle and loved the results. The pic to the right is the after photo
of the port locker. This side looked worse than the starboard side that is
below. You can tell that the photo below does look bad as it was prior to
refinishing.
 Presto had a little dry rot at one time and the starboard chain plate
bulkhead was replaced with 3/4" marine plywood, and glassed back in. The
root cause was a leaking chain plate to hull seal. You will need to reseal this
joint so dig this area out well to remove the old putty and clean it
till spotless with a solvent prior to repacking it with a flexable, 100%
silicone RTV. The leaking chain plate joint was the main reason behind the
water damage to the interior finish.
Very important to do a good job due to the structural importance.
The lower front of this little locker had a touch of dry rot that
was solved with a little GIT ROT epoxy. You can get syringes down at the
local Coop or Vet supply. Use a drill small enough so that the end of the
syringe just fits in the hole. This provides for a leak free fitting. All of
the hydraulic pressure will force the epoxy into the weak wood structure that
has been affected by rot or delamination. I used a small space heater to
heat up the repair to reduce the epoxy's viscosity and allow better penatration.
The small holes and the screw heads were capped with teak plugs prior to
refinishing. You can cut the teak plugs off flush to the surface with a Japanese
pull saw available from the Wood Workers Store. There are a few to choose from.
Presto had a little dry rot at one time and the starboard chain plate
bulkhead was replaced with 3/4" marine plywood, and glassed back in. The
root cause was a leaking chain plate to hull seal. You will need to reseal this
joint so dig this area out well to remove the old putty and clean it
till spotless with a solvent prior to repacking it with a flexable, 100%
silicone RTV. The leaking chain plate joint was the main reason behind the
water damage to the interior finish.
Very important to do a good job due to the structural importance.
The lower front of this little locker had a touch of dry rot that
was solved with a little GIT ROT epoxy. You can get syringes down at the
local Coop or Vet supply. Use a drill small enough so that the end of the
syringe just fits in the hole. This provides for a leak free fitting. All of
the hydraulic pressure will force the epoxy into the weak wood structure that
has been affected by rot or delamination. I used a small space heater to
heat up the repair to reduce the epoxy's viscosity and allow better penatration.
The small holes and the screw heads were capped with teak plugs prior to
refinishing. You can cut the teak plugs off flush to the surface with a Japanese
pull saw available from the Wood Workers Store. There are a few to choose from.
The results of refinishing was topped of by making a plexiglass door for the
locker. The main advantage is being able to hide what's inside.The hinges
were from Lowe's and modified, the latches were from the local Boater's World
and the plexi was from the local plactic's dealer in Knoxville. It was in
the scrap bin and only cost a couple bucks.The difference was quite improved
from the picture above .


MISC.:
The next little repair was replacing the trim around
the sink and ice box. The wooden strip was mostly missing and I found white
plastic T trim ( can be ordered from The Wood Workers Store 1-800-279-4441, under $10.)
that fit the grove in the plywood. It was a cheep easy fix.
Slight mod, added 1/4" plywood side boards(removable)
to the quarter berths to keep "stuff" from sliding into the bilge
next to or on top of the battery. In a good blow I have everything seeking
the lowest center of gravity.
The Sunday night chat session has revealed another common concern for 525 owners.
The plywood used to support the ceiling where the hatch is has a tendency to delamimate.
There are a couple of methods used to fix this, one is to cut it out from the inside and
use fiberglass tape to put the ceiling back in place. The other is to use a steel hook and
reach throught the hatch assess and dig out the old wood. both methods are messy and the cut
out and fix was thought to be the real fix. To reduce the possibility of water damage and
reduce UV damage to the trim, a cheep sunbrella cover can be used to cover the hatch area.
NOTE:
If you have had any inside stories to add, Email
me and I'll add onto this.
