 Here are some guidelines for servicing a little,
well-used item on most Santanas. The
Harken 150 cam cleat sits there day after day in the sun and rain and
you expect it to work flawlessly when you cleat a line into it.
Well did you ever look inside the little thing to see if it might be
worn out?
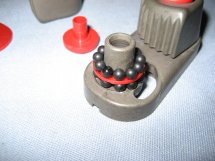
If your cam cleats came on your boat they may well be in excess of 25
years old and in need of new bearings.
The old ball bearings were white and subject to deterioration by UV; so
much so that
they would actually shrink up on one side or another.
Here are some guidelines for servicing a little,
well-used item on most Santanas. The
Harken 150 cam cleat sits there day after day in the sun and rain and
you expect it to work flawlessly when you cleat a line into it.
Well did you ever look inside the little thing to see if it might be
worn out?
If your cam cleats came on your boat they may well be in excess of 25
years old and in need of new bearings.
The old ball bearings were white and subject to deterioration by UV; so
much so that
they would actually shrink up on one side or another.
Buy a new unit, OR, new balls and new red guides. If your local dealer
doesn’t have them he can
order them from Harken or you may do so yourself via there online
store. The ball
bearing number is 150BALLS and the number for the plastic part kit is
HSB86.
The balls come 66 to a package, just enough to do one cam cleat.
The red plastic pieces have enough parts to service one unit also.
But there is a catch. Harken redesigned the base of the
unit some years ago and HSB186 will not completely fix the early units.
The offset of the posts is different now.
If you still have the early units, you can use the bearing separator
plates, but not the body base plate or top caps.
The newer units, however, will take all the parts and restore most
150’s to like new.
Here is the procedure:
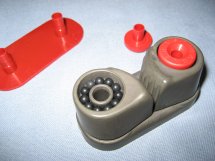
 Dismount the unit.
I like working in a medium size pail during disassembly to keep the
small components from ending up all over
my work area.
Now pry off the top caps with a small flat screwdriver or similar
instrument inserted between the base and the cam.
Lift up and off the cams spilling the balls and separator plates.
Remove the base plate with the screwdriver by gently
prying it away from the aluminum base.
This exposes the stainless springs which make the unit close on your
line.
Now wash everything in soap and water with a good brush being careful
not to reshape the springs.
Dismount the unit.
I like working in a medium size pail during disassembly to keep the
small components from ending up all over
my work area.
Now pry off the top caps with a small flat screwdriver or similar
instrument inserted between the base and the cam.
Lift up and off the cams spilling the balls and separator plates.
Remove the base plate with the screwdriver by gently
prying it away from the aluminum base.
This exposes the stainless springs which make the unit close on your
line.
Now wash everything in soap and water with a good brush being careful
not to reshape the springs.
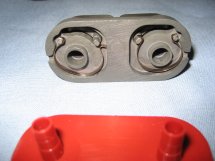
When all is clean you can start to reassemble. I put a drop of
dishwashing detergent on each raceway on the base and spread it around
with a toothpick. Then place 11 of the new balls on the raceway.
Next place a new ball separator with flat side down onto the balls you
just loaded, and
add soap to the raceway built into the separator.
Add 11 more balls to this and then slip the cam over the whole
thing. Do the same to the other side, making sure you have the cams
indexed in the correct direction.
Now insert the two top caps and keeping the
cams snug, turn the unit over, and put the springs back in place.
Add the plastic base plate and turn back right side up.
The unit should now be safe to handle without loosing any parts.
Take it to a source of fresh water and rinse out all the soap.
Remount with fresh sealant around the screws and you are done.
Servicing these little babies on the cabin top is a
challenge to be sure and I could see early on that an improvement was
I made some stainless plates which were drilled and tapped to accept
the screws.
The silicone sealant is good enough to keep them from getting loose, so
no loc-tite is needed.
Snug the screws up until the cams bind just a little then back the
screw off about half to three quarter turn so the
pressure is off the bearings.


LEN SCOONOVER
2/24/08

