Laserlight Tutorial
By Daryl Balluff
Download the tutorial here
What you will learn in this tutorial:
- The effects of Raytrace on an object to create a mirror
- Using the Video Post to make a glow
- Imitating a laser by using simple figures
TUTORIAL
- First, have a fresh empty 3d studio max file open. Before you do anything on this tutorial, click File, then Save As. Save the tutorial as whatever you want it to be. A choice I used is lltutorial.max
- Now, create a cylinder with a radius of 15 and a height of 100. This will be your Laser Generator. Use the rotate tool (
 ) and rotate the cylinder on the X-Axis Now Save.
- Now go to the material editor (
 ). Click on the material library (
 ). This is the material library for the objects in 3d studio max. For the laser emitter, we will use a pre-made material. On the left side of the material library screen, select the radio button next to Mtl Library under Browse From:. Scroll down until you find the Metal_Wall map. Select the map and it will appear on the first map in the material editor. Now drag and click the material onto the cylinder. Since the cylinder will not be very visible in the tutorial, we will not need to modify it anymore. Now Save.

- Now it's time to make the walls around the cylinder. Go to the Top view and make an L-Extension with these parameters:
Side Length: -2500
Front Length: 2500
Side Width: 100
Front Width: 100
Height: 1000
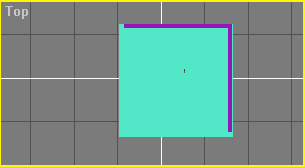
Now make a Plane that is next to the L-Extension that is 2600x2600. It should look like this in the top view:
Now Save.
- Now it's time to make mirrored walls. Go into the material editor and select the 2nd material slot. Press the Material Library button and select the Raytrace material under New. In the Raytrace Basic Parameters Rollout, uncheck the box next to Reflect. Type 50 in the Reflect option. Now select the box to the right of diffuse. That is the map button. Once the map editor (similar to the material editor) opens, select the radio button next to Mtl Library under Browse From:. Find the Space_Hi-Res_Stars map and select it. Now drag the material onto the Plane and the L-Extension. Now Save.
- It's time to make the laser. First, select the L-Extension and the Plane and Hide them. To do this, go to the Command Panel and select the Display button:

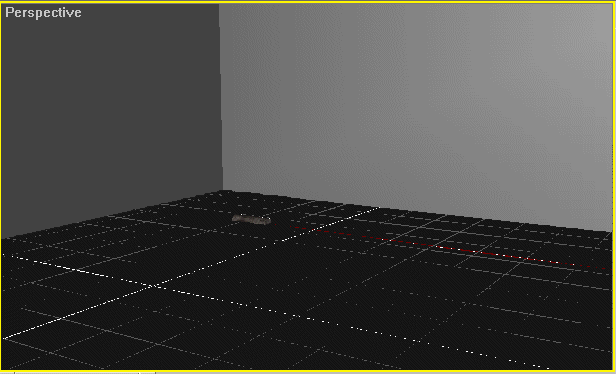
With the two objects still selected, go to the Hide Selected button and press it. This will make work significantly easier. Now make another Cylinder with a radius of 2 and a height of 400. Rotate it on the X-Axis like the other cylinder. Now move it so it is sticking out of the laser emitter. It should look like this:

Now Save.
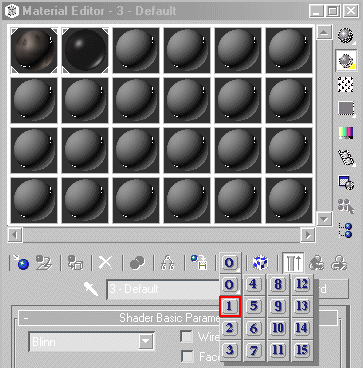
- Now we'll have a little fun. Go back into the material editor and select the third material. This will be your glow material. Make it a reddish color by clicking on the grayish box to the right of Diffuse: and move the dial next to Sat: all the way until it is dark red. Go to the Material Effects Channel and select the number "1."
Drag the material onto the "laserbeam" that you previously made. Now Save.
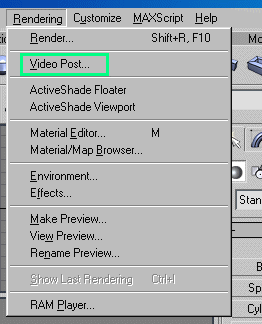
- Close out of the material editor and go to the Video Post Under the Rendering toolbar. If you are confused, go up to file, and look straight to the right and you'll find Rendering. Click on it and look for the Vidoepost. If you are still seemingly lost, check the picture below:
Once in there, click on Add Scene Event ( ). Make sure it is in the Perspecive viewport and click Ok. Then click Add Image Filter Event (
 ). Under the rollout with Adobe Protoshop Filter showing, click and scroll down until you find Lens Effect Glow and press Setup. Under properties, make sure there is no check mark next to Object ID. Check the box next to Effects ID and type in 1. Remember that number from somewhere? You should, since the material you made earlier had an ID 1. Now go to the Preferences button and change the Size to 2.0. That is all you need to do with the video post, so click Ok at the bottom and press the Execute Sequence Button (
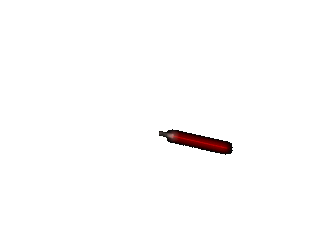
 ). Make sure the radio button next to single frame is selected and Render. This is what the glow does to laser. If it doesn't work, then read the previous steps and make sure you did it correctly. It should look like this (In a bigger window):
Now Save.
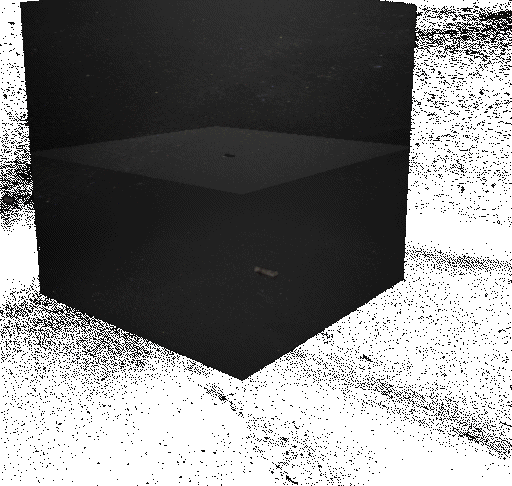
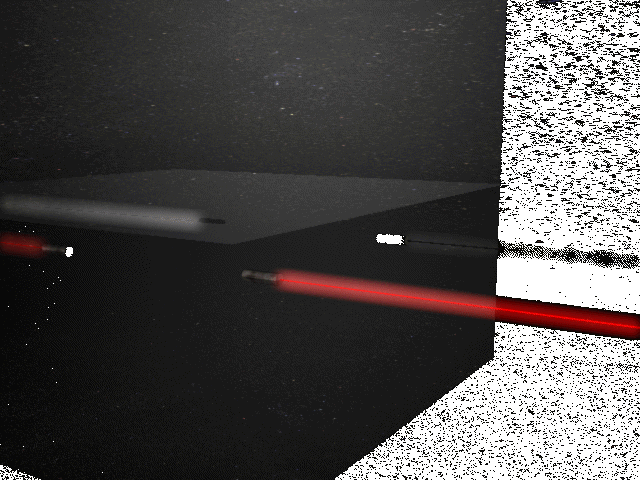
- Close out of the Video Post. Select the laser and emitter and go to the top toolbar labeled Group and select Group. Name it Laser. Now go back To the Command Panel where you hid the walls. Select Unhide All. Move and Rotate the Perspecive view by holding Alt and drag/click the middle mouse button to rotate and holding down Alt and Ctrl and drag/click the middlemouse button to zoom in/out. It should look similar to this:
Go back to the Video Post and render out the picture. - Congradulations! You have finished! You work should look like this when you render:
To save your project, look at the top-right screen of the video post and click on the floppy disk.
Home

