
| Pro
Form Pinion Depth Set Up Tool UPDATED! |
||||||||||||||||||||||||||||||||
| Page 2 | ||||||||||||||||||||||||||||||||
|
||||||||||||||||||||||||||||||||
 |
||||||||||||||||||||||||||||||||
|
||||||||||||||||||||||||||||||||
 |
||||||||||||||||||||||||||||||||
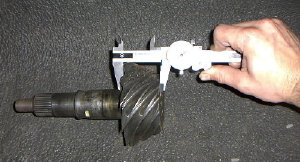
| Measurement of the factory pinion head without shim using a dial caliper. | ||||||||||||||||||||||||||||||||
|
||||||||||||||||||||||||||||||||
| Illustration of my measurements | ||||||||||||||||||||||||||||||||
| Needle on the dial indicator traveled .487 on the bearing bore measurement. Subtracting this number from 2", the bearing bore measurement I came up with was 1.513". | ||||||||||||||||||||||||||||||||
| Dial caliper measurement of the bearing race was 3.062". Dividing that number by two, the result was 1.531". | ||||||||||||||||||||||||||||||||
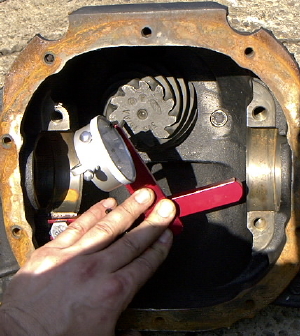
| The offset, as determined using step 9 above, resulted in an offset of .018" needing to be added to the pinion depth measurement below. | ||||||||||||||||||||||||||||||||
| The travel of the dial indicator on the pinion depth measurement from the bearing cap mating surface was .480". Subtracting that number from 3" left a pinion depth from the bearing cap surface of 2.530". | ||||||||||||||||||||||||||||||||
| The dial caliper measurement of the pinion head was 1.880". | ||||||||||||||||||||||||||||||||
| Adding the three measurements; dial caliper measurement of pinion head and shim of 1.880", pinion depth of 2.520", and the offset of .018", I was left with a final pinion depth of 4.418". This measurement is .002" shallower than the factory setting of 4.420". This is a good measurement. | ||||||||||||||||||||||||||||||||
| Originally, I did not like this tool from ProForm, and still
have one negative feeling about it. When I used the tool a second time, I
obtained correct readings, making it a useful tool. However, the dial indicator that
came with the tool was not used: I used a different dial indicator. Now, this could
have been a faulty indicator, but who knows. Overall, if you like tools and/or will be setting up rearends in the future, I think the tool is worth it. Again, the only problem I still have with the tool is that the dial indicator extension screwed into the dial indicator crooked. Having said that, I'd not use the tool as the be-all-end-all last word on how the gears mesh. As a matter of fact, no matter what method I used, I'd finish with checking the wear pattern with gear marking compound for sure. |
||||||||||||||||||||||||||||||||
| Back to Contents | ||||||||||||||||||||||||||||||||
| Pinion and Bearing Removal | ||||||||||||||||||||||||||||||||
