|
Lets Begin:
Open a new canvas, I like calling it a canvas, its actually an image, but we are painting a scenery today. 400w x 300 h pixels, transparent background.
Change your foreground and background colors. Foreground should be lighter, background darker. I created this using an old color scheme. You can choose whatever color scheme you like. My background color is #B1698C and my foreground color is #F5CBDA . Click on your background and select gradient from the flyout. Select gradient #1, foreground, background, angle 0, gradient fill the top square, repeat 0.Take your selection tool, antialias checked feather 0, rectangular shape and starting at 0,0 and ending at 400, 175, flood fill layer 1 with this color.
Effects, noise add uniform noise 3. Deselect.
Change your foreground color to a light teal or your water color and the background to a darker color of the same shade. Your gradient should be light at the top, darker at the bottom, same gradient. Take your selection tool again, starting at 0,168 ending at 400, 300. Flood fill.
Add noise. Deselect.
|
|
Mountains
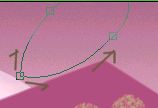
Now this is a little different, we will be using the draw tool. Change your settings. Type point to point. Width 1, line solid, Antialias, create as vector, and closed path checked. Follow the chart below and just add a node at each of these points. Just left click once to add the node.
| 0, | 100 |
| 20, | 73 |
| 39, | 76 |
| 61, | 66 |
| 101, | 96 |
Show off your friends.
| 210, | 106 |
| 289, | 78 |
| 344, | 58 |
| 399, | 92 |
| 399, | 166 |
| 0, | 166 |
| 0, | 100 |
Now you will have very pointy mountains, we are going to change this some. We still want peaks but we also want some rounding.
Click on your node edit. Hit the node edit button on the palette. Go to the following points and right click. Change the node type to symmetric.
Point 39, 76. Once you change the node to symmetric, pull on one of the arms to curve this area.
Point 101,96. You do not need to spread the arms on this node as it will do it automatically. Same with the following
Point 210, 106.
Now click off the canvas and take a look. If your happy, and the mountain goes from one side of your canvas to the other, change the layer to rastor.If not, pull the sides out a bit adjusting the width of the mountain.Change layer to rastor.
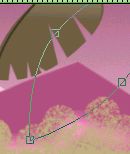
Click on layer1, the gradient fill layer. Change your background color to a light color. I used #EFC8D8. We are going to draw one more mountain, one in the distance. Turn off the gradient and turn off the foreground.We are using the same method.
| 88, | 98 |
| 127, | 60 |
| 179, | 84 |
| 226, | 62 |
| 278, | 89 |
| 184, | 128 |
We are now going to round the mountain peaks. Click on the following points and change type to symmetric if you want. If you prefer the more pointed mountain then leave as is.
127, 60 and slide the arms out a bit. Do the same with node 226, 62. Convert to rastor.Add some lightness to your mountain by using the retouch lighten RGB tool.
|
Adding Trees
Click on your first mountain, the top layer. Add a rastor layer.
Change your foreground color to #C3AE82. Turn off your background layer. Get your airbrush tool. Settings are: Shape round, size 35, hardness 100, opacity 100, step 25, density 52. starting at the far left along the mountain bottom, spray until you get to the right side. Spray straight across. Now above this line, but slightly over it start painting circles. Here is how I did it.

Effects, blur, gaussian blur .75 radius.
Click on the dark mountain. Make it active. Click on your retouch tool. On the second tab select lighten RGB. Go to the first tab and change the settings as shape round, size 35, hardness 0, opacity 30, step 1, density 100. Lighten the bottom behind the trees.
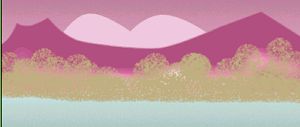
This adds a bit of mist.
Go to the top layer and add a new layer. Change your foreground color to #FEEBEE. Take your draw tool, change the settings as follows: Type single line, width 5, solid line and only antialias checked. Holding the shift key and starting at the far left draw a line across the water right along the tree bottom. Draw another line same color, same width starting at 0, 208 ending off the right.
Change your color to #B64DF1. The color of your dark mountain and draw another line, but change the width to 8, holding your shift key starting at 0, 211 and ending off the right side.
Change the color to the lighter mountain and change the width to 12, draw another line the same starting at 0, 235.
Using color #C3AE82, draw one more line width 10, starting at 0, 258.
Drawing the Palms
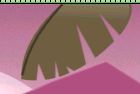
Change your foreground color to #647353 and background to #98a77f, or a dark green. Change the background to gradient. Click on the edit gradient and change the angle to 270, repeats still 0. Draw an oval starting at 190, 67 ending at 243, 198. It does not have to be exact, we will be moving it. The size is whats more important. Angle it, using the turn arm to approximately 45%, to the right so that the leaf is pointing into the pic from the top right. Move it up to 313, 28.
Node edit as follows
Convert to rastor.
Take your freehand selection tool, point to point, feather 1 antialias checked and cut out small slivers around the edge as follows.
Then take your draw tool beziar curve,dark color, width 2 and clicking along to top edge of your leaf make a beziar curve for the stem.
<>Draw a second leaf, but this time change the gradient to angle 90 degrees and repeat to 1. Draw this leaf slightly larger. Angle it, then move up into the very right corner and over the first leaf.
 Add noise of 3.
Cut the edges with the freehand point to point.
Add a stem using the draw tool, point to point with color #FEEBEE.
With the preset shape, oval draw long very skinny ovals, node edit and move just the top node curving the leaf. Draw some stems coming out of the water. You can also add some bezier curves. I used color #6d5c41 for these leaves. You can also add some pond leaves. This part is up to you.
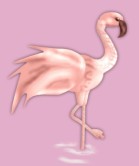
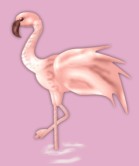
Open your flamingo tube. *Note, your welcome to use this tube in creating other graphics but it is copywrited and I do not want it reused in another tutorial.
Add a new layer, resize it to 65% and place the tube to the right in the water. You may use other tubes as well.
Add noise of 3.
Cut the edges with the freehand point to point.
Add a stem using the draw tool, point to point with color #FEEBEE.
With the preset shape, oval draw long very skinny ovals, node edit and move just the top node curving the leaf. Draw some stems coming out of the water. You can also add some bezier curves. I used color #6d5c41 for these leaves. You can also add some pond leaves. This part is up to you.
Open your flamingo tube. *Note, your welcome to use this tube in creating other graphics but it is copywrited and I do not want it reused in another tutorial.
Add a new layer, resize it to 65% and place the tube to the right in the water. You may use other tubes as well.
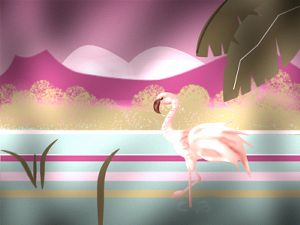
Finishing Touches
Merge all your layers flatten. Take your retouch tool, lighten, size 5, step 4 and add a small half circle in the water where the flamingo's leg is in the water.
Go to effects, Gregs Factory Output, pool shadow change the lightness to 86 and the intensity to 60, and the diagonal, the top one to 112. Apply.
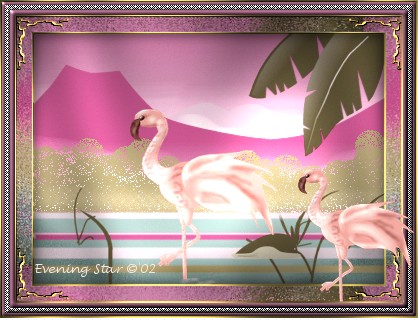
Resize it if you like, and add your favorite frame. Your Painting is completed.
This tutorial is property of Evening Star
©'02
Do not reproduce this tutorial in part or whole.
|
|