|
Greek Vase Tutorial
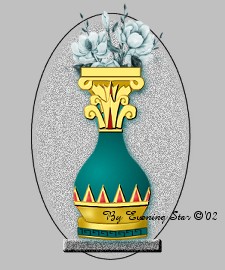
This tutorial teaches how to create gold with authentic shading to create this Greek Vase.
Materials:
The following files one contains the reddiamond psp file and the other the selections.
File
File
..and your PSP!
LetsBegin:
Create a new canvas 385 x 400, transparent background, 16.7mil. Col.
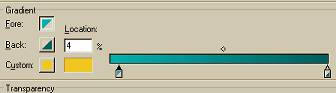
Add a new raster layer. Change your foreground color to #02B0AE and your background to #006262. Change your color to gradient. Select #1 Foreground to background. Change the horizontal to 32 and the vertical to 43. Repeats 0, and using style sunburst gradient. Now click on edit and change the lighter shade #02b0ae to area 4. As follows:
Selections load from disk 1gvvase.sel. Flood fill by right clicking with your mouse. Select none.
Color, ajust, brightness and contrast. Lower the brightness to -33 and increase the highlight to 25. Apply.
Effect, noise, add 3% uniform. LOL looks like a lightbulb.
Layers, new raster layer. Selections load from disk 1a_gvvasetop.sel. Flood fill by right clicking. Select none.
Add a new raster layer. Selections load from disk 2gvgoldbasetop.sel. Flood fill with #C79B03.
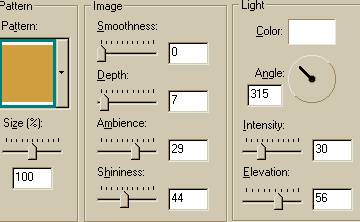
Layers, new raster layer. Selections load from disk 3gvgoldscrolltop.sel. Flood fill with #FFCC01. Do not deselect.
Effects, texture effects, sculpture. Use the following settings:
Add a new raster layer. Selections, load from disk, 4gvtopdeco1.sel. Flood fill with black, selections, modify, contract by 1 flood fill with #FFCC01. Deselect.
On the same layer load from disk 4a_gvtopdeco2.sel. Flood fill with black, selections, modify, contract by 1 flood fill with #FFCC01. Deselect. Sculpture, same settings.
4) Add a new raster layer. Selections load from disk, 5gvtopedge.sel. Flood fill with black, selections, modify, contract by 1 flood fill with #FFCC01. Deselect. Sculpture, same settings.
5)Layers, new raster layer, load from disk, 6a_gvtopdeco2.sel. Flood fill with black, selections, modify, contract by 1 flood fill with #FFCC01. Deselect. Sculpture, same settings.
**Repeat 5) for the next 2 selections: 6b_gvtopdeco3.sel and 6c_gvtopdeco4.sel.
Add a new raster layer. Selections, load from disk, 7gvtopred.sel. Flood fill with black, selections modify contract flood fill with #B70F0F.
Add a new raster layer.Selections load from disk 8gvtopbase.sel. Flood fill with black, selections, modify, contract by 1 flood fill with #FFCC01. Deselect. Sculpture, same settings.
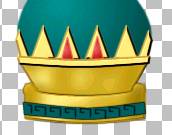
Add a new raster layer.Selections load from disk 9gvbottombase.sel. Flood fill with black, selections, modify, contract by 1 flood fill with #FFCC01. Deselect. Sculpture, same settings.
Layer, new raster layer. Selections, load from disk, 9a_gvbottombaseshade1.sel. Flood fill with #C79B03. Deselect.
Layer, new raster layer. Selections, load from disk, 9b_gvbottombaseshade2.sel. Flood fill with #A07D04. Deselect.
Layers, new raster layer, load from disk, 10gvbottomcup.sel. Flood fill with black, selections, modify, contract by 1 flood fill with #FFCC01. Deselect. Sculpture, same settings.
Layer, new raster layer. Selections, load from disk, 10a_gvbottomcupshade1.sel. Flood fill with #C79B03. Deselect.
Layer, new raster layer. Selections, load from disk, 10b_gvbottomcupshade2.sel. Flood fill with #A07D04. Deselect.
Layer, new raster layer. Selections, load from disk, 10a_gvbottomcupdeco1.sel. Flood fill with black, selections, modify contract by 1 and flood fill with #006262. Deselect.
Layer, new raster layer. Selections, load from disk, 10b_gvbottomcupdeco2.sel. Flood fill with black. Deselect.
Layer, new raster layer. Selections, load from disk, 11gvvasedeco1.sel. Flood fill with black, selections, modify contract by 1 and flood fill with #006262. Deselect.
Now open reddiamond.psp. Edit copy, edit paste as a new layer. Then continue edit pasting as selections into each gold diamond shape as follows:
Then take your freehand selection, lasso tool, and go around both of the end diamonds as follows and hit delete.

Layers, new raster layer, load from disk, 11a_gvvaseedge.sel. Flood fill with black, selections, modify, contract by 1 flood fill with #FFCC01. Deselect. Sculpture, same settings.
Layers, new raster layer, load from disk, 12gvtopdeco5.sel. Flood fill with black, selections, modify, contract by 1 flood fill with #FFCC01. Deselect. Sculpture, same settings.
Layers, new raster layer, load from disk, 12gvtopdeco6.sel. Flood fill with black, selections, modify, contract by 1 flood fill with #B70F0F. Deselect. Sculpture, same settings.
Layers, new raster layer, load from disk, 13gvvasefinish.sel. Flood fill with #A07d74. Deselect. Merge layers visable.
You are done!
Fill with flowers, or save it as a tube!
Thank you for visiting my tutorial, Greek Vase. Please come back and visit again!
Graphics and tutorial © '02 to
Evening Star
All rights reserved.
|
|

