|

This tutorial is simple, quick and easy. Once you have created this, its yours to do with as you please. Your welcome to personalize it. I simply show how I created this. The tutorial though is fully owned and copywrited by Evening Star. No duplications, copying, or distribution through emails is allowed.
Materials
- This zip contains the selections required, download and unzip it.Zip File
- Paint Shop Pro Program level 7, you may be able to create this at other levels.
Lets Begin:
- Open a new canvas or image, 236 x 397 pixels. Transparent background, 16.7mil. col.
- Add a new raster layer.
- Selections, load from disk, 1lbleaf1.sel. Change your foreground color to #4D7326 and your background color to black. Get your flood fill tool. Right click, flood fill with black. Selections, modify by 2, fill with your foreground color. Select none.
- Add a new raster layer.
- Selections, load from disk, 2lbleaf2.sel. Change your foreground color to #669933 and keep your background color black. Get your flood fill tool. Right click, flood fill with black. Selections, modify by 2, fill with your foreground color. Select none.
- Add a new raster layer.
- Selections, load from disk, 3lbback.sel. Change your foreground color to #DB3800, red and keep your background color black. Get your flood fill tool. Right click, flood fill with black. Selections, modify by **1, fill with your foreground color. Select none.
- Add a new raster layer.
- Selections, load from disk, 4lbstems.sel. Get your flood fill tool. Right click, flood fill with black. Select none.
- Add a new raster layer.
- Selections, load from disk, 5lbleaf3.sel. Change your foreground color to #73B038, bright green and keep your background color black. Get your flood fill tool. Right click, flood fill with black. Selections, modify by **2, fill with your foreground color. Select none.
- Add a new raster layer.
- Selections, load from disk, 6lbbody.sel. Change your foreground color to #956330, brown and keep your background color black. Get your flood fill tool. Right click, flood fill with black. Selections, modify by **1, fill with your foreground color. Select none. On the same layer, selections, load from disk 6a_lbbodyshading.sel. Flood fill with #4D3319.
- Selections, load from disk, 7lbtop.sel. Change your foreground color to #956330, brown and keep your background color black. Get your flood fill tool. Right click, flood fill with black. Selections, modify by **1, fill with your foreground color. Select none. Take your selections tool, rectangle, feather 0, antialias checked and draw a rectangle around the top then click once on the top, selecting it. Selections, invert. Effects, 3d effects, drop shadow. Change the settings to opacity 80, vertical and horizontal 1, blur 20, color black, apply. Select none.
Here is what you should have so far:
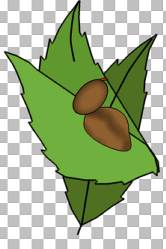
Pretty simple so far. Right?
- Add a new raster layer.
- Selections, load from disk, 8lbhead.sel. Change your foreground color to #937053, brown and now change your background color to #DDB99B. Get your flood fill tool. Right click, flood fill. Selections, modify by **1, fill with your foreground color. Select none.
Take your selections tool, rectangle, feather 0, antialias checked and draw a rectangle around the head then click once on the head, selecting it. Selections, invert. Effects, 3d effects, drop shadow. Same settings, except change the color to #6F4E35. Apply.Effects, noise add 3% uniform.
- Add a new raster layer.
- Selections, load from disk, 9lbhat.sel. Change your foreground color to #946330, brown and keep your background color black. Get your flood fill tool. Right click, flood fill with black. Selections, modify contract by 1, fill with your foreground color. Do not deselect. Get your airbrush tool. Spray once with the settings at size 49 round, hardness 80, opacity 100, step 25, density 23. Deselect.
Take your selections tool, rectangle, feather 0, antialias checked and draw a rectangle around the layer image then click once on the hat, selecting it. Selections, invert. Effects, 3d effects, drop shadow. Change the settings to opacity 60, vertical and horizontal 1, blur 20, color black, apply. Select none.
- Add a new raster layer. Name this layer feelers. Later we will need this layer.
- Selections, load from disk, 10lbfeelers.sel. Flood fill with black.
- Add a new raster layer.
- Selections, load from disk, 11lbtopwing.sel. Change your foreground color to #DB3800, red and keep your background color black. Get your flood fill tool. Right click, flood fill with black. Selections, modify contract by 1, fill with your foreground color. Select none. On the same layer, selections, load from disk 11a_lbtopwingshading.sel. Change your foreground color to #762002. Flood fill. Select none.
- Add a new raster layer.
- Selections, load from disk, 12wingdots.sel. Change your foreground color to #FFFFE7, light yellow, and keep your background color black. Get your flood fill tool. Right click, flood fill with black. Selections, modify contract by 1, fill with your foreground color. You may keep these dots black if you like.
- Add a new raster layer.
- Selections, load from disk, 13arms.sel. Change your foreground color to #E4C2A3, skin tone and keep your background color black. Get your flood fill tool. Right click, flood fill with black. Selections, modify contract by 1, fill with your foreground color. Take your selections tool, rectangle, feather 0, antialias checked and draw a rectangle around the layer image then click once on the arms, selecting it. Effects, 3deffects, inner bevel. Select the pillow settings, except change the ambiance to 43. Apply. Select none.
- Add a new raster layer.
- Selections, load from disk, 14lbnose.sel. Get your flood fill tool. Right click, flood fill with black, TWICE. Select none.
- Add a new raster layer.Name this layer eyelashes.
- Selections, load from disk, 15lbeyelashes.sel. Get your flood fill tool. Right click, flood fill with black, TWICE. Select none.
We are finished creating the image. Now for the Animation!
- 1st, resize it. Resize it to 75% percentage of original, maintaining aspect ratio and resize all layers checked.
- Add your saying: using a nice font. I used BrodyD, size 14, black, and vectored, this way I could position it to my liking.
- Take your crop tool and crop your image down some.
- Now, holding the shift key hit the D key, duplicate your canvased image.
- On either of the images, go to the eyelases layer, and delete it.
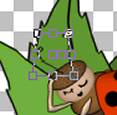
- Then, on this same image, go to the layer feelers. Get your deformations tool, holding the ctrl key slide either of the top nodes in slightly.
- On both images, layers, merge, merge flatten. Unless you want to add a background. If so, merge visable and add your background.
- File, save as and save as ladybug1.psp and ladybug2.psp. Remember where you saved these images.
- Open your animation shop.
- File, animation wizard.
- Same size as the firsth image selected, next.
- Opaque. Next.
- Upper left corner of the canvas and with the canvas color selected. Next.
- Yes, repeat animation indefinately selected and How long do you want each frame to be displayed, enter 50. Next.
- Click add image, find ladybug1.psp, click again add image and find ladybug2.psp. Next, finished.
- View, animation.
- Save as, and save your tag! You are done.
Thank you for visiting my tutorial, Animated Lady Bug.
Please come back and visit again!

This tutorial was created by EveningStar
© '02
All rights reserved.
Main Tutorials
|
|

