![]()
![]()
Throwing Mechanics
...the right way goes a long way
The objective of any throw is to hit the target provided. Generally, on a force play or cut-off throw the goal is to make the throw to the chest area of your target. On a tag play, the throw should be made roughly 15 centimetres (6 inches) above the dirt on the side of the base the tag is to be made.
If the throws consistently hit the mark, the throwing mechanics are most probably very good. However, if missing the mark is a regular occurrence, then mechanics most likely need correcting.
Factors to consider in having good throwing mechanics are:
1 - Grip;
2 - Stance;
3 - Arm Action and Follow-through.
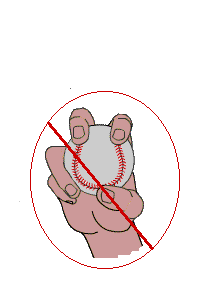
With reference to grip, assuming the hands are big enough, the index and middle fingers should be on top of the ball roughly 1-2 centimetres (.5-.75 inches) apart at the tips of the fingers. The thumb should be located underneath the ball positioned between the index and middle finger. In terms of depth, the ball should be held on the finger tips so that a pocket of air exists between the palm and the ball. Finally, the ball should be held with a four seem grip (top fingers should be positioned perpendicular to the horse shoe formation of the seams). The four seam grip promotes the straightest flight for the ball, thereby, increasing the probability of an accurate throw. A two seam grip (holding the ball along two seams) promotes lateral ball movement and makes it more difficult to throw a straight ball.
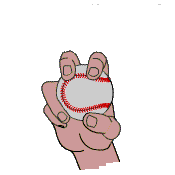
Four
Seam
Two Seam
With respect to stance, other than having the feet roughly shoulder-width apart and the weight on the balls of your feet, the most important factor is to point the glove shoulder at the target, in much the same manner a quarterback would. Therefore, a right-handed thrower would point his/her left shoulder at the target.
It is difficult to discuss arm action and follow through simply through words and images. There are numerous variables to consider. The two most important components, however, are throwing elbow positioning and follow-through path.
In order to minimzie the strain on the throwing elbow the position of the elbow during the forward motion as it moves past the body should be at shoulder height or slightly higher (regardless of the throwing action is "over the top" or "three quarters"). If the elbow is below shoulder height it is only a matter of time until elbow injuries occur.
In reference to follow through it is extremely important the arm finish the path it has begun. Generally speaking, the arm should finish going by the left hip (if the thrower is throwing with his right hand). In doing so, the muscles generating the arm movement are allowed to maximize acceleration and efficiently decelerate the arm in a safe manner. Not allowing the arm to follow its natural follow through path forces many of the muscles to work extra hard to slow down the arm. This can result in injury and is one aspect of what is referred to as "short-arming the ball".
Therefore, to achieve good throwing mechanics the player must start with a good grip (four seam), point his/her glove shoulder at the intended target, while keeping a solid balanced stance and execute safe arm action and follow through.
n
Click the button above to go back to the web page or
web site you were at before comming to this page
Copyright © 2000 Brookside Little League, Inc. All rights reserved