![]()
![]()
![]()
Grasp the principle
What makes a curve ball curve? To understand, try this simple experiment: kneel on the floor and paddle the baseball back and forth between your hands (keep them open and flat). See how it just rolls in a more-or-less straight line? That's what happens when a "regular" pitch is tossed: the ball spins somewhat in midair, but that's just because it's rolling as it leaves your hand. Until gravity kicks in, it's going to go in the same straight line.
Now try this: before you paddle the ball, give it a smart spin (either clockwise or counterclockwise; whatever's comfortable). While it's still spinning, use one palm to nudge it to another. See the difference? The ball's trajectory nudges it to one side or another toward the end of its path, as the rotational motion starts to have an influence on the forward motion. That's the essence of a curve ball.
In a plain-vanilla pitch, the ball is thrown out of the hand, rolling off the fingers with a straight arm. To throw a curve ball, the pitcher rotates the wrist and arm around the ball as it's released, which imparts a spin, and the spin creates the curve. It's that simple.
![]()
Get solid on the basic pitch
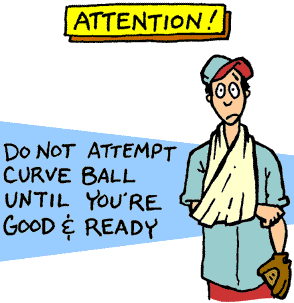
Ready to start tossing the ol' pill? First things first: before you start getting fancy, remember what was said about the hazards of overpitching. But if you feel you're physically ready, then you need to warm up that arm. Practice by throwing a ball 20 to 25 feet into a catcher's glove. As the blood flows into your muscles, walk further and further away from the catcher, until you're throwing from 46 feet (little league) or 60 feet, six inches (major league), which are the official distances from the mound to home plate.
Now, get as solid as possible on the standard pitch. You have to master a theme before you graduate to variations on that theme, and the quality of your curves depends on your having a good basic pitch practiced into your bones. So here's a template for the standard pitch. Check it against your current style and see if any bad habits have crept into your technique. (Note: These directions will use the right hand as the dominant pitching hand. If you're a lefty, switch the right with the left when following the steps.)

Face your catcher directly, holding the ball in front of you, concealed by your glove. Place your right foot slightly in front of you, pointed toward the catcher, with your weight on this leg and your torso leaning slightly forward. Your left leg should be slightly flexed.
With your hands still together, swing your arms up and behind your head, leaning slightly away from the catcher. As you reach up, all your weight should shift to your left leg. Your right foot then slides a few inches forward and turns right, so the toes point to third base.
Lean your weight forward onto your right foot. Let your left foot leave the ground and swivel naturally with your torso toward third base. As you swivel, bend and raise your left leg upward, so your thigh is level with your waist. Your joined hands should be coming from behind your head and down toward your left leg. If you froze in this position, your torso and right leg would be in a straight line, and you wouldn't be leaning forward or backward.
Just beforeyour joined hands touch your bent left knee, they separate. The glove hand stretches toward home plate and the ball hand toward second base, with your weight shifting back towards second, as if you were trying to touch it. As you stretch back, kick your left leg out toward third base (so your left hip, facing home, is higher than the right hip, facing second) then swing the leg toward home plate.
Your left foot should land pointing toward home plate and your legs should be in a long forward stride position. As your left foot lands, follow the natural momentum: move your weight forward, let your torso and hips rotate toward home, push off with your right foot, bending your left leg forward. Your right arm, meanwhile, is coming up towards you head, elbow bent in an overhand position, so your ball hand passes by your right ear.
As you lunge your weight forward onto your bent left leg, release the ball when it's about 12 inches in front of your head, then continue the follow-through: your right foot swings up from the ground, until it's about waist-high, while your right arm continues its arc down, across your body and ending up wrapped around your waist. Your left arm swings back, parallel with your torso. When your right foot touches back down, it should be at a point parallel or a few inches ahead of the right foot.
Sheesh! When you break it down like that, it seems forbiddingly complicated. But with some time and practice, it should all flow together naturally into one almost unconscious action. That's the key: If something doesn't feel like it fits into the process, you're probably doing it wrong. Get some coaching (if possible), or at least some feedback from experienced observers.
![]()
Get a Grip
Okay, you've warmed up and prepared your arm to handle the stress of hurling a ball. You've demonstrated an ability to get it over the plate, and you're ready to advance to the curve. Needless to say, it starts by getting your hands on the ball--but how, exactly, are you supposed to hold it? Ballplayers may earnestly tell you all kinds of arcane variations on specific grips and finger positions, but the reality is this: there is no "right" way to grip a baseball for a curve pitch.
But just because there isn't an absolutely right way, that doesn't mean there's not a grip that's right for you. Many pro pitchers use the following grip, because they feel that using the seams of the ball gives them some extra leverage to help the spin:
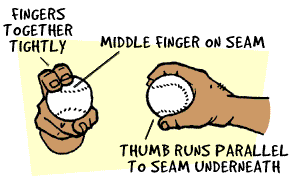
Use your index and middle fingers to grip the side of
the ball facing you. Both fingers should be tight together. The
middle finger rides along the seam, the index presses against the
middle finger, and the thumb runs parallel to the seam on the
underside of the ball.
![]()
Doctor your spin
Now it's time to put a proper spin on things. The motions of the curveball are the same as the "regular" pitch up until the ball's delivery--when your throwing arm moves past your head. It's only when your arm continues forward that the curveball becomes apparent, so we'll start there.
As your arm passes by your head in the overhand position, you're still holding the ball as if you're throwing a regular fastball: your middle and index finger are behind the ball and aimed at the plate.
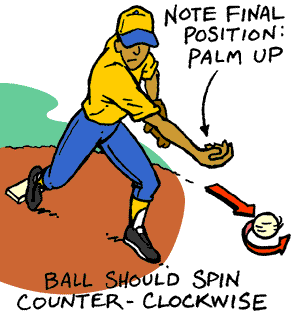
When your arm comes down in front of your head, the curve appears. Turn your forearm and wrist clockwise so your two fingers ride up and over the ball, and yank your forearm down at the same time.
In a millisecond or two, your hand will reach the level of your vision, with your forearm bent almost parallel to your vision. Your palm should be almost upright. This is the release point: the ball spins off your two fingers, and is also pushed by the upward thrust of your thumb.
As the ball sails off, let your arm continue downward, across your chest and ending at your hip and thigh.

The whole movement is a lot like a karate chop,
with your hand starting by facing palm-out beside your head, then
chopping down to palm-up position at your stomach. To practice, take
the movements slowly at first. You can try it with the whole pitch,
or just from the delivery, but don't worry about the ball actually
curving. As you practice more, stick with the whole pitch. When you
get the release right, you'll see how the ball approaches the plate
and then breaks down and to the side sharply
(but don't worry about a perfect break, either--if
it's curving at all, you're doing fine).
![]()
Work on control
Once you get the hang of the technique, you're faced with a harsh reality. It's not enough to get the ball curving--you have to get the curve just right. If it's too pronounced, the ball will arc out of the strike zone before it reaches the batter; if it's too subtle, the ball won't be particularly difficult to hit. Throwing curves will throw your game if they're out of control.
Where the ball goes can depend on the time of release and the position of your body. If the curve is too large, you might be pulling your arm down and releasing too soon. If it's breaking too high or too low--going into the dirt or sailing above the catcher--it may be that the forward stride of your pitch is too short or too long.
It'll take time to get just the right combination of throwing force and spin to make your curves consistent. And once you do that, you'll need to employ another level of control: you'll have to control the temptation to unleash your curve ball against every batter. Sure, it's impressive, but baseball isn't figure skating--there are no points for technical difficulty. The object of the game is to score the most runs, and if the opposing team gets too much exposure to your hard-won curving ability, they'll learn to compensate for it. The goal is to have a quiver of techniques that you use in an unpredictable fashion. After all, that's why surprised people say, "Life threw me a curve ball," isn't it?
-end-