
Effective Business Documents
Tips on Being Concise (To the Point)
![]()
Tips on Being Concise (To the Point)
Always begin with an introduction which highlights what will be in then letter or report.
Think about who your target audience is and meet their needs. A report to your boss will be much different than a memo to a colleague.
The language in business documents must be formal.
Be specific in your documents, don't say, "I need more pencils", say how many you need.
Facts must be set out clearly. Don't stray from the main point and try to use simple but intelligent language.
In reports you can use numbered lists or bullet points to set apart separate facts.
If you do not know who you are writing to assume that they know nothing about your topic. This way you make sure that you are explaining everything in enough detail.
Summarize what you have written about at the end of your report.
![]()
Every business has a house style. The house style usually involves a logo of some sort. For example everything you buy from McDonald's will have the "Golden Arches" on it.
The house style will also exist on all of the companies business documents such as letters, faxes, and invoices. In other words all of the business documents will have the same basic format and carry the company logo as well.
![]()
A letterhead is found at the top of almost all business documents. Letterheads are an important part of making sure business documents stick to the house style. Letter heads include:
A logo
The name of your company.
The address of your company.
The telephone number of your company.
The fax number of your company.
Your companies
website address.

To create your letterhead you will have to have all of the above items arranged in the header of a Microsoft Word document.
Take some time to play around with the position of the logo and the information, remember you are the one doing the designing and there is no right or wrong way so long as it is professional.
![]()
When writing a business letter you will have to include several things. These include:
In the header you create or open a letterhead in keeping with the house style.
Leave a space.
Right below the letterhead you will put the date.
Leave several spaces under the date. (5 to 10 you will need to judge how it looks)
Put the address of the person you are writing to. Include the name of the person if you know it.
Leave a space.
Address the person you are writing to include the name of the person if you know it:
If you don't know the person type: Dear Sir or Madam
If you know the person type: Dear
Leave a space.
State what the letter is regarding.
Leave a space.
Type your letter remember to be concise.
Leave a space between each paragraph.
Make sure
each paragraph discusses a different point.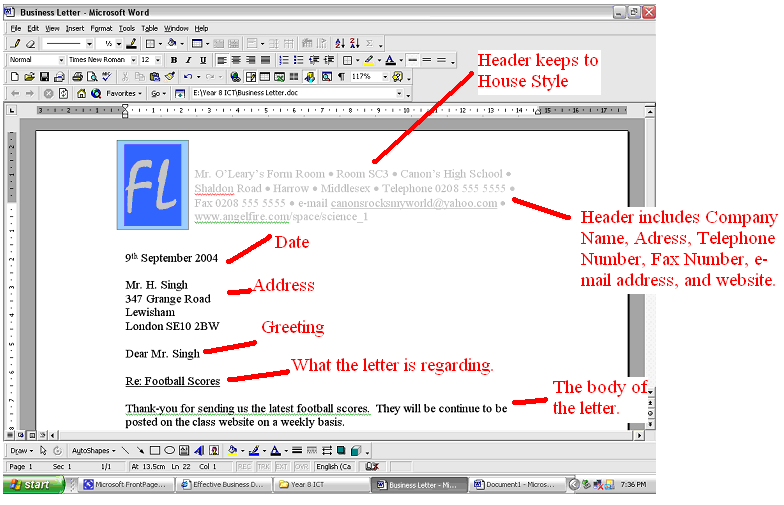
Leave a space.
Type a farewell statement:
If you know the name of the person type: Yours sincerely
If you don't know the name of the person type: Yours faithfully
Leave enough space for you to sign the document after it is printed (3 spaces should be good)
Type your name.
Type your position in the company.
In a footer
type the VAT number of the company if you know it.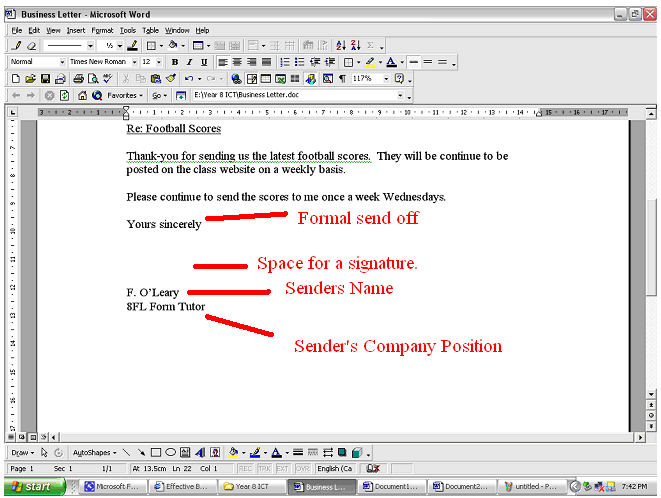
![]()
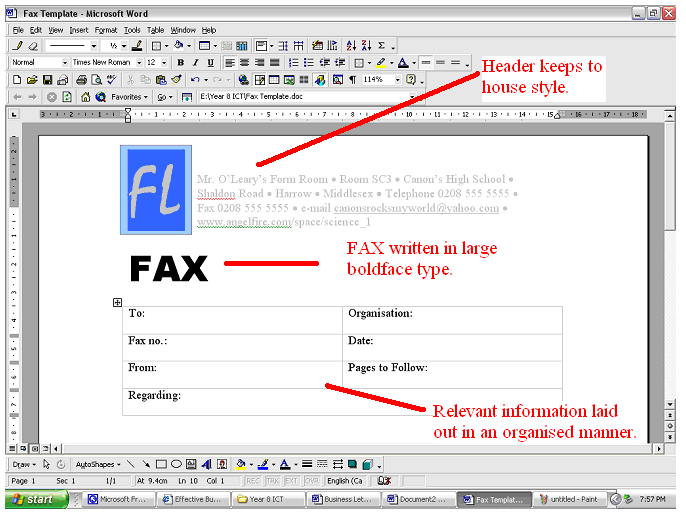
A fax cover sheet is place on top of a document that is to be faxed away it should include:
Create or open a letterhead which sticks to the house style.
The word FAX written in large boldface font. Arial black font, size 36, works well.
Leave a space.
Insert a table with 2columns and 4 rows in it.
Merge the bottom two cells.
The following information should be typed into the cells of the table:
Who the fax is for.
What organization the person works for.
The fax number of the person you are sending a fax to.
Who the fax is from.
How many pages follow the cover sheet.
What the fax is regarding.
![]()
A memo is used to communicate with people within an organisation. It should include the following information:
Create or open a letterhead which keeps with the house style.
The word MEMO in large boldface type. Arial Black font, size 36, works well.
Who the memo is to.
Who the memo is from
If there are any carbon copies (cc). A carbon copy tells the reader of the memo who else has the memo.
The
date

What the memo is regarding.
The body of
the memo.

![]()
A report is given by someone who has been studying or working on something. After the study or work has been done a report is produced and given to whoever is in charge. To write a report follow these tips.
Place a logo, date, title for the report, your name and the number of pages in a header at the top of the report.
Address the report to whomever you are giving it to.
Start with a summary of what is going to be found in the report. You don't need to list each item, but you can break it down into general topics.
Give
concise points about what you have been studying. See
above for tips on being concise.
Summarize with an opinion for effective action to be taken on the report.
Complete
the report with your name and signature.

![]()
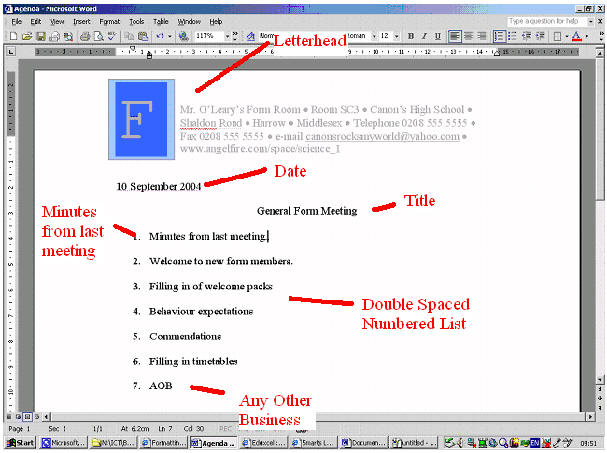
An agenda is a document that is designed to let people know what is going to happen at a meeting and to make sure that the meeting stays on topic. To make an agenda follow these steps:
Place a letterhead at the top of the the page.
Put the date under the letterhead.
Leave two spaces.
At the top of your agenda make a title which explains what the meeting is about.
Centre your title.
Leave two spaces.
Use a numbered list to list all of the topics which are on the agenda.
The first item on your list will always be "Minutes from last meeting" and the last will be "AOB" (Any Other Business).
Double space your list.
![]()
Make sure there is a letterhead at the top of your page.
Under the letterhead insert a table with two rows and six columns.
Merge all six cells in the top row and type Invoice in 24 font lettering and centre it.
Merge the first three cells in the second row and type "Date:" in this column. All remaining text will be in size 12 font.
Merge the next three cells in the second row and type "Invoice no:".
Click under the table and press the space bar.
Insert a new table with 6 columns and 3 rows.
Merge all the rows in the first three columns together. In the top right hand corner type "Invoice Address" (this is where the invoice is sent to).
Merge top row of the remaining columns together and type "Customer Order no.".
Merge the bottom two rows of the remaining columns together and type "Delivery Address (if different)". This is done just in case the goods which are being delivered go to an address different than where the invoice is going.
Click under the table and press the space bar.
Insert a table with four columns and 8 rows.
Follow the next instructions carefully
In the first cell in the table type "Quantity" then press tab.
Type "Product Description" then press tab.
Type "Price per Item" then press tab.
Type "Net Amount" then press tab.
Merge the first three columns of the sixth row together and type "Net Amount".
Merge the first three columns of the seventh row together and type "VAT Amount".
Merge the first three columns of the eighth row together and type "Invoice Total".
Size your tables and cells so that the invoice looks good.
Your invoice should look like something this .
![]()
Flyers should be flashy with very easy to read information.
They should include the company logo, the address of the company or store, and the details of any special offers.
You can include graphics in your flyer to jazz things up a bit.
One of the the best ways to set up your flyer is to use a table.
![]()
There are many ways that you could create a logo for you company. You could draw one by hand and then scan it to make a digital copy, you could create one using a graphics software package, we are going to learn to create simple ones using Microsoft word.
Open view menu, move down to toolbars, and
click on Drawing.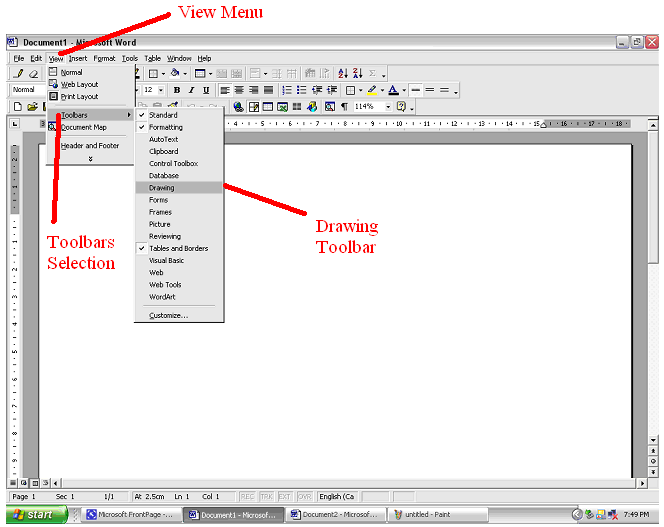
On the drawing toolbar select the text box
icon.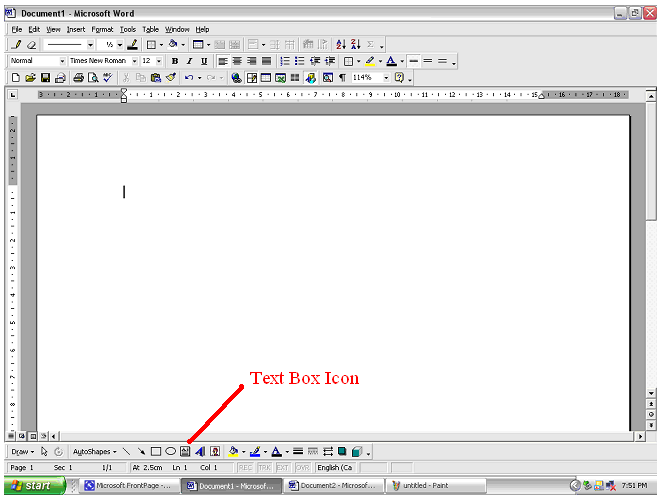
Click, drag, and hold your mouse button
until your text box is the right size. 
Choose a font and a font size for your
logo. (Make sure you choose a large font size like 48.)
Click inside the textbox and type your
logo. Initials or an Acronym are fine.
Use the sizing handles to adjust the text
box to the right size.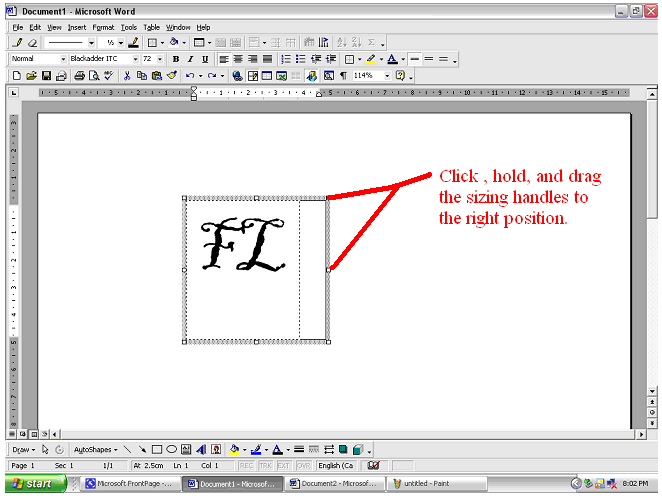
Right click and the text box border and
select Format Text Box.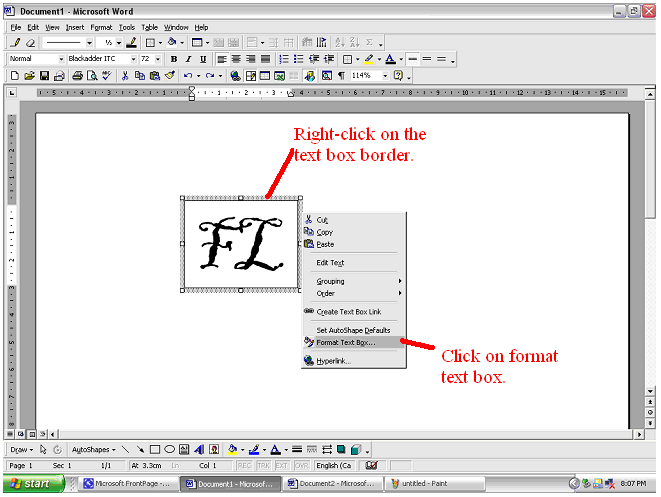
Click on the fill colour menu and choose a
background colour for your logo. Do not close the
Format Text Box dialogue.

Click on the Size tab of the
Format Text Box Dialogue.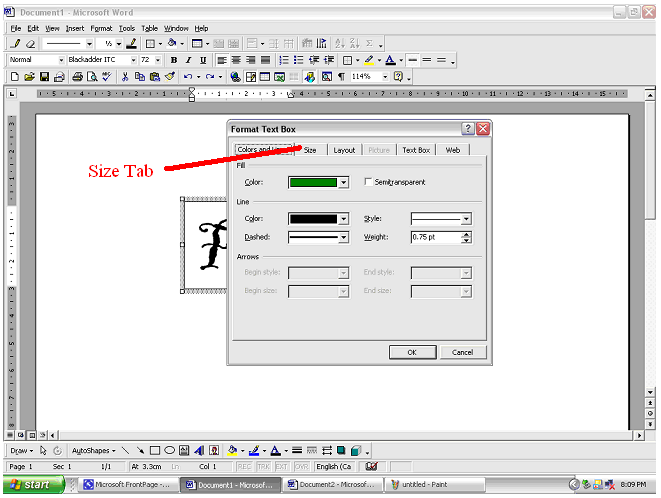
Make sure that your Logo is no
more than about 3cm by 3cm.
Click O.K on the Format Text Box dialogue.
Save your Logo so that you can copy and paste it into other documents.
![]()
If you want to create a logo with an image in it follow these instructions:
Insert an image from file or some Clipart into a Word document.
Add text to the image.
Text can be added on the image.
Text can be added under the image.
Text can be added over the image.
![]()
