The
places I have been, and the places I am going.
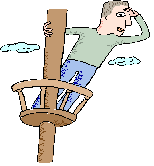
Have you ever wondered
where your life is going to take you? Who are you going to be, what you are
going to do, or who you are going to meet? In this Web quest you are going to
get the chance to explore and write about your future. You might be asking
yourself, “How am I possibly supposed to know what my future holds?” In
response to that question I would say, “It is your future, so you can do
anything with it that you would like.” In this Web Quest you will get a chance
to write about your future goals, dreams, and hopes.
The Task
You will be
engaged in gathering information on the places you have been, and the places
that you want to go. As your final product you will write a short book which
will share your thoughts, feelings, and ideas with other readers. After you have
completed this book your entire class will present these books in a play
scenario to an audience of your choice.

For teacher use:
Click here to view the Nebraska State Standards which I used when writing this
WebQuest.
Resources
There are books in the
classroom that will help you to remember the places you have been, and they will
also help you to choose places that you would like to go in the future. Click
here to see pictures that will help you in determining the places you have
been and the places that you would like to go.

The Process
1. Read
with your teacher the book Oh, the Places You’ll Go! By Dr. Seuss.
2. Begin
to think of some of the places you have already been, people you have met, or things that you have seen or done. Click here to look
at a map of the United States. This link will be a reference that will help you
remember some of the places you have been, it also gives pictures that you can
use as other references. For example, you might be looking at the map and see
Florida. Then you will think to yourself “Oh yes, I remember going to Florida,
we visited Disney World there." There are books in the classroom that you
will also be able to use as references.
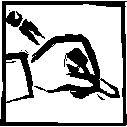
3. Write
an introduction for your story. Click here for an
example of an introduction.
4. Click
here for some questions that will help you think of some of the places that
you might have been, people you might have met, and things you might have seen
or done. The places can be as dramatic as another country or as simple as going
to Lincoln to visit the state capital.
5.
Now that you have a good idea of some of the places you have been, people you
have met, or things you have seen or done, you will begin to write your story.
The first couple of pages will deal with the places you have been. You need to
write one paragraph for each place that you have been. You should only have one
paragraph per page. The paragraph must include where you have been, what you did
there, whom you went with, and you can finish the paragraph by writing
your feeling about the place you visited. Click here
to see an example of a paragraph. When writing your paragraph make sure that you
leave enough room for a picture. You will be able to either draw a picture of
the place your paragraph is describing,
or you may look on the Internet for pictures that you can copy, paste, and print
out. You may also choose to use
clip art to represent the places you have been. Click
here if you want a good
place to look for photographs on the Internet.
6. Next
begin to think of places that you want to go, people you want to meet, and
things that you would like to see or do. What do you want to do in your future? Click
here for ideas that will help you think of some places you might want to go.
7. Now
that you have a good idea of some of the places you want to go, people you want
to meet, and things that you would like to see or do you will finish writing
your story. You will write a paragraph for each place you want to go, just like
above. Don’t forget to leave room for a picture that will represent your
paragraph.
8. Write
a conclusion to your story. Click here for an
example of a conclusion.
9. Begin
to draw your book cover. Be
creative! The book cover can include anything that you choose to use. Just keep
in mind the subject of your story.
10. In
this step you are able (if you choose to) to dedicate your book to someone. For
example:
This book is
dedicated to my sister Elicia.

11. Read
over you book to make sure that everything looks good. Make sure to go back
through and check your spelling.
12. Bind
all of the pages of your book together. Your teacher will provide you with these
materials.
13. Your
last step is to decide, as a class, whom you want to share your stories with.
You can vote to share them with your parents, your school, another classroom, a
nursing home, or any other group that you can think of.
Learning Advice
Make sure to use your
best handwriting when writing your stories. Remember that you are going to share
these stories with others, so readers must be able to read your handwriting. The
same rule goes when drawing your pictures; make sure that you are doing your
best work. Take your time when you are writing your story. This is not a race
and you want your final product to be something that you are proud of.
Conclusion
Congratulations,
you have now completed your book! Now you will have a story that you can keep
forever. This story will help to keep you on track. Whenever you lose your way
you can look at your book and it will remind you of all of your goals, dreams,
and hopes. It will remind you of all the places you want to go, all the people
you want to meet, and all of the things you want to see and do. Remember that it
is your future, so ask yourself “What do I want to do with it?”
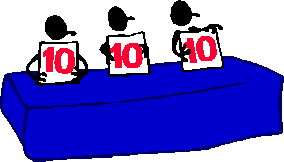
Evaluation
When evaluating your work I will be using a rubric
to make sure you have accomplished everything that I have requested of you.
Click here to see a copy of the rubric.