<xmp>
<body><!--'"</title></head>-->
<script type="text/javascript">
//OwnerIQ
var __oiq_pct = 50;
if( __oiq_pct>=100 || Math.floor(Math.random()*100/(100-__oiq_pct)) > 0 ) {
var _oiqq = _oiqq || [];
_oiqq.push(['oiq_addPageBrand','Lycos']);
_oiqq.push(['oiq_addPageCat','Internet > Websites']);
_oiqq.push(['oiq_addPageLifecycle','Intend']);
_oiqq.push(['oiq_doTag']);
(function() {
var oiq = document.createElement('script'); oiq.type = 'text/javascript'; oiq.async = true;
oiq.src = document.location.protocol + '//px.owneriq.net/stas/s/lycosn.js';
var s = document.getElementsByTagName('script')[0]; s.parentNode.insertBefore(oiq, s);
})();
}
/////// Google Analytics
var _gaq = _gaq || [];
_gaq.push(['_setAccount', 'UA-21402695-21']);
_gaq.push(['_setDomainName', 'angelfire.com']);
_gaq.push(['_setCustomVar', 1, 'member_name', 'scifi/wolfslair', 3]);
_gaq.push(['_trackPageview']);
(function() {
var ga = document.createElement('script'); ga.type = 'text/javascript'; ga.async = true;
ga.src = ('https:' == document.location.protocol ? 'https://ssl' : 'http://www') + '.google-analytics.com/ga.js';
var s = document.getElementsByTagName('script')[0]; s.parentNode.insertBefore(ga, s);
})();
////// Lycos Initialization /////////////////////
var lycos_ad = Array();
var lycos_search_query = "";
var lycos_onload_timer;
var cm_role = "live";
var cm_host = "angelfire.lycos.com";
var cm_taxid = "/memberembedded";
var angelfire_member_name = "scifi/wolfslair";
var angelfire_member_page = "scifi/wolfslair/battletutorial/Pages/background.html";
var angelfire_ratings_hash = "1767822284:9ce4e514429f61f9ebb7ea9770dff8d7";
var lycos_ad_category = {"dmoz":"arts\/animation","ontarget":"&CAT=family%20and%20lifestyles&L2CAT=hobbies","find_what":"about popup window"};
var lycos_ad_remote_addr = "209.202.244.9";
var lycos_ad_www_server = "www.angelfire.lycos.com";
var edit_site_url = "www.angelfire.lycos.com/landing/landing.tmpl?utm_source=house&utm_medium=landingpage&utm_campaign=toolbarlink";
</script>
<script type="text/javascript" src="https://scripts.lycos.com/catman/init.js"></script>
<script type='text/javascript'>
var googletag = googletag || {};
googletag.cmd = googletag.cmd || [];
(function() {
var gads = document.createElement('script');
gads.async = true;
gads.type = 'text/javascript';
var useSSL = 'https:' == document.location.protocol;
gads.src = (useSSL ? 'https:' : 'http:') +
'//www.googletagservices.com/tag/js/gpt.js';
var node = document.getElementsByTagName('script')[0];
node.parentNode.insertBefore(gads, node);
})();
</script>
<script type='text/javascript'>
googletag.cmd.push(function() {
googletag.defineSlot('/95963596/ANG_300x250_dfp', [300, 250], 'div-gpt-ad-1450207484070-0').addService(googletag.pubads());
googletag.enableServices();
});
</script>
<script type='text/javascript'>
googletag.cmd.push(function() {
googletag.defineSlot('/95963596/ANG_above_728x90_dfp', [728, 90], 'div-gpt-ad-1450207484070-1').addService(googletag.pubads());
googletag.enableServices();
});
</script>
<script type='text/javascript'>
googletag.cmd.push(function() {
googletag.defineSlot('/95963596/ANG_below_728X90_dfp', [728, 90], 'div-gpt-ad-1450207484070-2').addService(googletag.pubads());
googletag.enableServices();
});
</script>
<script type="text/javascript">
(function(isV) {
if (!isV) {
return;
}
//this.lycos_search_query = lycos_get_search_referrer();
var adMgr = new AdManager();
var lycos_prod_set = adMgr.chooseProductSet();
var slots = ["leaderboard", "leaderboard2", "toolbar_image", "toolbar_text", "smallbox", "top_promo", "footer2","slider"];
var adCat = this.lycos_ad_category;
adMgr.setForcedParam('page', (adCat && adCat.dmoz) ? adCat.dmoz : 'member');
if (this.lycos_search_query) {
adMgr.setForcedParam("keyword", this.lycos_search_query);
}
else if (adCat && adCat.find_what) {
adMgr.setForcedParam('keyword', adCat.find_what);
}
for (var s in slots) {
var slot = slots[s];
if (adMgr.isSlotAvailable(slot)) {
this.lycos_ad[slot] = adMgr.getSlot(slot);
}
}
adMgr.renderHeader();
adMgr.renderFooter();
}((function() {
var w = 0, h = 0, minimumThreshold = 300;
if (top == self) {
return true;
}
if (typeof(window.innerWidth) == 'number' ) {
w = window.innerWidth;
h = window.innerHeight;
}
else if (document.documentElement && (document.documentElement.clientWidth || document.documentElement.clientHeight)) {
w = document.documentElement.clientWidth;
h = document.documentElement.clientHeight;
}
else if (document.body && (document.body.clientWidth || document.body.clientHeight)) {
w = document.body.clientWidth;
h = document.body.clientHeight;
}
return ((w > minimumThreshold) && (h > minimumThreshold));
}())));
window.onload = function() {
var f = document.getElementById("lycosFooterAd");
var b = document.getElementsByTagName("body")[0];
b.appendChild(f);
f.style.display = "block";
document.getElementById('lycosFooterAdiFrame').src = '/adm/ad/footerAd.iframe.html';
// Slider Injection
(function() {
var e = document.createElement('iframe');
e.style.border = '0';
e.style.margin = 0;
e.style.display = 'block';
e.style.cssFloat = 'right';
e.style.height = '254px';
e.style.overflow = 'hidden';
e.style.padding = 0;
e.style.width = '300px';
})();
// Bottom Ad Injection
( function() {
var b = document.getElementsByTagName("body")[0];
var iif = document.createElement('iframe');
iif.style.border = '0';
iif.style.margin = 0;
iif.style.display = 'block';
iif.style.cssFloat = 'right';
iif.style.height = '254px';
iif.style.overflow = 'hidden';
iif.style.padding = 0;
iif.style.width = '300px';
iif.src = '/adm/ad/injectAd.iframe.html';
var cdiv = document.createElement('div');
cdiv.style = "width:300px;margin:10px auto;";
cdiv.appendChild( iif );
if( b )
{
b.insertBefore(cdiv, b.lastChild);
}
})();
}
</script>
<style>
#body .adCenterClass {
margin:0 auto;
display:block !important;
overflow:hidden;
width:100%;
}
#body .adCenterClass #ad_container {
display:block !important;
float:left;
width:728px;
}
@media (min-width: 768px) {
<!-- For 300px or less ads ONLY -->
#body .adCenterClass #ad_container {
width: calc(100% - 372px);
}
}
@media (min-width: 1110px) {
<!-- For 728px or less ads -->
#body .adCenterClass #ad_container {
width: calc(100% - 372px);
}
}
</style>
<div style="background:#abe6f6; border-bottom:1px solid #507a87; position:relative; z-index:9999999">
<div class="adCenterClass">
<a href="https://www.angelfire.lycos.com/" title="Angelfire.com: build your free website today!" style="display:block; float:left; width:186px; border:0">
<img src="/adm/ad/angelfire-freeAd.jpg" alt="Site hosted by Angelfire.com: Build your free website today!" style="display:block; border:0" />
</a>
<div id="ad_container">
<script type="text/javascript">document.write(lycos_ad['leaderboard']);</script>
</div>
</div>
</div>
<!-- ///////////////////////////////////// -->
<script type="text/javascript">document.write(lycos_ad['slider']);</script>
<div id="lycosFooterAd" style="background:#abe6f6; border-top:1px solid #507a87; clear:both; display:none; position:relative; z-index:9999999">
<div class="adCenterClass" style="display:block!important; overflow:hidden; width:936px;">
<div id="aflinksholder" style="float:left; width:186px;">
<a href="https://www.angelfire.lycos.com/" title="Angelfire.com: build your free website today!" style="display:block; border:0">
<img src="/adm/ad/angelfire-freeAd2.jpg" alt="Site hosted by Angelfire.com: Build your free website today!" style="display:block; border:0" />
</a>
</div>
<iframe id="lycosFooterAdiFrame" style="border:0; display:block; float:left; height:96px; overflow:hidden; padding:0; width:750px"></iframe>
</div>
</div>
<!--- UNDERDOGMEDIA EDGE_lycos.com JavaScript ADCODE START--->
<script data-cfasync="false" language="javascript" async src="//udmserve.net/udm/img.fetch?sid=17754;tid=1;dt=6;"></script>
<!--- UNDERDOGMEDIA EDGE_lycos.com JavaScript ADCODE END--->
</xmp>
Untitled Document
Background Image
Lets first prepare the background
image for us to use.

In Photoshop, load up your
image and adjust the colours
by using the Brightness/Contrast,
Hue/Saturation and color balance.
Resize the image to your
preferred output resolution, and keep a record of the image size.

Save, and load the image
into Max, by opening your environment dialog box
and dragging the image into
your environment map slot using the Asset Manager.

To be able to see the image
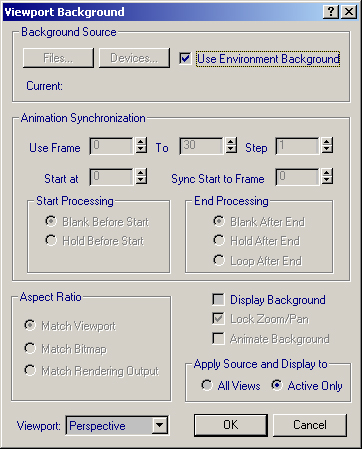
in your max viewport, we need to load it into the viewport background,
bring up the viewport background
dialog box, found under the Views menu.
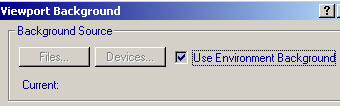
Check Use environment background,
and Display Background.
Now we can see the image
in your perspective viewport.