- Geraldine
E. Solano
- CUNY
TOPS Fall 202
- ESC
770: Dr. Espinoza
-
MBL
Lesson Plan:
What Causes the Seasons? (Lab)
Adapted from Vernier teacher resources
-
Aim:
To examine how the solar radiation effects the Earth depending on
it’s axis during different times of the year
-
Grade
Level:
Middle School Science
-
Objectives:
-
By the end of this lab students will be able to:
-
 Use micro based learning tools and technologies
-
(Vernier temperature
probe and computer)
-
Monitor simulated warming
of a city by the sun in the winter
-
Monitor simulated warming
of a city by the sun in the summer
-
Make observations and
collect data
-
Analyze and interpret
results
- Standards
Addressed:
- S4
Scientific Connections and Applications
- S4a
Demonstrates understanding of big ideas and unifying concepts.
- S5
Scientific Thinking
- S5a
Frames questions to distinguish cause and effect; and identifies or
controls variables.
- S5b
Uses concepts from Science Standards 1 to 4 to explain a variety of
observations and phenomena.
- S5c
Uses evidence from reliable sources to develop descriptions,
explanations, and models.
- S5d
Proposes, recognizes, analyzes, considers, and critiques alternative
explanations; and distinguishes between fact and opinion.
- S5e
Identifies problems; proposes and implements solutions; and
evaluates the accuracy, design, and outcomes of investigations.
- S5f
Works individually and in teams to collect and share information and
ideas.
- S6
Scientific Tools and Technologies
- S6a
Uses technology and tools to observe and measure objects, organisms,
and phenomena, directly, indirectly, and remotely.
- S6b
Records and stores data using a variety of formats.
- S6c
Collects and analyzes data using concepts and techniques in
Mathematics Standard 4.
- S6d
Acquires information from multiple sources.
- S6e
Recognizes sources of bias in data.
- S7
Scientific Communication
- S7a
Represents data and results in multiple ways.
- S7b
Argues from evidence.
- S7c
Critiques published materials.
- S7d
Explains a scientific concept or procedure to other students.
- S7e
Communicates in a form suited to the purpose and the audience.
- S8
Scientific Investigation
- S8a
Demonstrates scientific competence by completing a controlled
experiment.
-
Materials
-
Power
Macintosh or Windows PC
-
Globe
of the earth
-
Vernier
computer interface
-
Masking tape
-
Logger Pro metric
ruler
-
Temperature
Probe
-
Lamp
with 100-watt bulb
-
Ring
stand and utility clamp
-
20-cm
length of string
-
Student
data collection handout
-
Lesson
Overview
-
In
this experiment, a simulated sun—a light bulb—will shine on a
Temperature Probe attached to a globe. We will study how the tilt of
the globe influences warming caused by the lighted bulb. If globes
with adjustable tilt are used, make sure the tilt is 23.5 degrees. A
fan may be used to cool the globe and probe between runs. If a
150-watt bulb is available, larger temperature changes can be
obtained and longer data collection periods can be used.
-
Background
-
Because
the axis of the earth is tilted, the earth receives different
amounts of solar radiation at different times of the year. The
amount of solar radiation received by the earth or another planet is
called insolation. The tilt of the axis produces the seasons.
The rays from the sun strike the earth more directly (closer to
perpendicular) in the northern hemisphere than they do in the
southern hemisphere. When the sun's rays strike more directly, they
tend to warm up the earth more than when they strike at a sharp
angle. Since the North Pole area receives light (and warmth) all day
long, the North Polar Ice Cap will melt back during the summer.
While the Northern Hemisphere is experiencing summer, the Southern
Hemisphere is having a winter season. At this time the South Pole
Area is without sun (and warmth) all day long, therefore, the ice
around
Antarctica
builds up due to the lack of heat. By examining the movies
carefully, it is possible to determine where on the earth there will
be 24 hour "days" and 24 hour "nights". On the
movie on the right, the Northern Hemisphere is receiving less direct
solar rays (or none at all) while the Southern Hemisphere is
receiving more direct solar radiation. By examining the movie
carefully, it is possible to determine where on the earth there will
be 24 hour "days" and 24 hour "nights". This
will be the opposite to the situation observed in the movie on the
left. Therefore, in the movie on the right, the Southern Hemisphere
gets warmer (summer) and the Northern Hemisphere gets colder
(winter). The tilt of the earth's axis creates a situation in which
the directness of the sun's rays changes throughout the year as the
earth orbits the sun. This change to the Angle of Insolation (the
angle at which the sun's rays strike the earth) is what makes
certain parts of the earth either warm up more or cool down -
creating the seasons.
-
Procedure
and Timing
-
20-minutes/
Beginning: Conducting the lab-Demo for Students
-
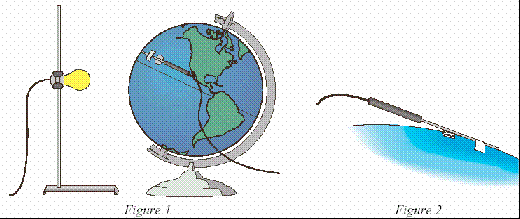
1.
Ready the light bulb (simulated sun).
-
a.
Fasten the lamp to a ring stand as shown in Figure 1.
-
b.
Stand the ring stand and lamp in the center of the work
area.
-
c.
Position the globe with the North Pole tilted away from the lamp.
-
d.
Position the bulb at the same height as the Tropic of Capricorn.
-
Note:
The sun is directly over the Tropic of Capricorn on December 21, the
first day of winter.
-
-
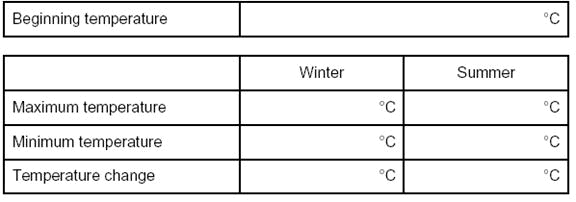
2.
Attach the Temperature Probe to the globe. Figure 2
-
a.
Find a city or location on the globe.
-
b.
Tape the Temperature Probe to the globe with the tip of the probe at
the location. Tape the probe parallel to the equator. Place the tape
about 1 cm from the tip of the probe.
-
c.
Fold a piece of paper and wedge it under the Temperature Probe to
keep the tip of the
-
Temperature
Probe in contact with the surface of the globe as shown in Figure 2.
-
3.
Position the globe for winter (in the Northern Hemisphere) data
collection.
-
a.
Turn the globe to position the North Pole (still tilting away from
the lamp), the location, and the bulb in a straight line.
-
b.
Cut a piece of string 20-cm long.
-
c.
Use the string to position the location on the globe 20 cm from the
bulb.
-
d.
Do not turn on the lamp until directed in Step 5.
-
4.
Prepare the computer for data collection by opening the Experiment
10 folder of Middle School Science with Computers. Then open
the experiment file that matches the probe being used.
-
5.
Collect winter data.
-
a.
Note and record the temperature displayed in the Meter window.
-
b.
Click Collect to
begin data collection.
-
c.
After the first temperature reading has been taken, turn on the
lamp.
-
d.
When data collection stops after 5 minutes, turn the lamp off.
-
e.
Choose Store Latest Run on the Data menu.
-
6.
Position the globe for summer data collection.
-
a.
Move the globe to the opposite side of the lamp.
-
b.
Position the globe with the North Pole tilted toward the lamp. Note:
This represents the position of the Northern Hemisphere on June 21,
the first day of summer.
-
c.
Turn the globe to position the North Pole, the location, and the
bulb in a straight line.
-
d.
Use the string to position the location on the globe 20 cm from the
bulb.
-
e.
Do not turn on the lamp until directed in Step 7.
-
7.
Click Collect
 summer
data.
summer
data.
-
a.
Let the globe and probe cool to the temperature that was recorded in
Step 5.
-
b.
Click Collect to
begin data collection.
-
c.
After the first temperature reading has been taken, turn on the
lamp.
-
d.
When data collection stops after 5 minutes, turn the lamp off.
-
e.
Click the Statistics button
 ,
and then click OK
,
and then click OK
 to
display Statistics boxes for both runs.
to
display Statistics boxes for both runs.
-
Record
the minimum and maximum temperature for each run.
-
8.
Print copies of the graph
-
9.
Record data and answer follow up questions in the data information
-
table
student handout.
-
30
Minutes / Middle: Students perform the activity and fill in student
handout
-
15
Minutes Ending/ Assessment
-
Summarize
the activity by examining and discussing data chart and handout
questions with students to access comprehension and clarify
misconceptions.
-
Extension
-
Repeat
the experiment for other locations in the Northern and Southern
Hemispheres.
-
Student Handout
Name:
______________
Date:_________
-
What
Causes the Seasons?
-
Data
Collection Table
-
-
Processing
the Data
-
1.
In the space provided in the Data table, subtract to find the
temperature change for each season.
-
2.
How does the temperature change for summer compare to the
temperature change for winter?
-
3.
During which season is the sunlight more direct? Explain.
-
4.
What would happen to the temperature changes if the earth were more
tilted than 23.5 degrees?
-
5.
As the globe is moved from its winter position to its summer
position, the part of the globe closest to the bulb changes.
Describe how it changes.
-
6.
What other factors affect the weather in a region?
-

-
-
- © Geraldine E. Solano
- no part of this portfolio may be reproduced
without written consent of the author

