
JDM Front End Conversion
This is very easy and will show how to do this WITHOUT
WELDING ( I do not take responsibility for anyone's car. )
If you're not sure or don't like my idea, take it to a professional. Thank you.
Tools:
1. Wrench
2. Socket set (12mm and 14mm will be a must)
3. Screws (depends on the holes - 3/8" size)
4. 16 gauge wire - about 25ft to 50ft sill be just fine
5. Butt connector

6. Low power drill machine

7. Spot weld bit

8. DO NOT USE WELD BIT! IT WILL TAKE YOU FOREVER TO DRILL EACH HOLES!!!

9. Electrical tape
10. Wire connectors for connecting the headlights.
Here's an example:

11. Screw driver
Ok. So now you have your tools. Now make sure you have all of your JDM conversion parts.1. Front bumper
2. Headlights
3. Radiator support
4. Hood
5. Fenders
6. Bumper support
7. Bumper reinforcement (or you can use the USDM ones
8. Grillie (goes above the bumer, between the headlights)
Ok so now since you have all these parts, you're ready to begin.
1. First you have to take out the front bumper. You'll need a screw driver
for that.
2. Unscrew the fender liners from the fenders and the bumper
3. Pull the bumper off
4. Take out all the bolts from top of the bumper support
5. Take out the headlights (SAVE THE BOLTS)
6. Unbolt the bumper support
7. Take out the fenders. There are bolts on the top and you'll find one bolt
when you open the door. When you open the door, you'll spot it through the door
and the fender. You'll also need to remove the stock side skirts to get to the
other two bolts for the fenders.
8. And ofcourse, the hood, unbolt that off.
OK, so you're ready to start taking off the bumper support. You'll have to use the spotweld bit to remore the spot welds. There are about 40 to 50 spot welds. Trust me, with the spot weld bit, you'll have it off in a few hours.
1. Take out these spot welds

and these....

***REMEMBER, NOW YOU KNOW WHA THE SPOT WELDS LOOK LIKE, SO TAKE THEM ALL OUT. EVERY CAR HAS DIFFERENT AMOUNTS OF SPOT WELDS OR WHERE THE SPOT WELDS ARE. BUT TAKE OUT ALL OF THEM ON EACH SIDES. SOME YOU WON'T HAVE TO MOVE BECAUSE THEY'RE NOT CONNECTED TO THE BODY FRAME. TO FIND THAT, JUST FEEL THE OTHER SIDE OF RADIATOR SUPPORT AND SEE IF THERE'S A BUMP AND IF NOT, THEN YOU WON' TNEED TO WORRY ABOUT THAT SPOT WELD BECAUSE IT'S NOT CONNECTED TO THE BODY FRAME***
Here are some more examples of the spot welds after they're drilled out.
Some aren't all the way drilled because it's to show you how it looks like.
The passanger side looks really bad because I didn't have the spot weld bit
then and I used a regular drill and it fucked it up pretty bad and I got to
a point where I started cutting the radiator support out.


2. Now that all the spot welds are cut off, its still going to be very tough to take them out and you'll new a CROWBAR to move the radiator support.
3. Put the JDM radiator support. Once you put it in place, it should look like
this.

4. You will have to bend the AC line a little bit to fit the radiator support.
Its very easy to do that, with your hand. Here's an example of the AC lines
and how it looks after you bend it and put the radiator support on

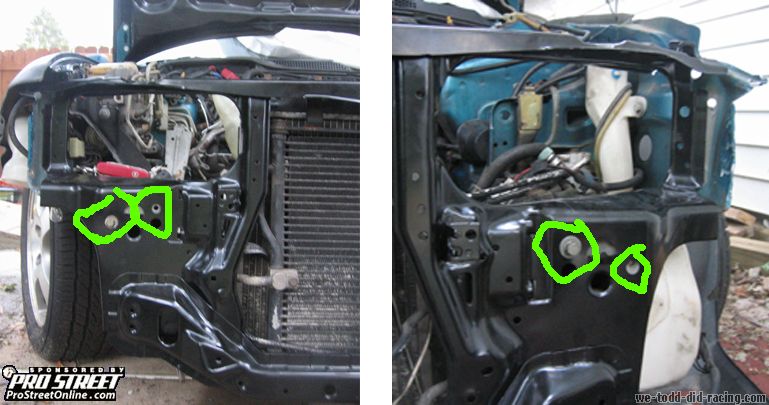
5. Now it's time to put on the radiator support. To do that, you have to bolt
it on first so you can connect the radiator on. You'll bolt it on where the
USDM bumper support was originally bolted. Here's a picture of where the holes
are:
6. After it's bolted on, it's going to be a lot easier for you to bolt the radiator on and see the fittings for the fenders.
7. Now it's time to cut off some parts of the body to fit the headlights on. Here's to show you where to cut from.

8. Now you are ready to put the headlights on to see how it fits. For people,
that have the HID like me, there are a few more extra steps. You'll find those
instructions in the end of this setup.
Here's a pic to show you an example of the headlight installed.

9. Now put on the fender to see how it fits. They should fit perfectly. Here
are some pictures to show example:

10. Ok, now you can take out the fenders and the headlights off to put on the bumper support then you're going to put them back in. To do that, you'll unbolt those bolts that are holding the radiator support. Then install the bumper reinforcement support and the radiator support on together. Make sure you use the factory bolts because those are not the same grade as just any bolts you'll find in Home Depot. Just those 4 bolts will hold the radiator support perfectly. We've tested it by having me and my friend sit on the radiator support. They don't move. But don't just leave the whole thing on with only 4 bolts.
11. Now you should start drilling holes on your radiator support matching the
original holes you made while taking out the radiator support. Use the strongest
bolts you can get from home depot or wherever you get them from.
Heres an example w/ some pictures:

12. Ok, you should be done with bolting by now.
13. Now put the headlights on first and then put the radiator support on. Once you're done, put the bumper support on. This is the support that connects to the reinforcement. Bumper support holds the front bumper.
14. You're also going to have to change the hood latch. You can either buy a 90-93 latch and cable or you can use the one from your car. Even though I have used the original cable, I am going to change it to a DA cable because it's a lot better and longer than the DC2. But the latch is perfectly fine. All you have to do is turn it around and install it. The original bolts fit in just perfectly. Here's a picture:

15. Install the hood now if you already haven't. Close it all up to see if everything fits. If so, then bolt on everything if you already haven't bolted the parts on. I did my final bolting in the end, after I saw that everything fit perfectly.
I hope this helped people. Took me 3 hours to write this up. I can't think at the moment but ill go over the whole thing to see if I'm missing anything. If so, I'll add in later. If you have any questions, just e-mail me and I will be happy to answer them for you. Thanks
Here are some final pictures after it's done!

thanks to JDMoMo Honda Tech
