Special Graphic Effects
by MasterSean2k

I) Why?
II) Making a Big Character [Difficulty: Intermediate]
III) Making a Small Character [Difficulty: Intermediate]
Credits
Please note: Rather than explaining how each thing works, I am giving examples of features that can be included in a game without including the raw code. I hope that these inspire you to experiment and play around with switches and variables.
I. Why?
-> Why make big characters? <-
The default size of an RM2k character is 24x32, and occasionally this won't be enough to express the full array of magnificence and detail your character deserves. When this happens, it's a shame to reduce the quality of your work simply so it fits into RM2k. This tutorial will teach you how to keep the quality and still use it in a game.
-> Why make small characters? <-
Often, the world map is large, but the character graphics make it look smaller. You canshrink the graphics to make your world maps have a greater effect.
II. Making a Big Character [Difficulty: Intermediate]
{You need 1 variable, 1 switch, and 1 charset}
NOTE: This tutorial uses IDraw3.
You've gotten your big character drawn, but you don't know what to do. If you shrink it, the quality will drop like a stone. If you leave it, it won't display correctly. If this sounds familiar, take a look below.
--------------------
- First and foremost, obtain/make a big character graphic. For this tutorial, I will use an edited Alex. (4x the original size)

- Then move the character, without resizing, so it takes up the smallest number of 24x32 segments possible.
- Now in IDraw, go to View, Shift Picture.
- Highlight a column of 24x32 segments.
If this portion of the character is supposed to be on the LEFT side of the character, shift it LEFT four spaces.
If this portion of the character is supposed to be on the RIGHT side of the character, shift it RIGHT four spaces.
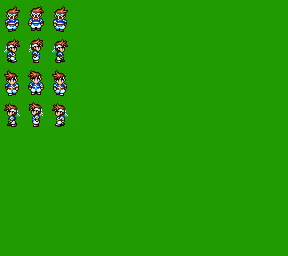
- Repeat the above steps with the whole charset. Eventually, Alex would look something like this:

- Now divide the sections into separate charsets. This is what Giant Alex would look like:

- Import the graphic to RM2k and go to the Event Editor. Do the following:
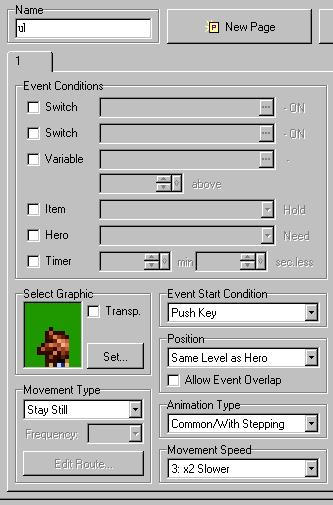
- Put the upper right corner next to that event and for the graphic set the UR set of the graphic. Name this ur.
- Put a blank graphic below ul. Name this blankl and set it to "Same Level As Hero."
- Put a blank graphic below ur. Name this blankr and set it to "Same Level As Hero."
- Put the bottom left corner below that event and for the graphic set the BL set of the graphic. Name this bl.
- Put the bottom right corner next to that event and for the graphic set the BR set of the graphic. Name this br.
- The events should be like this:

- Now go into Common Events in the Database. Make one and call it "Bigchar_move", set the type to parallel process, and activate it with a switch.
- Double-click on the Event Commands
- Randomize a variable (1-4)
- Make a Fork Condition (Check variable, and set 1)
(In the fork)
- Move ul down.
- Move ur down.
- Move blankl down.
- Move blankr down.
- Move bl down.
- Move br down.
- Set the variable to 0.
(In the Else case)
- Make a Fork Condition (Check variable, and set 2)
(In the fork)
- Move ul left.
- Move ur left.
- Move blankl left.
- Move blankr left.
- Move bl down.
- Move br left.
- Set the variable to 0.
(In the Else case)
- Make a Fork Condition (Check variable, and set 3)
(In the fork)
- Move ul right.
- Move ur right.
- Move blankl right.
- Move blankr right.
- Move bl right.
- Move br right.
- Set the variable to 0.
(In the Else case)
- Make a Fork Condition (Check variable, and set 4)
(In the fork)
- Move ul up.
- Move ur up.
- Move blankl up.
- Move blankr up.
- Move bl up.
- Move br up.
- Set the variable to 0.
- Wait 1.0 seconds
- The completed mini-project should look somewhat like this:

III. Making a Small Character [Difficulty: Intermediate]
{You need 1 charset}
NOTE: This tutorial uses IDraw3.
Your world map is a mess. A giant hero graphic won't make this better, but maybe a small graphic will. Read to learn how to make a small world map character (like in Chrono Trigger).
--------------------
- Take a regular 24x32 graphic. I will use Alex (again).
- In IDraw, select the entire charset (72x128)
- Right-click and pick "Stretch"
- Check "Smooth" and "% Use". Then type 50%

- Now separate the individual characters and center them along the bottom in 24x32 segments.

- In your game when you teleport to the world map, just beforethat have is change the hero's walk grahics to this.
Credits
--------------------
If you wish to use this tutorial on your website, you must link directly from your website to this document (https://www.angelfire.com/rpg2/mastersean2k/gfx_effects.html) unless given permission.
Written by MasterSean2k.
mastersean2k@hotmail.com
http://mstuff.s5.com
© 2002 by MasterSgameS
"Alex" graphic originally created by ASCII corp.
IDraw3.32.1 © 1996-2001 hawk
RM2k by ASCII
RM2k translationby Don Miguel
|

