
![]()
You will need PSP 5.0 or higher, and BladePro, and
a program like Winzip that unzips files.
| Download Here! |
Step 1. - This part's very simple, just click here to
download a .zip file of a mask that we're going to use in this tutorial. |
| Step 2. - Now unzip the file, and
drag the mask to your PSP Masks folder. If there isn't a folder called "Masks" in your PSP Program Files folder, then make one. |
|
 |
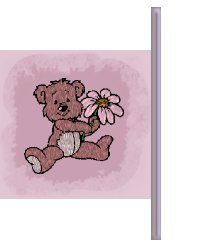
Step 3. - Open PSP, and open a tube to use for your
side border. I used the cute teddy bear picture that you see on the left. The picture should be roughly 100 x 100 in size; if it isn't, you can resize it. |
| Step 4. - Now go to Selections, Select All. Then Edit, Copy. | |
 |
Step 5. - Open a new image, 200 x 200, 16.7 million colors, with any color background. |
 |
Step 6. - Go to your tube, and select a color on it that you like, and is a medium-dark shade. If there aren't any colors you like on the tube, then find any color that matches with the tube. Set that as your foreground color. |
 |
Step 7. - Go back to your new image, and flood-fill it with the foreground color you just selected. Now Edit, Paste the tube onto the center of the image. Do not de-select. |
| Step 8. - Go to Selections, Modify, Expand. Expand it by 30 pixels. | |
 |
Step 9. - Go to Image, Crop to Selection. |
 |
Step 10. - Selections, Select None. Now go to Masks, Load From Disk... And open spongemask.msk. |
 |
Step 11. - Open another new image, same size as the last one. Flood fill it with a color a couple shades lighter than your foreground color. (The edges of your image shouldn't be black; I just made mine that way so that it would be visible.) |
 |
Step 12. - Go to the image that you just put the mask on. Go to Edit, Copy. Then paste it onto the image you just opened. |
 |
Step 13. - Crop off the extra edges of the image. |
 |
Step 14. - Set your background color as white, then go to Image, Add Borders, and enter: Top: 50, Bottom: 50, Right:50, Left: 0. |
 |
Step 15. - Use your line tool to draw a line on the right side of your image. Before doing this, set your tool controls to a width of 10 and uncheck the box "antialias". |
| Step 16. - Use your magic want to select the line you just drew. | |
 |
Step 17. - Apply BladePro or buttonize the line. It's your choice on what preset or value to use. |
 |
Step 18. - Crop off the extra white now. |
| Step 19. - Now go to Image, Add Borders again, this time making them Top: 0, Bottom: 0, Left: 0, Right 1100. | |
| Step 20. - Flood-fill the border with a color of your choice. I tend to use a color that's a shade lighter than my other light color. |
* The End *
Some samples of ones I've made:


You can email me at: fairia@hotmail.com .
