| Block Brakes |
|---|
A complete review
I've seen a few block brake tutorials, but none that provided complete coverage of this subject. I felt it would be helpful to many players to have a complete review available. The block brake concept Tracks are divided into blocking sections. Only one train is permitted in a section at a time. At the start of a section, a train is blocked if the section ahead has a train. This technique will help prevent crashes, since two trains cannot be in the same section at the same time. Why build tracks with block brakes? There are some good reasons to use block brakes in your track designs.
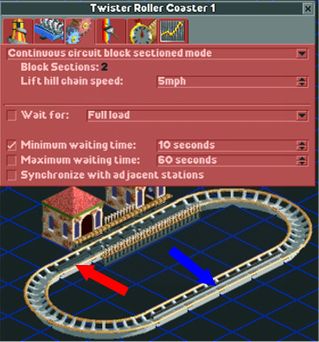
Is there a downside to using block brakes? To be completely fair, the answer is, "yes." Since only one train can enter a station at a time, a station cannot have one train loading while a second one is unloading. This slows down the action around the station. The result is lower throughput (riders per unit of time). A possible remedy is to build two stations - one for the entrance and one for the exit. Designing a track with blocking sections may result in a larger footprint for the ride. The shorter station length provides compensation - the net effect should be small. I have found that adding block brakes to a design tends to reduce the excitement rating by a tenth or two. The reduction is small enough to ignore. Finally, block brake coasters are more difficult to design. Each section functions as an independent unit - a consideration absent from tracks without block brakes. That said, if you understand the concepts, and devote a little practice to it, you will find that the rewards are well worth the effort. Blocking sections A coaster that uses block brakes has its tracks divided into "blocking sections." Only one train is permitted in a section at a time. The blocking track will stop a train until the entire section ahead of it is clear. This means a track with three sections can have a maximum of two trains; the general formula is: Maximum number of trains = Number of blocking sections - 1 From a practical standpoint, most designs will require at least twice as many blocking sections as trains to achieve smooth operation. The coaster pictured below has two blocking sections. The station itself is a blocking section - only one train at a time is permitted in a station for block-brake-equipped coasters. The red arrow points to the block brake, which is located directly behind the station. All the track except for the station itself is part of this section. All of the flat, straight track (blue arrow) has lift chain. This helps the train make it around this track, as there is no lift hill. With two block sections, only one train is permitted on this track.
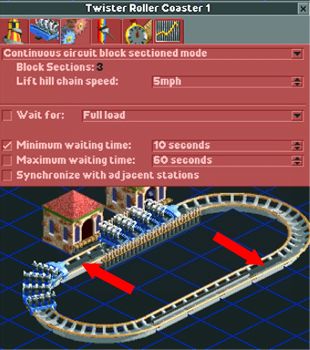
The track below adds an additional block brake. The brakes are marked with the red arrows. With three sections, the track permits two train operation. Notice the starting positions of the trains. They are at the front of their respective sections.
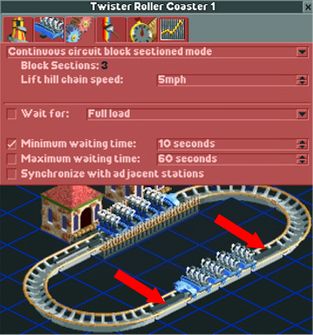
In the picture below, we again have two block brakes. This time both are positioned on the back straightaway. Notice the positions of the trains. Train 2 no longer starts directly behind the station. The track behind the station, including the curved pieces, is part of the station section. This is a bad idea. The station section serves only to load and unload passengers. Non-station track in this section is "dead" from a utilization standpoint.
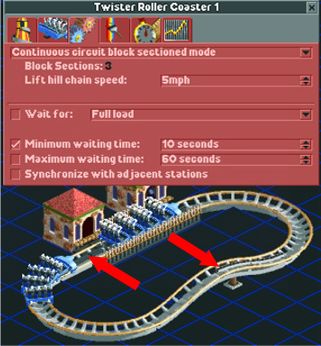
So our first rule in building block brake coasters is this: Place a block brake directly behind the station. The third type of sectioning track So far, we have described two types of tracks that divide tracks into sections: station tracks and block brake tracks. There is a third, very important sectioning track: a lift hill track that performs the transition from incline-to-level. This is illustrated below. Notice that the track has three block sections. The station is one section. The first turn and lift hill is the second. The third section begins with the downhill track and ends at the block brake behind the station.
Let's compare block brake track to the lift hill transition track:
From these behaviors, we can develop several rules for block brake track designs: Blocking tracks should be placed where trains are moving slowly, that is, at the top of hills. It is desirable that a train is able to start a section from a dead stop and successfully complete its run through the section. This is not required if you are sure a train will never be blocked at the start of the section. Practical application of these rules The three rules above are sweeping generalizations. Here are some tips to apply them:
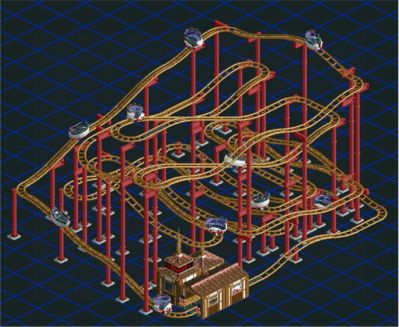
This is "Spinning Wild Mouse EX" from the Extreme track pack. Notice that its lift hills are built with transition tracks. Each provides a blocking section. At the top of every hill on the entire ride is a lift hill transition track. The result is a total of twenty-four blocking sections on this ride. This yields a hefty carrying capacity for a mouse coaster, smooth operation, and the added safety of block brakes. One final point: You will sometimes find that coasters that run smoothly in test mode will have trains blocked waiting to enter the station once the ride is open. If this happens, just reduce the number of trains. Enjoy building your next block-brake coaster! |