Ripple Sig Tutorial

You will need:
Paint Shop Pro 7
Super Blade Pro
Eye Candy 4000
The Image Template Below

After saving the Image above, open it in Paint Shop Pro. Hold down the shift key and press "D" to duplicate the image so that you can keep the template the way it is. Now open the tube of your choice. I'm using a rose tube for this tutorial, but the image can be anything you want it to be.
1. Now minimize your tube, we're going to be working with the template first. Choose your magic wand ( ) and click anywhere inside the black areas. Now go to Selections > Modify > Select Similar. Once you've done this, all the black areas on the image should be selected with marching ants moving around them. Leave the image as it is and minimize it.
2. Create a new image. Make the dimensions 360x360 pixels. Now set your foreground color to null and the background color to gradient. Choose any grandient you wish. I chose a dark blue grandient for this image. Now choose your flood fill tool ( ) and fill the blank image with your grandient. Now go to Effects > Texture Effects > Mosaic - Glass. The settings should be as follows.
Number of Columns: 50, Number of Rows: 50, Symmetric checked, Glass Curvature: 50, Edge Curvature: 0, Grout Width: 2, Grout Opacity: 80.

This is going to be your tile image. Now set your background to Pattern and find this new image in the list. Select it and minimize your grandient tile.
3. Go back to your template now. Make sure the black areas are still selected and choose your Flood Fill tool () and fill all the areas inside the marching ants with the grandient tile you've made. After all the areas are filled with your grandient tile, keep it selected and go to Effects > Plugin Filters > Flaming Pear > Super Blade Pro and press the circular button above the disc (as shown below). Then Click "ok".

4. With the areas still selected, go to Effects > 3D Effects > Drop Shadow and use the following settings.
Vertical: 1, Horizontal: 1, Opacity: 65, Blur: 4.9, color: Black (#000000).
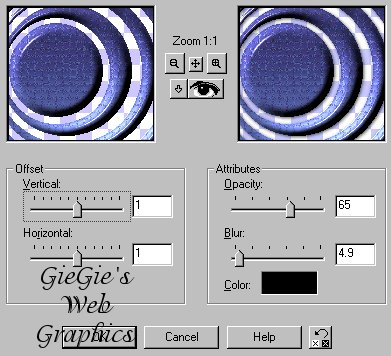
Make sure the areas are still selected once you have completed the drop shadow.
5. Now we're going to fix up our tube. Select your tube image again and go to Edit > Copy, or press Ctrl+C while your tube is the active image. After you've copied your tube, go back to the template and make that the active image. Then go to Edit > Paste > Into Selection. Now your tube should be pasted inside the selection you had and the ants should be marching around the pasted tube (See Below).

Now with the ants marching around the pasted tube, go to Effects > 3D Effects > Drop Shadow, and use the same settings as shown above.
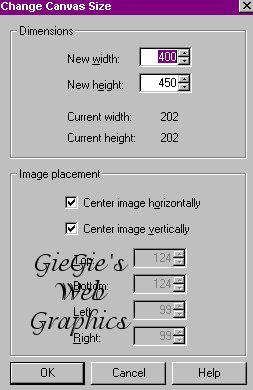
6. Go to Selections > Select None on the image now. Then go to Image > Canvas Size and make the new dimensions 400x450. Make sure the center image horizontally and vertically boxes are checked and click "ok".
7. With the image resized, you're now ready to put your tube on there. Go back to your tube now and resize it until it will be the right size to fit on your image the way you want it. I resized my tube by 75%, then went to Effects > Sharpen > Sharpen, and resized again if it was nessicary. ALWAYS REMEMBER to sharpen your image after you resize it so that it will still look clear. To resize your image, go to Image > Resize and have the settings as follows.
Percentage of Origional should be selected, Width: 75, Hieght: 75, Resize Type: Smart Resize.

8. Now go to Edit > Copy or hold Ctrl+C and copy your tube. Paste your tube as a new layer onto your image then by going to Edit > Paste > As New Layer. Once this is done, move your image to where you want it and once more do a drop shadow as you did above.
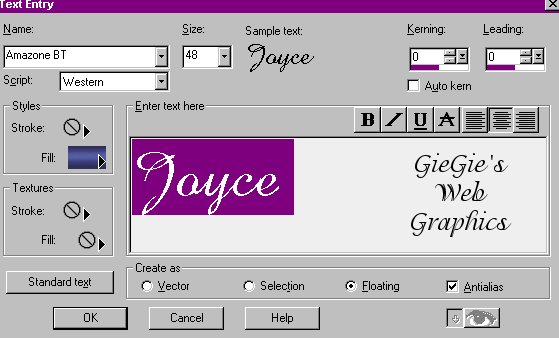
9. Now choose your Text Tool ( ) and make sure your background is still set to your grandient tile pattern and your foreground is set to null. Now click on your image anywhere and choose your font and your text. My font is Amazone BT at a size of 48. Make sure you've checked Antialias and selected Floating as your options.
Once your text is on your image, position it where you want it and then go to Effects > Plugins > Flaming Pear > Super Blade Pro and do the same as was told above. Once you've done this, keep the text selected and once more go to your effects menu. But this time go to Effects > Plugins > Eye Candy 4000 > Grandient Glow. The settings of the Grandient Glow should be as follows.
Under the Basic Tab you should have Glow Width: 15.05, Soft Corners: 0, Overall Opacity: 100, Draw only outside Selection Checked.
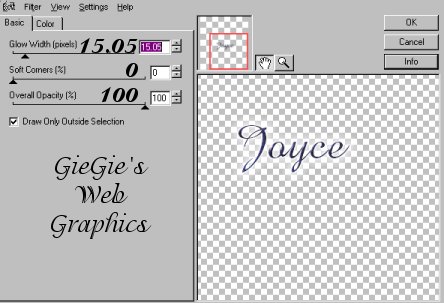
Under the Color Tab you should have Thin Selected and Opacity: 99.

10. Go to Selections > Select None. Now go to Layers > Merge > Merge Visible. Then go to Edit > Copy.
11. Go to Effects > Texture Effects > Mosaic - Glass and use the same settings you used on your grandient tile. Now go to Edit > Paste > As New Layer. The image should be pasted just on top of where the mosaic is and give it a nice reflection effect.
12. Select the crop tool ( ) and crop the image to just inside of the mosaic area but be careful not to cut out any of the "reflection" areas. After you've cropped your image, go to Image > Resize and resize it to 75%. Then go to Effects > Sharpen > Sharpen and save your image as whatever you want.
Now it should look something like this:
Congratulations! You're now done and should have your first ripple sig tag that's all you're own! I hope you had fun making your sig tag and that I wasn't too confusing! LoL =) Here are some other examples of what you can do with this tutorial: