
Apex'i Turbo Timer Install
![]()
 You always want plenty of wire, connectors, and electrical tape.
![]()
To start the install, you will need to remove two interior pieces. Start by removing the top plastic piece of the steering wheel cover. This piece should be able to be squeezed and or pulled and it will come off because there are no screws to remove. This is where I mounted the Turbo Timer. Next remove the bottom part of the steering wheel cover by unscrewing two Phillips screws on the bottom. Pull those to piece out and remove them from the vehicle. The colored plastic piece below your dash is the next piece. There are 4 bolts needed to be removed. Two of them are behind plastic covers which you can remove by popping them off with a flat head screwdriver. Before you pull this piece off, you have to remove the two screws from the hood latch release. You can either disconnect and slide out the cable or do like i did and leave it. The only difference is whether or not the piece is fully removed or just put on the floor out of the way.
![]()


![]()
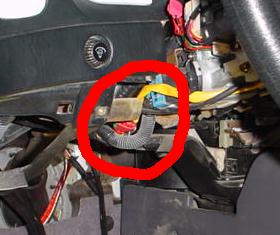
DISCONNECT THE BATTERY NEGATIVE BEFORE YOU START WIRING!!! This black wire loom contains the Ignition Wires and that blue clip above it is the Ignition Harness. You are going to want to start by removing the electric tape at the top by the blue harness. This will open the wire loom and allow you to pull it down. I would suggest cutting it away from the wires so you can wrap it later.
![]()
 There
are 5 wires in the wire loom you cut away.
There
are 5 wires in the wire loom you cut away.
1 White --- 12v+
1 Black and White --- Ignition 1
1 Black and Blue --- Ignition 2
1 Blue --- Accessory Power
1 Black and Red --- Starter
![]()
Out of the turbo timer harness will be 6 wires. Two of them will go inside the engine bay through a hole in the firewall. You can either find a hole or drill one. I drilled a hole though so that it would be close to the harness and easier to wire. I then ran the wires along by the battery and next to the ECU.
![]()
The wires inside the car on the harness are red, blue, and green. I used quick connects and connected copper wire to the wires on the harness.

These wires will have to be connected to those on the ignition harness.
Red --- White
Blue --- Blue
Green --- Black and White
![]()
With the wires connected, the next thing to do is to get some wire loom and wrap the wire in it. Zip Ties are then used to hold the wire loom in place. Once you do that you will want to stick the wire loom up and out of the way.
![]()


![]()
The next thing is to move to the engine bay after running the white and black wire from the harness to the ECU. The ECU harness has two different connections. The A and the B hook ups. The top one is B and the bottom is A. For the Timer, you need to tap into the B harness with quick connects. The O2 Sensor for the header is a White and Black wire and then find a solid black wire for the ground. The number for the O2 sensor is #48.
![]()


![]()
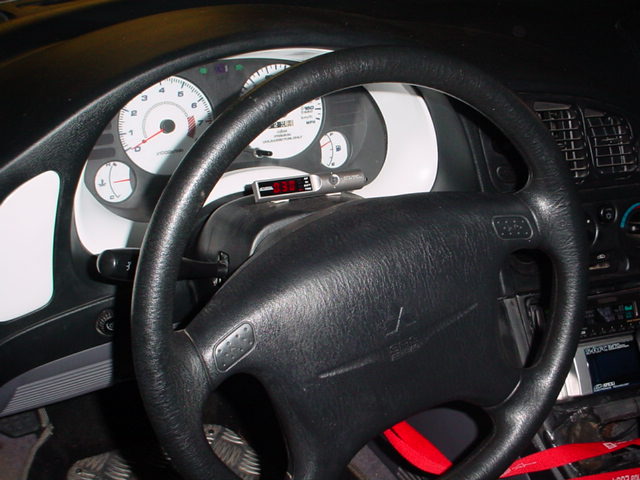
Once you get it wired up, reconnect your negative and turn your car on. First turn the key but do not start it and this will be the first way to check if your wires are right. Then if everything lights up the next thing to do is to crank the car and see if it works. Then you can tape everything up and put everything back in and you are done.
![]()
