

Read the shorter version here.
Prolog:
9/5/2003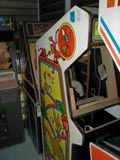
Note the original Atari receipt is still in there!
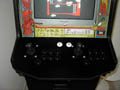
Well, I made a trip over to see Robert, about 20 miles away, on a Friday after class. He had a nearly complete (probably working) Robocop cabinet for $25. It didn't have sideart and the cabinet was a funky shape. "Where's the charm, where's the retro?" I asked him. He said that I could look around the warehouse, if I wanted to pay a little more. So we took a trip to the warehouse, where he keeps the cabs with the potential to restore. There were ones tha would have worked, like an old SF2, 2008, Road Blasters, Tron, and a few other bland ones. Even a cocktail table or two. I used to have a cocktail table in my dorm room, and the thought crossed my mind, but I decided on a standup. Why not go all the way. No tabletops or cocktails for me. So way in the back, hidden behind a BattleZone was the cab I had been looking for: an old Atari Kangaroo. The side art was retro, and the colors were great! It even had the working coin doors and marquee! (I still don't know how the glass marguee survived being in that warehouse shifting around for years.) I was planning to pay through the nose for this, since he said it was one with the potential to restore. Here is how the conversation went:
keep in mind the Robocop cab was giong for $25
Me: How much for that beauty?
Robert: Whoa Whoa! That's a real nice one, I'll probly restore that, it's gonna be a little more!
Me: Oh, how much?
Robert: Gosh, at least $30!
Me: Sold.
I had not planned to find a keeper that day, so I took some measurements of the game and went back home to see if it would fit in the spot I had picked out. It did, and quite well, so I rounded up my roommate, Alex, and went back to pick up the cabinet. We loaded it into my Expedition and headed for home.
When we got home, we had a hell of a time getting it up 3 flights of stairs.
Then the work began.

Since I wanted this to look as original and complete as possible, the next project I tackled were the lights, specifically the marquee and coin-slots. I took apart an old lamp and used a 60-watt bulb to light the marquee. It looked great, but was too hot in the sealed space. I ended up ordering a 15-watt flourescent light (equals 60 incandescent) from ebay, and paid less than $4, including shipping. A true flourescent kit from
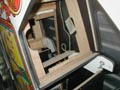
The first of many trips to Home Depot. Since I was not going to use an original monitor (it alone would have been more than the entire project cost), I had to do two things: Remove the old monitor brace and install a shelf cabable of holding a 50lb TV at just the right angle. I went to Home Depot and got a peice of thick, 3/4 in plywood cut to the width of the cabinet, 23 3/4. I also got a thinner peice cut for a keyboard shelf, but this was slightly narrower because the cabinet has a second layer of MDF at control panel level. The shelf I constructed actually sat on this MDF, secured with industrial L brackets.
Also, guy I bought the cabinet from kept the original bezel (and rightly so, it's worth twice what I paid for the cab). So I needed a new bezel. I had a piece of plexiglass cut for the bezel (23 3/4 x 23 3/4). You wouldn't think it was square, but it goes an inch into the marquee area and an inch behind the control panels. As a bonus, the scraps from the plexiglass (cut there) are exactly marquee size, in case I want to change it.
I searched for a good deal on a TV on Anandtech, a great resource for finding good deals. Originally I had found a better price on a Sharp, which I think is the best TV out there. But that was from Amazon.com, and I did not want to wiat for it to be shipped, plus shipping is hard on electronics. So anyway, I measured the cab and discovered it was 23.75", so a 25" TV would not fit. And the extra cost for a 22" was too much, so I went with a 20" Magnavox. It has mono sound and no s-video. This was good news for me, it keeps the cost down. And I will argue that composite video (a.k.a. yellow RCA) is just as good for the resolutions MAME runs at than S-video. Save S-video for DVD's and XBOX 2. This TV has front AV and Audio inputs, and the bezel artwork hides the cords. I suppose rear input would be best, but you can't always choose. The only thing about the TV I have not figured out yet is how to get it to turn on when power is applied. I still have to turn it on via remote when the power strip is switched on. One more thing, if you have a bezel, make sure it does not block your remote control's infrared receiver.
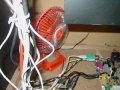
Today I bought a small, 8-inch desk fan for the cabinet. Since my motherboard will not be in a case, it will run much cooler than if it were. But, there is also no active cooling to take the heat away, so I got a little fan to blow over it. It's switched to low, and is on when the power strip is on. I think you would be fine without a fan, but if you do that, just leave the back off the cabinet. Lights + Electronics + TV = Heat. And if you are worried about your motherboard cathcing the wood on fire, don't. The combustion point of wood is many hundreds of degrees more than your PC puts out. After all, the original PCB hung right inside the cabinet wall..
Today I ordered my HotRod SE. I did research on all the options: X-Arcade, SlickStick, custom Happ, even original controls, but I decided hands down on the HotRod. Click here to see why.
My HotRod came about 2 weeks after ordering with yellow lettering. I had asked for yellow flipper buttons (which I got) instead of orange or white, and they went the extra mile to try to match the letter to my project as well. Really cool. Unfortunatly, I decided to peel off the letters to give it a more original look. It is the only thing on the cabinet that is not original, but it looks awesome. It has a blend of Street Figher (3 over 3) and NeoGeo (upward-sloping 4). This, by no accident, makes it perfect for MK3, because the stray button makes the perfect Run button, and there are 2 block buttons instead of one. Click here to see how to set optimal MK3 buttons on the HotRod SE. I couldn't be happier.
Also, there is room in the middle where many choose to add a spinner or a trackball, or both. I say Arkanoid plays fine with a joystick, and anything more would crowd the surface, but that's just me.
Also on this day, since it was getting time to wrap up, I ordered a 15w (equal to a regular 120W) flourescent lightbulb on Ebay for the marquee light. The original bulb was burned out, so I gutted the whole assembly, thinking I could never find that sized bulb, although they probably had it at Home Depot. Regardless, I was not using 12v power anymore, I needed something to plug in. Originally I had taken apart an under-cabinet flourescent light, but found out that it was unballasted. This means that you have to hold down and "charge" the light before it would go on. Since this light needed to be sealed behind the marquee glass, I needed a self ballasting light, and I got one on Ebay for next to nothing, $3 including the shipping! I installed it using the socket from a lamp I broke apart that is always switched on, and plugged in to the power strip. So when the power strip is turned on, so are the coin and marquee lights.
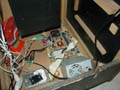
After months of trying to figure out which computer to get (see tips), I finally decided to get a little beefier CPU than I had budgeted, so it would be useful longer and play the newer games as they came along. I also saved myself $50 by getting a motherboard with the exact video card I was going to buy anyway built in. This info is all on the tips page, but in short I ended up ordering a motherboard, CPU and CPU fan from Newegg.com, and I used a Hard Drive, CD-ROM, 230W power supply I had from old computers. As for RAM, I kept my eyes on the Anandtech Hot Deals forum (see link) until I found 512 DDR at a good price, $54. It is now even cheaper, but I couldn't wait. I also ordered this system without a case. First of all, nobody was going to see the computer inside the cab. Second, cases are expensive to ship, and it wasn't worth any money to me. Third, the computer will run SO much cooler when it is just sitting out, and I had planned all along to use a desk fan to cool it. I got this idea, by the way, from my friend who works at Microsoft. He said that their workhorse computers have the sides of the case taken off and a big box fan blowing through them. I have also heard of people using window units, but lets not get crazy. So the parts are on there way, time to start assembling.
One of the final touches is to get the bezel artwork made. I say made because I sortof made it myself. Here's the deal: The guy who sold me the cabinet kept the original glass bezel, with silkscreen artwork, for his collection. I still wanted one to keep the cabinet looking original, and hide the TV, cables, and TV shelf with something a little more presentable than black plywood. I needed a custom job, since my TV is wider than the 19"vertical monitor the original bezel was designed for. So Robert was nice enough to let me borrow this very fragile 2 foot by 2 foot peice of glass to scan. Then I borrowed my brother-in-law's scanner (man, I am a mooch!) and scanned it in, in 8 sections (top left, middle left, etc). THEN my roommate Alex helped me join the peices seemlessly in Photoshop and get the color just right. Both of these things are harder than you would thing, because when you are printing at 400dpi, any mistake shows up. Then I cut off some of the left and right borders so then whole TV would show. So then when I had it all joined, I cut it back up into 8x10 peices to be printed. Then I drove over to Kinko's to get color laser prints on heavy paper, about $1.50 a print. Not bad considering that reproductions on Ebay go for $60 plus shipping. After I had it printed, I took it home, carefully cut it out, and taped it to the back of the 24"x24" plexiglass I had cut earlier. Total cost, about $20.
I also went back to Home Depot to get the hardware I needed to mount the HotRod,a nd also buy a 1 1/8" drill bit to mount the flipper/power Happ buttons.
Ok, I now need to start putting the whole thing together while I wait on the computer to come. The hard work is done, the shelf for the TV is ready, so the TV goes in. Done. I decided, you may notice from the pictures, not to go with a secondary bezel to hide all of the TV. I didn't do this because the TV is silver, and since the bezel comes in to cover the outer edge, it's like I have a silver bezel. It looks good to me.
Next I put the bezel in and it looks great, and once I mount the control panel it will be semi-permanent. You can't get to the TV or remove the plexiglass once the HotRod is in place. I purchased some L-brackets for the HotRod to sit on, and since the lip fit perfectly into the cabinet, it is a tight fit even without screws. You can see this detail here. Coming up in "Kangaroo 2.0" (my already planned upgrade), I will have some sort of a latch to remove the control panel easily. Until then this setup can take some beathing.
The computer arrived from Newegg, and it worked great from the start. Once I got a XP Pro installed, I was off. When it first booted up, I noticed that my 2 GHz CPU was coming up 1.5 GHz. I did some simple math and realized that the Front Side Bus (FSB) must be set to 100 instead of 133 (100/1500 = 133/2000). A simple jumper switch and it was running at full speed. I did take advantage of this underclock to see if all the games worked. They did work fine, and for a second I regretted getting the 2GHZ when a 1.5Ghz obviously works just as well. But in the future, this may not be the case, so I just figure I am set for the life of the cabinet. I had all the MAME roms on my main computer's hard drive, so I hooked them both up to the cabinet mobo and copied them over. I slapped it all into the cabinet, just spread out on the floor of the cab, and it worked great. I did all the tweaks to XP and the computer that I mention on the tips page, and I was off and running. The only snag I hit was that the Mortal Kombat games are not programmed into MAME, but that little headache is avoided if you use my guide.
Well, that takes the cabinet to completion. The cab is a great addition to the apartment and everyone plays a few games now and then. At parties the adult games like "New Fantasia" and "Miss World '96 Nude" are especially good for a laugh. Sometime at parties I put on a crazy Japanese game just for background (I prefer "Quiz Crayon"). I also made the desktop picture a screenshot of Kangaroo, so it looks original when nothing is playing. Then, I set the screensaver to "Slideshow" and pointed the source folder to the "cabinets" folder in MAME. It's fun to see all the cabinets, and one of them always seems to bring back memories and make you want to play.

Here are some little things I have changed since the cab was finished. I drilled out the lock (so easy!) to finally get the lower coin door open. Once it was open, I took out the coin boxes and freed up a lot of weight and room. The lock stayed largly intact, so I used superglue to put it back in, so now it looks original, but the door isn't locked. Once that was out of the way, I had room to install a shelf that raises the computer off the ground. Now the ports are even with the lower door, and I have easy access to the USB ports. A disc-on-key (USB key) is a must for transferring games, updates, and files to the cabinet.
Jan 20, 2004
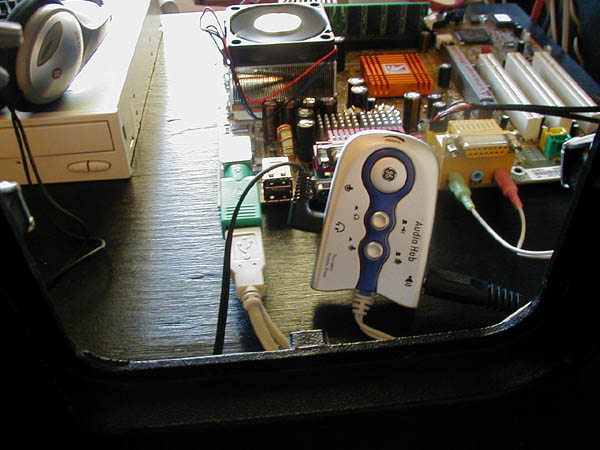
Well, the game has been working so well that I haven't really done much to it except add games and update MAME. I recentrly, though, solved one of my biggest headaches, and added a little bonus feature in the process. In MAME, some games are loud and some are quiet. If you want to adjust the windows volume, you have to back out of the game each time, and that's annoying. "Why not just use a multimedia keyboard with volume control?" you ask? Because the HotRod (and other control panels) only work with basic 104-key keuboards. I also can't adjust sound directly from the speakers because they are sealed behind the marquee glass. Solution? Well, they DO make a USB voume knob, for about $50. Instead, I bought a cheap ($6.99) Audio Hub from GE. It allows you to plug in speakers and headphones, and adjust the volume on each. There is a toggle so that when you mute the speakers it automatically switches to headphones (great for when you want to play but not bother others.) It also lets you adjust game volume on the fly. It was a very nice little find. Here are some pics of the Hub installed: Hub 1, Hub 2
Sept 16, 2004
It's been a while since I updated the page, and I have in fact moved, and the game came with me. It had to be completely taken apart before moving, so when I put it back together, I did it right this time. Here's what I have done:
The Kangaroo cabinet will soon be an MP3 Jukebox as well as a MAME cabinet. Improvements include:
Once that is all finished, I can start on my next projects: a restored PinBot machine and a bartop MAME cabinet. See you then!

