
1. Open a new image with these settings:
Width: 500
Height: 150
Resolution: 75
Background Color: transparent
16.7 million colors
2. Go to your Preset Shapes Tool  with these settings: with these settings:
Shape Type: Rounded Rectangle
Style: Filled
Line Width: 1
Antialias Checked
3. Go to your new transparent image and start at the left and make a rectangle about the size that you want your
bar to be. (It doesn’t matter what color you make it in.)
4. Next open the background graphic or the graphic that is what you want your bar to match and then flood fill the
bar with that image. To Flood Fill go to the little bucket in your tools and then:
Fill Style > Pattern
Blend Mode > Normal
Paper Texture > None
Match Mode > RGB Value
Tolerance and Opacity:
100
Sample Merged NOT checked
Next Click on the middle box that looks like a grid.
New Pattern Source > Scroll till you find the name of the background image that you want to use.
5..Next go to: Image > Effects > Inner Bevel with these settings:
Presets > Rounded
Width > 5
Smoothness > 50
Depth > 5
Amb. > 0
Shininess > 50
Color > White
Angle > 315
Intens. > 50
Elevation > 30
Then click OK.
You can play around with these settings if you want to make it look the way you want it to... these don’t have to be
exact. : )
At this point it should look like this:

6. Next go to Layers > New Raster Layer > OK.
Then go back and do steps 2-5 again if you want it to be a double bar.
Then go to Layers > Merge > Merge Visible.
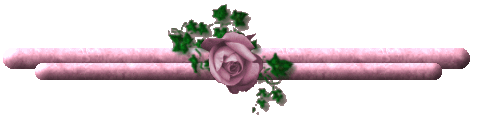
If you wanted to make a plain double bar you are now done : )
It should look similar to this:

If you would like to add a graphic to the middle of it please continue.
7. Go to Layers > New Raster Layer > OK
8. Open the transparent gif that you want to use. (This is also an excellent place to use picture tubes as you can
get them resized to the size you need and not lose any quality : )
9. If using a graphic go to Image > Resize and click on Percentage of Original with the two boxes at the bottom
checked. Set it to the % you need (50% will make it half the original size etc...).
10. Copy and Paste as new image onto the bar and use the mover tool (looks like two arrows on a weather vane : )
to move it to the exact spot you want it to be.
11. Use the crop tool to cut it down so that there is no wasted empty space around it and save it as a transparent
gif.
It should look similar to this when you finish:
Home
| 
