Site hosted by Angelfire.com: Build your free website today!

Carpentry 2

The Continuation of My Occupation

Summer of 2000

This summer I'm mainly working on remodelling a gambrel modular home in Essex. As of 7-21-00 We've had the foundations in, the concrete cutters been here, We've rebuild all the indoor petitions in the main house and recut the windows (pain in the arse since everything was glued together-and instead of using the normal sized nails, they used smaller nails, and a lot more of them! in other words-SAWZALL and FLATBAR and ELBOW GREASE! We've rebuilt the entire Garage area turning it into two floors, and turned the house from a modular gambrel house to a half modular, mostly stick built gambrel house with a kick.

The saw zall is in revolt-it only works when it feels like it and for no apparent reason. The circular saw is fast becoming my favorite tool-cuz the sawzall wont work, and I've always been good at cutting straight with it. I'm really happy cuz while I'm a girl, and my hammers a stanley, and kinda small, I can still hammer much better and faster with less swings than Jake or Mikey (who quit due to incompetence, frustration, and an inability to listen unless the instructions were repeated four times-and he had three tries to get it right.)

We used 25 foot long I-beams across the garage area-pretty cool, but scary to plywood because they wobble. In the main house the Electrician asked for us to take out the drywall on the ceilting and put in strapping. Steve-my boss says sure. Problemo-the guys who built the modular home used expandable foam to glue (glue? yeah right, like permanent bondage) So Steve had to cut down every bay, and we nailed strapping to the drywall on the bottom of the joists-so the dust from the drywall, and the foamy stuff on the insides of the joists would fall with every hammer swing since the nail gun was being used by someone else on some other floor (Steve, upstairs) In other words-COUGH COUGH HACK WHEEZE, THANK GOD I DONT HAVE TO DO THAT AGAIN

We're waiting for a slab to be poured, but the guys never come, so a section of the flooring is being supported by a few temporary joists layed out diagonally to run past the foundation wall one floor below the suspended section, and those joists are supported by a few posts. We'll make the permanent walls as soon as the slab is poured. We have an addition on the other side of the house to build-two floors. A little destruction of temporary walls, another microlam beam, a bunch of stuff-I don't know what exactly, Steve reads the plans not me. I keep forgetting to look at them when I get a chance. We have a wrap around porch going up, tons of white cedar shingles going up.

So far without the second addition, any one floor of this house is larger than my whole house! This house is HUGE and will have two chimneys-but again the masonist is no where to be seen along with the slab guys. We're extending the face of just the front door out five feet, but the foundation wall is larger than just where the slab's going since we're putting columns up and a bluestone front step. The house the owner is living in now is an enourmous mansion with a gorgeously landscaped garden encompasing the entire yard except for areas left as regular grass. The place in Essex was bought for the view of the water (marsh actually). This place is gonna be beautiful, enormous, and fancy! We've got the storage trailer FULL with windows, and theres tons more in the basement, and we haven't gotten to windows yet! O yeah, we're putting in three or four lallycolumns in the basement.

UPDATE: 7-26-00 We've torn out the other far wall, and build the sill and floor for the second addition. The boss is on vacation, its pouring like crazy, the strappings all finished. Instead of buying pre-primed trim, Steve bought unpainted trim and a gallon of primer and two paintbrushes so me and Jake painted a crap load of 10' 14' and 16' trim boards-all four sides. So my arms have white paint lines all over them. Then in using the chalk line-Bob was goofing off, so I have blue chalk all over my fingers. From picking up rusty nails my fingers are orange. I'm officially multi-colored.

BEFORE CONSTRUCTION PICTURES

Not really, they're a few days after I came on site, the house was finished exterior-wise when my boss came on site. He stripped it all down.

This is the front of the house, the area where the front door is will be pulled out 5 feet, and have columns with a bluestone front step. The house will have white cedar shingles-and be left to age naturally, white trim (I think) and birchwood colored roof shingles. We put in the dormers.

This is a side view of the house, where you see the drywall now, and the back door, now that entire addition is built, two floors, gambrel with a kick, rake boards, and four gable ends meeting in one point (and a double skylight) As soon as my Camera is fixed I'll take pictures of the difference. The garage was fully up and sided when Steve started out-but it was like this when I started.

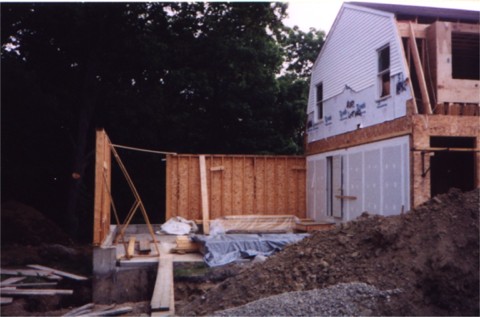
Heres a better view of that same side of the house, and what part of the origional garage wall we left up. At this point the footings were poured not the foundation, so ditches encircle the building. Hence the dirt pile and the gravel and the warped planking.

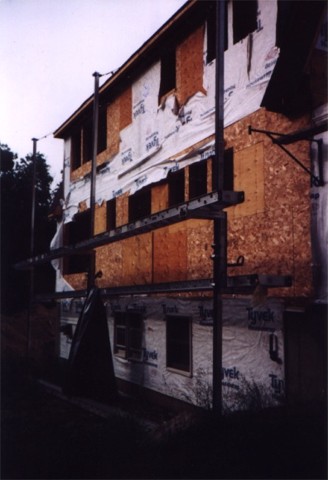
This is the back of the house-we already resized all the windows, and as the chip board was glued and they went staple crazy-it was a pain to make the rough openings bigger. The bottom windows go into the basement. Where the regular plywood is-we put that up, the chipboard is what the modular company used. Footings for the wrap around porch will be poured, right now cardboard tubes mark the holes-which aren't even strait, and have either caved in, or are flooded with water. HAHA you lazy concrete guys! You have to start ALL over again!

Here you can see where they dug and poured the footings and you can see the keyway. The guys working on the footings are Keith, Bobby, Craig, and 'Keiths Shadow' They poured the walls after this picture was taken. See the myriads of ditches and dirt piles and the drainage pipe thats hard to walk along without falling off of.

This is a picture of all the indoor petitions we built on the second floor. The body in the picture is Jake-hiding from my mom who took the picture. The insulation in the background is R30 and will be reused. The back wall has been torn down, and the space extends into the addition. Somewhere in the front left of this picture an old fashioned masonry chimney will be built but the masonist is impossible to reach so we'll get the measurements later on.

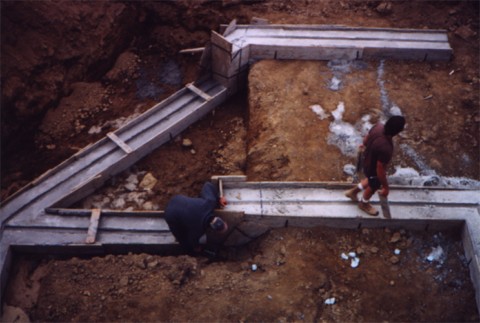
This is a picture of the footings on the right side of the house. Keith is in the blue, and his shadow is in the maroon. Again, as of 8-2-00 we've built the subfloor on top of the cement walls, and torn out the wall on the first floor to extend the living area onto the addition. Later on we will be adding a wrap around porch.

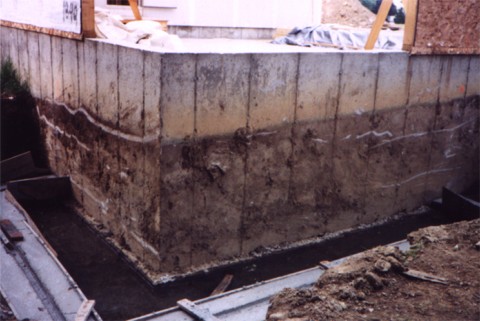
This shows the old foundation wall (the fithly one, obviously) and the new one. The old one was cut down (Concrete cutter-funny guy, dont know his name, but he had like 6-8 dimples when he smiled, it was kinda weird) BTW, the whole area around the concrete walls have been backfilled, all around the house.

Other Jobsites during the summer of 2000

While the foundation guys were working we didn't have much to do, so we worked on two jobsites in Malden-putting up a staircase, and four skylights. We worked on a jobsite in Ipswich-replacing a door and taking out drywall which was probably replacing horsehair plaster since there was metal mesh under the drywall on the ceiling (Don't ask me why-I can only guess) We worked on a site in Topsfield and One in Danvers. (I forget what we did, if I remember I'll tell you. And we did yard work for the boss (Which Jake didn't like at all, so he left early-leaving me to work! I was sooo mad!) So far the biggest problem-MOSQUITOS AND GREENHEADS!!! They bite right through Bug sprays, and it's too hot to wear longsleeves and pants. Best advice-Stay at least a floor up! There's less of them the higher up you go, and I dont mean the top of a hill, I mean above the land. Oh yeah-the topsfield jobsite I forgot. I remember-we replaced windowboxes, some clapboards, and the trim around the garage where it had rotted away. Later on we helped out at another jobsite in Ipswich-Lifting 5/8 plywood up to the roof for siding. Took a full morning.

Oh yeah-one of the sites I forgot, in Danvers we stripped two rooms (somehow they were both kitchens, and right next to each other.) The bottom 3 1/2 feet were tile with an inch of mud/concrete/whatever-it-is behind it attached to that metal mesh crap. Above that was horsehair plaster (YUCK!) Beneath that was the small boarding strips. Using a hammer to break up the tiles a bit, and a flat bar to get behind the mud, we got rid of the tile-When we couldn't stand walking on rubble we shoveled the stuff into a truck and drove it to some dump. I forget how much money for a load of rubble. We shoved a flat bar up between the horse hair plaster and the boarding to get the plaster off-DUSTY! I'll get back to how dusty it was later. By this time-I had no patience. I used the claw of my hammer to pull the boards off. Again, when we couldn't move the ladders or dig out places for the legs of the ladders, we shoveled the junk out. (High ceilings in both rooms) Thankfully we didn't need to touch the ceiling, and if we did-no biggie, they were putting in a drop-ceiling anyways. The old chimney was on a corner where one room joined the other (Behind walls we stripped bare) It was used to vent gas from the appliances. We discovered a huge hole in the chimney leaking the gasses into the main house. The 1 ft by 1 ft tiles on the floor were glued with thinset to quarter inch plywood. Scott and I (See? I can use proper english! Take that Ms. Mullen!) used crow bars to dig out way under the plywood, and work out way into lifting the plywood up (Very strenuous and very tiring!) So once both rooms were stripped bare to the studs, and something-thin-and-durable-and-ugly-over-the-hardwoodfloor-which-is-over-the-subfloor um i lost myself, oh ok, so we stripped both rooms down, then built a temporary wall to hold the weight of the upper floors while we replaced the old beam with either a mircolam or paralam, dunno which, and didn't pay attention to which was which. Anyways, we replaced the beam, rebuilt the wall under it, and took out the temporary wall-and went home. Two things to mention-the dust, I'll get back to that, and the Building Inspector Assistant of Danvers. The first day we were on the site (We were only there for two days.) Any ways we were hard at work and since we weren't touching the beam or the walls yet, we didn't have a building permit (although one was applied for, and we would get it before we touched the walls or the beam) so he comes up all pissed and tells us to go home because we didn't have a building permit. We didn't touch anything structural so by law-we didn't need a permit. My father was recently a building inspector for a larger city and head of the building department in that city. According to my father-we could take out the plaster and replace it with drywall, and there was nothing the city could do but whine and complain, legally we were ok. I found that out when I got home, but I'm thinking-this is DESTRUCTION not CONSTRUCTION, not until the beam, and we'll have the permit by then. But I didn't complain-I got to go home. ONTO THE DUST PART OF THE STORY-EWWWWWWW EWWWWWWW We had the windows open and the fans blowing the dust out. All the way down the street you could see the dust clowd from the site because it was soo dence. Horse Hair plaster sucks up moisture, so after a while-your tongue was dry and thick, and the plaster coated out hair. When you go to wash that stuff out-after it's already absorbed all the oils and moisture in your hair, when you get water on it, it turns stiff, so in two days I used a full half bottle of shampoo and half bottle of conditioner and it took two weeks for my hair to turn to normal again.