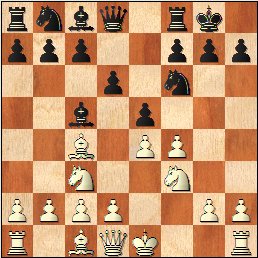
1.e4 e5 2.f4 Bc5
Black pressures the f2 square. The main benefit of this move is to delay white's efforts to move his king to safety by castling.
3.Nf3 d6 4.Bc4
White's idea in the King's Gambit is to put pressure on f7 from the beginning.
4...Nf6 5.Nc3 0-0 Diagram
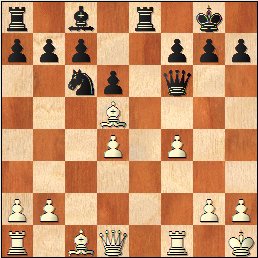
6.d4?
This move is premature. White ends up a pawn down as a result of the following sequence of moves.
6...exd4 7.Nxd4
Nxe4 8.Nxe4 Re8 9.0-0 Rxe4 10.c3 Nc6 11.Bd5 Bxd4+
12.Kh1
[Not 12.cxd4? Rxd4 and white is down another pawn.]
12...Re8 13.cxd4 Qf6 Diagram
14.Bd2
[14.Bxc6 may have been better]
14...Qxd4 15.Qb3
Be6 16.Bxe6 fxe6 17.Bc3 Qb6
18.Qd1
White want to keep the queens on the board after quickly losing two pawns.
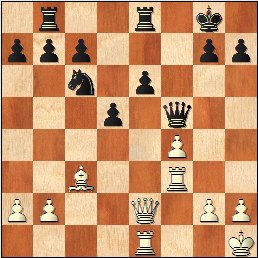
18...Qc5 19.Rc1 Qf5 20.Qb3 Rab8 21.Rce1 Diagram
21...Qf7 22.Rf3 d5 23.Qd1 Ne7 24.Qc2 Qf5 25.Qe2 Nc6 Diagram
Notice how the empty f7 square leads to vulnerability for the black king. White threatened to win back a pawn with check, and then double rooks on the opened file.
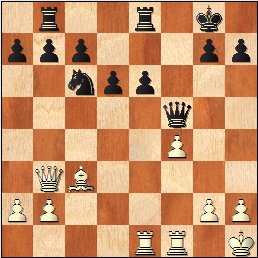
26.Qf2 Rbd8 27.Be5 Qf7 28.b3 d4 29.Rd1 Nxe5 30.fxe5 Qd7 Diagram
This is the critical position. Here I realized that I would not be able to stop the advance of the passed pawn on the d-file. Then I saw the drawing combination.
31.Rf1!
d3?
[31...Qe7!? 32.Rf7 Qg5 33.Rxc7 d3 34.Qf7+ Kh8 35.Rxb7 d2-/+; 31...Qd5! 32.Qg3 Rf8-+]
32.Rf7
[32.Qxa7 d2 (32...Qc6 33.Qe3 d2 34.Rd1-+) ]
32...Qd4
33.Rxg7+
[white may have had some winning chances with 33.Qg3 g6 34.Qh3 (34.Qg5 Rf8 35.Qf6= Rxf7=) 34...h5 35.Qg3 Qg4 36.Qe3 Rf8 37.Qf2 Qf5 38.Rxf5 Rxf5 39.Qg1 d2 40.Rd1]
33...Kxg7
Black must take the rook. [33...Kh8 34.Qf6 Rf8 35.Rf7+ Kg8 36.Qg7#]
34.Qf6+
[34.Qf6+ Kg8 35.Qf7+ Kh8 36.Qf6+]
1/2-1/2