

Embroidered Garters
Maitresse Yvianne de Castel d'Avignon, OL - AEthelmearc

This is one of the pair of garters that I made for my husband.
| Garters were commonly worn with the cotehardies popular in England and France during the 14th and 15th century. Garters were a basic clothing accessory used by men and women to hold up hose or were worn as a decoration just below the knee. (fig.1)This pair is inspired by a late 15th century extant example of one belonging to Maximilian I of Habsburg, Holy Roman Emperor, and a member of the Order of the Garter. One of the more obvious differences being that I chose to create this on velvet rather than a plain silk ribbon. Ever since I read about embroidered velvets in Fashion in the Age of the Black Prince I have wanted to try my hand at it. This project allowed me to experiment on a small enough scale that I wasn’t overwhelmed with the task before I even began. | |||||||||
| . | |||||||||
| 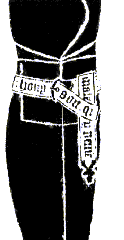 fig.1 - Brass rubbing detail of a garter worn by Sir Simon de Felbrigg, 1416 | ||||||||
| . | |||||||||
| I used store bought velvet ribbon that resembled the color and nap of a piece of 15th century velvet that I saw at the Cleveland Museum. I also chose to use a purchased metallic cording for the edges rather than embroider it. That way I could focus on stitching the letters on top of the velvet rather than spend an outrageous amount of time embellishing the finished edge of the ribbon. | |||||||||
| . | |||||||||
| I searched several different web sites for a Latin phrase that was short enough to fit on the garter and yet had personal meaning. In the end I ended up having the phrase “for love and honor” translated into Latin for me. I tried several different pens to get the outline of the lettering on the ribbon. All of the water soluble ones I tried failed miserably and even a Sharpie permanent marker smeared and came off on my fingers. I was near maximum frustration when I discovered that a Staedtler pigment marker would make thin lines and stay put. The lettering was drawn onto the velvet and the ribbon was placed into an embroidery hoop. | |||||||||
| . | |||||||||
| The embroidery is the same stitch and method used on the original piece - a satin stitch with every stitch being made at a similar angle to that of a calligraphy pen when writing the same hand. This kept the stitch length short and the "strokes" of the letters flowing smoothly. The thread I used for the embroidery is a poly core wrapped with thin metallic strips in imitation of medieval gold thread (which would have been gold strips wrapped around a silk core). I have used this thread before and know that it does not tarnish like many modern metalic threads. My thread knotted almost immediately when doubled, so I had to use it single ply. The darkness of the embroidered letters are caused in large part to small threads of the nap sticking through between the embroidery. Using a thicker thread or several strands plied together would have allowed me to fill in the letters much better and as a result they would have been brighter. The back of the embroidery gives a glimpse of what could have been accomplished on a flat fabric even with single ply thread.(fig. 2: below) You may also notice that the edges of the letters aren’t very straight. Another problem I ran into was the nap of the velvet hid where the tip of my needle was going through the fabric. It was mostly guesswork on where to place the needle every stitch. | |||||||||
| . | |||||||||
 fig.2 | |||||||||
| . | |||||||||
| As well as embroidery - pearls, metallic mounts and gemstones were common clothing embellishments of this period. Between the words on the original garter are enameled and pearl studded roses. I replaced these with purchased metal and crystal beads. The beads although pretty, were not a random choice. By sheer luck the local craft store had beads that depict my registered badge: Fieldless: On four demi-fleurs conjoined in cross Or, a torteau. The beads are also similar to some cast metal mounts that were found in a London archeological dig site (fig. 3) |  fig. 3 - Cast copper alloy belt mount | ||||||||
| . | |||||||||
| Once the lettering and bead work was completed I used the metallic thread to stitch gold cord to the edges of the garters. I also added a small piece of ribbon to the back of the garter where it will hang loose for added weight and visual appeal should the garter get flipped to the reverse side when being worn. Since I did not have a proper strap end I attached a different style of bead to the “tail” of the garter. (fig. 4) This is not just a nice costume accent but it also provides a little extra weight to help hold the end of the garter in place. While they hardly show when the garters are being worn, I plan to replace the D rings with more appropriate buckles as soon as I can purchase suitable ones. | |||||||||
| . | |||||||||
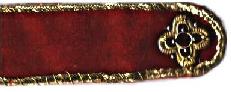 fig. 4 - Strap end detail | |||||||||
| . | |||||||||
| . | |||||||||
| BIBLIOIGRAPHY | |||||||||
| . | |||||||||
| |||||||||
| . | |||||||||
| |||||||||
| . | |||||||||
| |||||||||
| . | |||||||||
| |||||||||
| . | |||||||||
| |||||||||
| . | |||||||||
| |||||||||