

MISCELLANEOUS
(227).."BETTER BALANCE"
Practice With Your Feet Together for Better Balance....
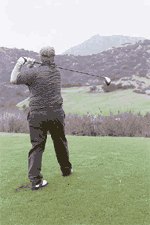
Many golfers tend to swing too fast and too hard. This is especially true on full swings with the longer clubs. To find and apply the proper swing pace to your swing, start by making practice swings with your feet together.
Begin by placing your feet together. Take some short swings, letting your body turn as the club swings freely back and forth. Keep your feet together and lengthen your swing until you reach your full back swing. Now hit a few shots, keeping your feet together.
As you are doing this drill make sure that you keep your balance throughout the swing.
Note how straight, how solid, and how effortless you hit the ball with this nicely paced swing.
Now, go back to normal shots with your feet shoulder width apart and keep that some smooth arm pace. Your shots will definitely improve and you will have found the right tempo for a repeating swing.
This drill will also help you achieve other important fundamentals in your swing. So for better tempo and more consistent shots, use this drill to improve your swing.
Back to Menu
(228).."SLICE STEPPIN"
The Gary Player Step-Over
Have you ever watched Gary Player hit a tee shot and immediately take a step toward the target with his right foot? He didn't lose his balance-this move is intentional and a great one for you to try to help straighten out your slice and add distance to your drives.
If you frequently fall victim to a weak fade or slice, you're probably not firing your right side through the ball at impact. The Gary Player Step-Over is just the thing to activate your right knee and hip through impact, which will help you square the club face and generate power.
The next time you're working with your driver on the practice tee step through with your right foot (for right-handed golfers) immediately after impact. Step along the path your club is traveling on-just let
 your right foot follow the club head through impact and finish with your shoulders, chest, hips and both feet facing the target. Soon, you'll be releasing the club head more aggressively through the ball and watching that weak fade turn into a powerful draw.
To help fire your right side for longer, more powerful tee shots, step through with your right foot-immediately after impact-along the same path that your club head traveled on. This will activate your right hip and knee and help you square the club face and generate power.
Back to Menu
(229).."FAT SHOTS"
Let's make things simple: if you're hitting fat shots, your swing is bottoming out too early. The golf swing is essentially U-shaped and the bottom of your U is occurring before the ball, causing you to hit the ground first. You're chunking it. Chili-dipping it. Laying the sod over it. Hitting the big ball before the little ball. (The big ball is Mother Earth, by the way.)
Make sure the ball is in the middle of your stance.
Now you must make sure you are not swaying. Stick a broken shaft, dowl rod, any thing along side your right leg so it is parallel and about 3" inches away. Now swing and see if you slide back and contact the rod, If you do, fix it before doing the drill below.
Tour pros' swings are exactly the opposite. Their swings bottom out after the ball. They hit the ball first as the club head is descending, then take a shallow divot. Here's a drill to help you do the same: on the practice tee, put a tee in the ground an inch or an inch and a half
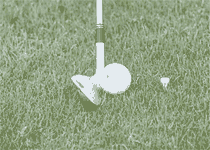 in front of the ball. Sink it into the ground about as deeply as you would if you were teeing up a 4-iron on a long par 3. When you swing, your goal is to hit the ball and knock the tee out of the ground. With some practice, you'll soon be hitting the ball first and then taking a shallow divot. This will move the bottom of your swing forward-and reduce the likelihood of hitting a fat shot and you'll strike the ball much more crisply and solidly, and notice dramatic improvements in both distance and accuracy.
Back to Menu
(230).."HITTING A HOOK"
PLAYING A LOW HOOK
Sometimes you are put in a position on the course that requires you to attempt a shot that is somewhat out of the ordinary. The low hook is a shot that can be very handy given the right situation.
Here's how to play this shot:
Set up with a slightly wider stance than normal and position the ball slightly back of center. Aim your feet, hips and shoulders squarely, but to the right of the target. Take the club back low and wide along the line of your feet. Regulate the amount of hook by how much you toe-in the club at address, not by manipulating the club head with the hands. In other words close the face (toe-in) and then grip the club, don't just turn the club with your hands to toe-in the face. Make a normal swing. Most amateurs aim too far to the right, get very steep on the back swing and too vertical on the downswing. The net result is often a fat shot. Instead, feel as if you're making a sweeping motion with the club.
Remember. don't try and manipulate your swing, just make a normal swing.
Back to Menu
(231).."GRIP PRESSURE"
Grip Pressure..... Arguably, the most important part of a golf swing...
A common problem for Average Golfers is gripping the club too tightly. Tight muscles slow clubhead speed, rob you of distance and manipulate the club face at impact, open or closed!
Do you routinely Top the ball? Again, grip pressure.
A Constant Light Pressure, just tight enough to hold onto the club through the swing, but not tight enough to tighten the fore arm muscles and this will keep your upper body relaxed. This facilitates a full turn and acceleration through the ball. Funny game... golf. The harder we try... the worse we do.
Make (and finish) a slow, relaxed (no tension) backswing. Keep the hands relaxed... if hands are clenched so are the arms and the chest muscles. If the hands are relaxed... so are the arms and the chest and the "FASTER" you can un-turn.
Key Thought.... No Tension.
DRILL: HUM. When you begin your swing start an even pitched hum and maintain it to the swing finish. If you are tensing up, the HUM will let you know.
Back to Menu
(232).."ANGLE OF ATTACK"
Have you ever noticed that Tour pros tend to take divots on nearly every iron shot, while many amateurs only take divots when they hit an iron shot fat? Known as "Hitting Down" on the ball, it is the reason that the tour pro's swing has a steeper angle of attack, and the clubface strikes the ball first, then takes a divot after the ball is long gone.
Many golfers, however, take a more shallow, sweeping angle of attack. The next time you head to the practice tree, try this drill. Place the majority of your weight on your front foot, lifting the heel of your rear foot off the ground. Hit a few easy 7-irons. You'll notice that your angle of attack is steep and it's much easier to make crisper contact, striking the ball first. Remember this drill the next time you're not striking the ball as crisply as you'd like.
Back to Menu
(233).."NATURAL SWING"
Club, head, arm, feet, knee bend, hand, etc. positions in the golf swing are often over emphasized in teaching. Thinking of where the club and body are at various points in the swing prohibits a golfer from making the natural motion of shifting weight back and through, which is at the heart of good golf.
By limiting swing thoughts, you will become a more successful, effective player. I've found that a great way to get golfers to understand the weight shift is by comparing it to things they have done or seen. A good example is a tennis player serving and shifting all his weight to the back foot then coming forward and landing on the front foot. Another examples are a baseball swing , ping pong swing, or a football quarterback throwing a pass with the same basic motion from his back to his forward foot. What do these all have in common? They are allowed to just happen. You do not think about balance, weight shift, hand position, your brain takes over and makes the correct moves for you. So why is it so hard to let this happen when we make a golf swing? Go figure.....
Bottom line, quit thinking about and trying to make a golf swing, allow your brain to take care of the natural motor functions of the golf swing and you will strike the ball much better, with more consistency. Why do you think your practice swings feel so good and when you swing at the ball it feels so different.
Don't make the golf swing...allow it to just happen.
Back to Menu
(234).."LOGO LINE UP"
One of the most common errors in putting is poor alignment. Specific sources of trouble can be poor posture, head position, or ball position. Many golfers may also have problems with their eyes, in that they have not trained their eyes to see the line correctly. Often times they are aiming their putter to the right or left of the hole and are simply unaware of their tendency.
If you are one of these players, finding a method of aligning properly will be very beneficial to your game. Some players employ intermediate targets for assistance and others use the line on their putter as a targeting tool. My favorite, however, is to line up the logo or marked line on the golf ball along the intended line of the putt.
You may have noticed that tour players are very particular when it comes to replacing their ball on the green after it has been marked. This is usually part of a putting routine that involves a specific placement of the ball prior to hitting the putt. Most often, they are taking care to aim the logo or marked line of the ball along their choosen line.
Notice:
Although the logo on the
 ball can be used I have found that a line drawn on th ball is much more visable and easier to line up. Getting the mark exactly in the center is very difficult. Marking devices are relatively inexpensive and well worth the cost and will guarantee a center line mark on the ball.
DRILL:
The next time you head out to play or practice, try experimenting with lining up the logo or marked line. Start by practicing 2 or 3 footers to ensure that your aim is true. If you have aligned properly, you will see the logo turning straight over the top of the ball as it falls into the hole. Once you are comfortable with these short putts, begin to practice from longer distances.
Back to Menu
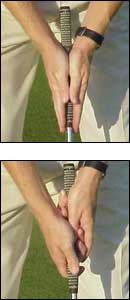
(235).."A CORRECT GRIP"
I know there is a bunch of you out there that have no idea what so ever about the grip and why you should see the knuckles of the left hand.
Many golfers , and especially those who slice the ball badly, have a weak grip. The left hand is turned to the left so that no knuckles on the hand are showing when looking down in the address position.
A tell-tale sign of this grip is the left thumb, which is placed on the top of the shaft rather than slightly to the right side of it. Soooo, what is the correct (natural) grip and why?
If you stand straight or bent over a little with your arms hanging down, relaxed,
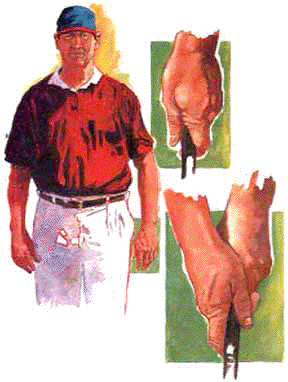 notice the backs of your hands point at an angle away from your body. This is the natural position the hands at address and impact.
If you now slide the club into the fingers of the left hand, this is the natural grip position. It is a position that gives you the best chance of returning the club to square at impact, because this is the natural position the body brings the hands to at impact. The point is if you grip the club by rotating the hand right or left of the natural grip position, when you do get the club back to impact and your body has put your "hands" back to the natural position, the club face WILL be open or closed.
Not everyone's left hand hangs at the same angle, but it is a rare one that does not hang at some degree of an angle. If you try to grip the club otherwise, you are going against your nature and making the game more difficult than necessary.
Back to Menu
(236).."THE 3/4 SWING"
Today's tip will teach you how to hit more greens and lower your scores. When it comes to hitting greens in regulation, most golfers would do well to pursue accuracy rather than power. Hitting a smooth 7 iron instead of a hard 8 iron is one example of this concept.
Another way to power down is to hit less-than-full, or 3/4 shots, instead of full shots into the greens. Many professional golfers use this technique. Practice of the 3/4 swing can be a "cure all" for swing flaws and control problems.
Most golfers, when making a 3/4 quarter swing approch it from the wrong side. They a think in terms of a 3/4 back swing. The better golfer thinks in terms of a 3/4 finish. This is a monumental difference because it is much easier to control your finish position rather than trying to gauge the length of your back swing.
Drill:
The best way to become proficient at the 3/4 shot is to spend some time on the range getting used to the notion of ending your swing with less than a full finish. Begin by using an 8 or 9 iron and pick a target you can easily reach. After hitting a few shots, you will be amazed at how easy it is to dial in your irons.
Additionally, if you have been a player who has struggled with controlling the length of their back swing, you will be equally amazed at how this shorter finish position will positively influence the overall control of your swing.
Back to Menu
(237).."ELBOW CONTROL"
Not having the elbows in sync during the golf swing is vital for a good golf swing. The "chicken wing", during the back or down swing and pulling the right arm back too far behind his body at the top of your back swing is another. Correcting these tendencies is one swing change that will help you achieve better ball striking
These are a very common problems among golfers and leads to timing problems on the down swing. If your swing ever feels jammed or bunched up coming in to the ball, chances are your right arm traveled too far behind you on your back swing. A great way to keep your right arm in check is to focus on keeping your elbows held close together throughout your swing. The chicken wing or when your elbow points behind you at the top of the back swing or down the fairway in the down swing causes a reverse pivot (tilting of the shoulders), which will also kill a good golf swing.
Drill:
A great drill for learning this feeling is to
 simply squeeze a Nerf ball between your elbows and hold it there for a few moments. You may also substitute a towel or a head cover instead of a Nerf ball for convenience. You will find new muscles working while you are holding it in place. This also promotes a good shoulder turn instead of a tilting of the shoulders, which has been robbing you of consistency and distance. Next, make a few ½ swings while keeping the Nerf ball in place. Once you have learned to keep it there during your practice swing, head to the practice tee and hit a few balls off a tee with your seven iron. As you perform this drill, you will be forming a new habit that will keep your arms working in time with your body. One word of caution, though. Make only 1/2 swings with the Nerf ball in place. For full swings, remove the Nerf ball and try to produce the same sensations you had with the drill.
Back to Menu
(238).."TOE DOWN CHIPPING"
One of golf's most common sources of frustration is a simple chip shot. It can cause both high and low handicappers to see red. In this tip I will help you improve your chipping by helping you focus on your set up position.
The main flaw I see day after day is slouchy posture and a low hand position at address. When you set up in a bent over position, the grip of your club will drop down and cause the toe of the wedge to come off the ground. This will cause chunky shots and pulls to the left. This poor set up will also cause thin or skulled shots if the club is pulled too far to the inside during your take away.
Drill:
 A proper set up position will include good, tall posture, a narrow stance, and a club that is soled correctly at address This address position will help your club to swing straight back and through and assist you in making solid contact.
A great way to improve your set up position and your chipping is to practice with the toe down so only the toe makes contact with the grass. By using your club in this "toe down" manner you will eliminate many of the usual chipping faults and see improved results immediately.
Back to Menu
(239).."PALM PUTTING"
The best putters on the PGA Tour have excellent mechanics. Most players use a technique that keeps hand and wrist movements to a minimum in order to maximize feel and distance control.
Since controlling distance is the primary goal in putting, it is imperative that you learn to hold the putter properly. For most golfers this means holding the putter more in the palms and less in the fingers. This technique helps to quiet the wrists and encourage a shoulder-dominated stroke.
The most common putting grip is called the Reverse Overlap grip. This grip differs from the full swing overlapping grip, or Vardon grip, in that the index finger of the top hand is now placed on the outside of the fingers of the bottom hand. This finger placement creates a "live tension" along the back of the top hand a helps to bind the two hands together as a unit.
Drill:
By using the "Pressing Palms" drill you will immediately feel the palms gripping the putter instead of the fingers.
 To practice this drill, simply grip the putter by pressing your hands together with the putter grip held between the palms. As you make a few practice strokes with this grip you will feel your shoulders doing the bulk of the work and your wrists becoming passive during the motion.
Once you have learned to keep the putter under control, try making a few short putts using this drill. If you have been a wristy or jabby putter you will begin to erase the bad programming and be on your way to a more consistent stroke.
Back to Menu
(240).."CHIP or PUTT"
CHIP OR PUTT FROM THE FRINGE ?
A big part of becoming a good golfer is learning to make strong choices when faced with a variety of options on the course. A perfect example is when your ball comes to rest on the fringe of the green. Should you chip the ball or putt it? Whichever you choose, if you're not completely sure you're doing the right thing, your effort will be tentative at best. It's important, then, to know all the pros and cons involved when there's a choice to be made.
GENERALLY, GO TO THE PUTTER
Most golfers have better control over their putts than their chips, so it makes sense to putt the ball whenever the situation allows. Because the fringe grass is longer than the grass on the green, you'll have to hit
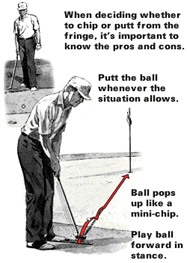 the ball a little harder, which is something you'll get a feel for over time. You may find it helpful to play the ball forward in your stance to catch it slightly on the upswing. This will pop it into the air just a hair, like a mini-chip, and give it some overspin. Work on this technique on the practice green.
WHEN NOT TO PUTT
Putting from the fringe becomes ill-advised if the fringe grass is wet or unusually thick, or if the fringe slopes upward and your ball lies below the level of the green. In these cases, the smart play is a chip shot. Choose a club that's lofted enough to pop the ball over the fringe but gets it rolling on the green as soon as possible. Often you won't even have to use a real chipping stroke; you can just "putt" the ball with a short iron or wedge. Use your normal putting grip, holding the shaft vertically, so the heel is off the ground. Then make a simple arms-and-shoulders stroke.
WHEN NOT TO CHIP
Never chip from the fringe when the green slopes downhill to the hole, unless the hole is a long distance away, like 40 feet. On most downhill shots, you'll want to take advantage of the fringe, letting it slow the momentum of the ball so it trickles down to the hole. If you chip the ball and land it on the downslope, it kicks forward and is often difficult to stop near the hole.
Back to Menu
(241).."CHIPPING 101"
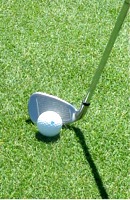
Like any other part of the game,
 a large part of successful chipping is making solid contact every time. To ensure this, the club must hit the ball as it travels on a slightly downward path. This is dictated by your setup:
BALL OFF RIGHT FOOT
Set up with your feet inside shoulder width and pointing slightly left of target so you have no trouble
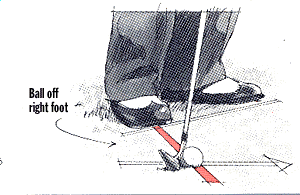 seeing the line. Play the ball opposite your right foot so contact is made before the club reaches the bottom of its arc.
HEAD, HANDS, WEIGHT GO LEFT
While the ball is positioned to the right, basically everything else goes left: Your weight is centered primarily on your
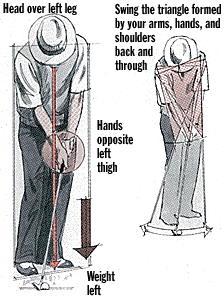 left foot; your head, instead of being positioned behind the ball, is over your left leg; and your hands, to position them ahead of the ball, are opposite your left thigh. From this position you are guaranteed a descending blow. When making this stroke DO NOT allow your wrists to break, but do allow your fore arms to rotate naturally when going back and through the stroke.
When you try this chip, only make a 1/4 swing...the contact a distance will amaze you. The biggest mistake made by my students is to try and hit to hard, go easy and you will see how easy it can be to chip with consistency.
Back to Menu
(242).."SHORT GAME SWING"
A popular misconception is that the short game requires a short swing. As a result, chips, pitches, and sand shots are hit with short, stabby strokes that produce skulls, fat shots, and general misdirection.
You should think long, slow, and smooth for the short game. Precision is important around the green, so there isn't much margin for error. It's vital that you maintain a steady, smooth rhythm and tempo for
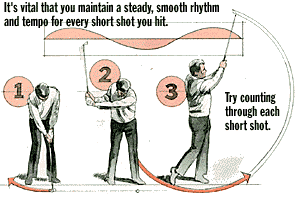 every short shot you hit. Forcing yourself to make a short swing because you have to move the ball a short distance throws off your timing.
Instead, try counting through each short shot you hit. Count "one, two, three": "one" as you start the club away from the ball, "two" when you reach the top of the swing, and "three" as you swing through. From 40-yard pitch shots to delicate chips off the apron, maintain the same count. You'll find it much easier to make consistently solid contact
Back to Menu
(243).."DIFFERENT LIES"
Downhill Lie Setup
When faced with a downhill lie, do not panic. Transfer your weight more on the upper foot, with the ball played a little more forward in your stance. Do not over swing.
The Uphill Lie
When faced with an uphill lie, do not panic. Transfer more weight to your upper foot and play the ball back a little further in your stance and swing normal. Do not over swing.
Side hill Ball Above Feet
A side hill, ball above the feet, shot tends to draw/hook more. Try opening the club face a little to put a fade spin to counteract the draw. Balance your weight a little more to wards the toes, and if one foot is higher than the other put more weight on the upper foot. Swing smooth and easy, and do not over swing.
Side hill Ball Below Feet
A side hill, ball below the feet, shot tends to slice a little so close the club face a little. Keep your weight back over heels and balanced. If one foot is higher than the other put a little more weight on the higher foot. Swing smooth and easy. Do not over swing.
Tall Tree In The Way
This calls for the high shot. Play the ball closer to the front and put a little extra weight on the back foot and keep weight back thru the down swing. The ball will take a higher than normal trajectory
and clear the tree. Of course you have to practice this and learn the normal limits to make a good assessment of what shot to hit.
The Low Shot Under an Obstruction Lie
If you need to keep the ball low, such as under tree limbs, but need some distance, try the low shot. Play the ball rear of center and press hands forward of the ball more. Use a 3, 4 ,or 5 iron and close the club face. Keep your hands ahead of the club for the whole swing. The ball will come out low and hot, so compensate with the amount of back swing. Sometimes the ball will draw a little more than usual, so practice this shot and it will add another trick to your bag.
Back to Menu
(244).."OVER SWINGING"
Over-swinging is going to far at the top of the back swing. It is very common among players striving for more distance, but in reality over-swinging results in less distance and consistency.
Mathematically a longer arc should create more clubhead speed. Not so,unless done correctly. Over-swinging will definitely throw the clubhead in a very poor swing plane. How far should you take the club back?
Only as far as you can turn your shoulders-with balance and with out tiliting them. If the club goes back farther than the shoulders, the left wrist will break down and the left shoulder will dip. This will not only open or close the clubface but will take the pulling action away from the legs, thus allowing the shoulders or hands,or both to take over and dominate the forward swing. This type of motion puts the club in an outside-in plane . This is known as over the top, which usally produces the dreaded slice and loss of distance, because the arms are making the swing instead of the body.
How does a player cultivate the proper length of backswing? We are all individuals and our muscle coordination is not the same,therefore it would be foolish to try to force the club to a parallel position at the top of the backswing if your physical abilities do not allow you to do so. Trying to take the clubhead to parallel will not only shorten your distance it will wreck your accuracy as well. So returning to the earlier premise: The club should not go back any further than you can turn your shoulders-with balance and with out tiliting them.
How can golfers learn this? By feel, Keep the left wrist in a flat position in relation to the back of the left forearm and back of left hand. This will allow the wrist to hinge naturally, not break, which will allow the club to go back only as far as the shoulders turn. Practice this drill daily,and before you know it your muscles will get conditioned and trained to stretch further under control to create the arc you desire without over-swinging. Going to parallel is not the answer to solid shot making and power. Distance is the speed of the lower body pulling the speed of the motion of your left arm corresponding together to launch the ball towards the target
Back to Menu