

MISCELLANEOUS
(211).."THE PERFECT SWING"
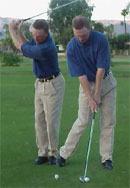
Most golf instructors, with few exceptions, will agree that the perfect golf swing is a myth. All you have to do is look at the variety of different swings on the PGA and LPGA tour each weekend on television. The swings may look different but they have some common elements. First, they all start with good basics: Grip, Aim and Setup. Most importantly, the swing repeats itself every time. There are players who have success on tour with funny looking swings. It is because the swings repeat each time from constant practice. Also, they have confidence that their swing will work.
The golf swing can be simple but is often complicated by too much thinking. A good golf swing starts with good rhythm. You can't make a good forward swing unless you take your time going back to set up proper rhythm and motion. A swing that is too fast back, usually has the club and body working against each other and helps create poor shots. The object of the golf swing is to create speed on the downswing -- not the back swing. A fast backswing will create bad motion and a hands dominated swing that will be hard to repeat. Take the club away slow for better motion and rhythm. Because the backswing sets up the downswing.
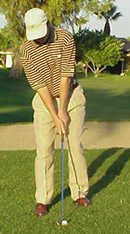
A good backswing starts with the arms -- not the hands. You don't want to pick the club up at takeaway. You want to draw it away in a one-piece motion. As the club starts back, the left shoulder and hips should turn naturally to allow weight to transfer to the right side. The hands should begin to set at waist high. As the club continues to the top, the shoulders should continue to turn. At the top it is important to have the hands set but not broken down. Overswinging at the top will create negative club speed and inconsistent swings.
The object of the downswing is to return the clubhead to the ball with maximum controllable speed. Just as too fast of a backswing is no good, too hard of a downswing can also cause bad golf shots. There are many theories on what should start the downswing. I find that most players who think about pulling with their left arm from the top will create a more consistent swing with all body parts working together. Many players from watching the tour players tend to try to lead the downswing with the left side, and as a result slide ahead of the ball at impact causing weak slicing shots.
To complete the swing you must have a good finish. The finish in the golf swing, unlike in baseball, needs to be high, not left. I find most beginners find it more natural to finish low and left causing topped shots and difficult to get the ball airborne. The clubface needs to stay square for several inches after impact to create proper flight on the ball. Also, in the finish the weight that you transferred to the right side in the backswing now must transfer to the left side. With a good finish your right knee should face the target, right foot up so all spikes are visible, and hands high close to your left ear.
Back to Menu
(212).."ALL RIGHT"
I seem to have a problem of hitting the ball left to right. I tried using a stronger grip, hitting from inside to out, and moving closer to the ball, and nothing has helped. My other problem is I can start out using my nine iron all the way through my three iron and it seems I hit every club the same distance.
Sound familiar...If this is your problem there is a good chance you are not transferring your weight throughout the swing so that basically at impact most of your weight has remained on your back foot. Distance comes through coordinated use of both your upper and lower body. If all you use during the swing is your arms and shoulders, the shots will generally all slice and the club head speed is only being generated by your smaller body muscles, your arms and hands.
To start getting your legs into the act, take a 7-iron. Put your feet right together. Keep your weight back behind the balls of your feet. In other words, stay off your toes. Try to swing at a ball. You will be forced to get your upper and lower body to turn around your spine or else fall down.
At first this is difficult to hit balls from. As you begin to get the proper feel of your upper and lower body working together, you will start to hit these 7-irons longer than you did previously with your feet apart. Make sure when you finish each swing your weight ends up on your front foot and your belt buckle faces the target. When you have mastered this drill, try other clubs with your feet in the normal shoulder apart width. Still try to feel the same sensation of your arms, shoulders and hips working together around your spine. This will begin to instill the proper fell of proper rotation and transfer of weight that every good golf swing must have.
Back to Menu
(213).."FAT SHOTS"
For both high and low handicap golfers alike, hitting the ground before the ball can be most exasperating. This is known as hitting it "fat" because of the fat piece of turf you take in the process.
In order to cure your fat shots, you must first find out what is causing them. This tip is going to assume that you hit it fat only when you swing hard, or at full speed. When power is the issue, your legs are probably driving too hard on the down swing, causing you to hang back as you deliver the club to the ball. This ultra leg drive creates excessive tilt in your torso and, consequently, your club slams in to the ground as you are leaning backward.
The best way to fix this lean-back move is to learn to keep your legs under control on the down swing. Once you can keep your legs from driving so hard, your upper and lower body will stay in their proper positions. We'll call this being "matched up" and by doing so you will cure that fat shot for good.
Drill:
A simple and effective way to learn proper
 leg motion is to practice the "Umbrella Drill." To begin, stick a regular golf umbrella in the ground just outside your front foot. Next, make a pivot motion, like a full swing, turning back and through.
If you over-use your legs you will slide into the umbrella on your down swing, but if you pivot correctly, you will not touch the umbrella at all. Practice this drill until it becomes a habit, and your fat shots will disappear in no time.
Note: (Practice this drill without a club first, or until you become familiar with the correct movements.) Then let er' rip and see if you are running into the umbrella.
Back to Menu
(214).."SWING EASY"
Ernie Els has earned the nickname "The Big Easy" because he always looks so laid back, relaxed, and tension free. Unfortunately, in the world of amateur golf, excessive tension is a common problem. I often see veins popping out of forearms and knuckles that are whiter than a new cabretta golf glove. Tension is a swing wrecker and will only rob the you of power and solid contact. This is because it inhibits the correct hinging of the wrists and the correct swinging motion of the club. This in turn leads to a huge amount of energy being expended just to get the ball into the air. If you are turning golf into an aerobic event, you probably are gripping the club too tight.
Drill:
Simply grip a 7 iron as you normally would and then allow the pinky finger of your top hand to let go of the club.
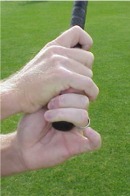 Then slide the club down to where your punky is off the end of the grip completely. Your ring finger should now be at the top of the grip. Next, make a few lazy swings using this 9-finger grip. You will find it much harder to grip too tight and you will feel the wrists and arms lighten up as well. You can even hit balls with this grip in order to train your hands to grip the club with the proper tension. I would suggest first hitting the ball off of a tee until you develop some confidence in the new feeling. If you still have too much tension in your hands, try gripping the club with only 8 fingers on the club so that the middle finger is now at the top of the grip. This will definitely give you more of a loose feeling and will allow you to swing the club more freely.
Back to Menu
(215).."PUSH PUTTIN"
Great putters are famous for having great touch and the ability to roll the ball the correct distance. Great putting, however, is more than just good speed. The best putters are able to roll the ball smoothly so that it skids very little on the way to the hole.
One of the common keys among great putters is to keep the putter head low to the ground throughout the stroke. Poor putters are often guilty to picking the putter up in the back swing and then making a decending hit on the ball. This kind of chopping action will actually put backspin on the ball and cause it to jump and skid off the putter face. A player will always be inconsistent when using this kind of stroke, even if he has a good, natural feel for distance.
Drill:
The Push-Putt drill is used to teach players the proper feeling of using the larger muscles of the back and shoulders to move the putter. To execute this drill, set up to a ball placed only a foot or so from the hole. Then, instead of making a normal putting stroke, simply use
 the putter to push the ball into the hole. By starting the motion in the direction of the hole, the player is forced to move the shoulders and putter together in order to achieve good results. Once the drill is mastered from inside two feet, the player needs only to practice some longer putts while using a full stroke.
Give this drill a try (it's tougher than it sounds) and the ball will soon be rolling roll smooth and true.
Back to Menu
(216).."WRISTY PUTTS"
One of the easiest ways to ruin your putting game is to move the wrists during your putting stroke. Many golfers move the wrists and don't even realize that they are even doing it.
A great way to keep your wrist movement in check is to focus on keeping the end of your putter pointed at the center of your body throughout the stroke. This ensures that your shoulders and back move the putter head while keeping your hands passive through the stroke.
Drill:
A great drill for mastering this feeling is to take out a 9 iron and grip it along side of your putter grip. The key here is to put the end of the grip of the 9 iron against your chest so that your 9 iron and putter form one long, extended club. Once you have it held firmly in place, make a few practice putts. Do this while taking your normal stance and posture. If you are normally a wristy or arms putter you will immediately feel a new sensation. Your shoulders and upper back are now being used to move your putter in what is called a pendulum motion.
One other tip with this drill is to keep your head still during the stroke. It is easy to get a rocking motion going if you have not practiced this drill before. After you have a good feeling for the drill, hit a few putts without the 9 iron. Try to mimic the stroke you made with the drill. The feeling you want is that the end of the grip is still pointed at the center of your body during the stroke, from start to finish. If you have never felt this sensation before I'm sure you will be amazed at the great roll you put on the ball and how perfect the ball gets started on the correct line.
Consistent putting is a great way to drop strokes quickly and is an area where individuals of all ages and abilities can excel with a little practice. Remember, 40 plus percent of the strokes you get during a round of golf happen on the dance floor (green).
Back to Menu
(217).."DOWNSWING SLIDE"
The dreaded "Downswing Slide" can be the cause of many poor shots in golf. Sliding ahead of the ball will rob you of power and cause a variety of problems such as thin shots, tops, and pushes to the right. Often times, players are sliding forward in an attempt to shift their weight, but rather than creating the desired turning weight shift, they slide past the ball instead.
While transferring your weight is very important, of even greater importance is staying behind the ball at impact. The term "stay behind the ball" simply means that your head should be to the right of the ball at impact, just as it was at address. Just take a look at the tour player swing sequences in any golf publication and you will see the players left ear is always behind the ball at impact.
This is one fundamental that cannot be ignored. Great driving and consistent iron play are predicated on this key element of the swing.
Drill:
Using the "Swing By" drill will teach you the feeling of staying behind the ball at impact. To perform this drill, grip your wedge up side down in your left hand and a 7 iron up side down in your right. Place the grip end of the wedge on the ground where the ball would be and then swing back and through, all the while keeping the wedge in place.
If you have been a slider, you will feel very stable and well behind the ball (or behind the wedge in this case) as the 7 iron "Swings By". Master this drill and then head to the practice tee and duplicate the feeling with the golf ball. What a great feeling you will have as your club swings freely through the impact zone and releases with ease.
Back to Menu
(218).."BUNKER SHOTS"
Today's bunker tip is advice taken from years of old. Many of the best tips have been around for decades and for good reason. You have no doubt heard that when hitting a bunker shot your club should not hit the ball directly, but rather enter the sand 2 inches behind the ball and let the cushion of sand carry the ball out. This is sage advice and a great tip, but many golfers have difficulty hitting the sand consistently in the same place. They either hit the sand too far behind the ball and leave the ball in the bunker, or catch it thin and send it over the green. While I still think that hitting the sand 2 inches behind the ball is correct, it is not enough to know what to do. You also need to be willing to invest some time in your bunker game and to know how to practice effectively.
Drill:
The best drill I have seen for learning how to control
 where your club enters the sand is to practice using a line drawn in the sand. Before you hit any practice shots draw a straight line in the sand about 3 feet long. Then practice by hitting the line (without a ball) and you will be able to see where your club is entering the sand. When you have learned to hit the line every time, put a ball in front of the line and keep practicing. Focus on hitting the line and not on hitting the ball and you will find that the cushion of sand will carry the ball out with ease.
Back to Menu
(219).."WEIGHT SHIFT"
Many golfers struggle with transferring their weight during the golf swing. This is because they usually attempt to shift their weight by sliding or swaying their hips from side to side. This movement creates a false feeling of weight transfer and in fact promotes what is called a "reverse weight shift." A reverse weight shift occurs when your weight stays on your front foot during the back swing and then moves to your back foot on the down swing.
In order to learn a proper weight shift, you need to find a way to keep your hips underneath your torso during your back swing. The best way to keep your hips in a good position is to concentrate on taking the club away with your shoulders and arms while keeping your hips still. In other words, don't let your hips begin to turn until your club has passed in front of your back knee. This will initiate a true pivot and weight shift and will allow your body to move effortlessly during the swing.
Drill:
The best way to get the true feeling of how a good weight shift feels is to do the "Step Drill." This drill is borrowed from the game of baseball and it is very effective. To perform this drill, start with your feet together and then swing the club to the top. As you start your down
 swing, initiate the movement by stepping toward the target with your front foot, much as a batter would step into a pitch.
By starting with your feet together you will eliminate the chance of poor hip movement or a reverse pivot, promote a good shoulder rotation and weight shift. Now by stepping into the shot you will assuredly move your weight to your front foot. This drill is also very good to get the feel of the swing starting at the bottom and stop those golfers that cast their hands to start a golf swing. Try this drill without a ball first or until you have mastered the stepping motion with good balance.
Back to Menu
(220).."RIGHT ELBOW"
Many of us hackers. including me, have a tendency to get our right arm out of sync with our body. We have the problem of pulling our right arm back too far behind our body at the top of his back swing. Correcting this tendency is one swing change that will help you improve your consistency!
This is a very common problem among golfers and leads to timing problems on the down swing. If your swing ever feels jammed or bunched up coming in to the ball, chances are your right arm traveled too far behind you on your back swing. A great way to keep your right arm in check is to focus on keeping your elbows held close together throughout your swing.
Drill:
A great drill for learning this feeling is to simply squeeze a Nerf ball between your elbows and hold it there for a few moments. You may also substitute a towel or a head cover instead of a Nerf ball
 for convenience. You will find new muscles working while you are holding it in place. Next, make a few 1/2 swings while keeping the Nerf ball in place. Once you have learned to keep it there during your practice swing, head to the practice tee and hit a few balls off a tee with your seven iron. As you perform this drill, you will be forming a new habit that will keep your arms working in time with your body. One word of caution, though. Make only ½ swings with the Nerf ball in place. For full swings, remove the Nerf ball and try to produce the same sensations you had with the drill.
Back to Menu
(221).."UPHILL SHOTS"
Of all the shots in golf that can baffle a player, few can be as exasperating as an uphill chip shot. Exasperating because most players tend to stub or chunk this seemingly easy shot. Most golfers go astray by placing too much weight on their front foot and by employing a club with too much loft. This combination creates a scenario where a sand or lob wedge now has little or no bounce, causing the leading edge of the club to get caught in the turf prior to impact.
What is needed is for you to allow the angle of the slope to get the ball up into the air, instead of using a high lofted club. Try using an 8 or 9 iron instead of your wedge and you will have great success. Also, move some of your weight to your downhill foot and widen your stance slightly for good balance. This will help your club to swing up the slope and make solid contact with the ball instead of digging into the hillside. By putting your weight on the downhill foot the shouders become parrallel with the slope and this is very important in making consistently good uphill shots.
 Drill:
One of the best ways to practice a new shot is to exaggerate the feeling you are trying to learn. As in this picture, Try using a 6 iron while standing on a severe up slope. Notice that the ball is in the middle of the stance, the weight is slightly favoring the back foot and the "shoulders" are parallel with the slope. If the grass is not too long you can use anything from a 5 iron to a 9 iron and achieve fantastic results.
Back to Menu
(222).."BELLY SHOT"
One of the most awkward shots in golf occurs near the green, when the ball comes to rest against the first cut of rough. This close to the green, most players would usually select a putter for the shot. In this case, however, due to the height of the rough, a putter will get hung up and make a smooth stroke nearly impossible.
A better choice for the shot is a sand wedge, using it to hit the ball in the belly for a designed thin shot. This technique will allow you to make consistent contact with the ball because the round bottom of a sand wedge will glide over the rough with ease.
To set up for this shot, start with your feet together, and place the ball back in your stance. Next, set your hands slightly forward and keep a light touch on the club.
For the stroke itself, be sure to keep the club head above the ground and be conscious of keeping a smooth rhythm.
 Drill:
In order to learn the bellied wedge shot, go to the putting green and hole a few short putts using your sand wedge.
Be sure to not ground your club, and focus on contacting the ball with the leading edge of the club. After a few minutes you will become accustomed to the thin hit and you will see the ball rolling as true as a putt. When you feel confident, try this shot next to the green and you will be amazed at the results.
Back to Menu
(223).."SOME DRIVING TIPS"
Here are few tips that might help your driving ability...........
Drive Thru Your Drives
A good thought process for driving is to imagine the club hitting thru the ball and not at it. Try to imagine the club´s swing path and the ball simply getting in the way of the club. You swing the club along the target line and the ball goes along for the ride.
Driver Ball Position
The proper ball placement for the driver tee-shot is off the leading foot´s inside heel.
Grip it Light
Many short hitters grip the club too hard, causing tightness in the fore arms, and a tense take-away. A light grip will cause you to loosen up and swing with more flexibility. A good analogy is to grip the club like it was a small bird.
SWING IT BACK SLOW-The majority of touring pros take the first 12-36" of the back swing deliberately slow, causing a smooth back swing, getting maximum distance. The Golden Bear said "The slower your back swing, The farther the ball will go", which is true. Extend to a high finish! A full finish adds more yardage to the ball.
Less Spin Equals More Distance
The next time you clean your clubs, skip the driver, let those grooves get a little clogged up. The less grooves there are, the less spin is induced on the ball and it will fly farther. Test it out for yourself.
Preparing For A Long Drive
A long drive is a product of good timing, weight shift, balance and flexibility. Work on a smooth, consistent, well balanced swing and let your body´s weight shift help you get the most out of your swing.
See Half of the Ball
A properly teed up golf ball extends half of its body above the club head. Remember the tee height depends on the height of the club face, so if you use a lower faced club, for instance a 3 wood, then you would lower the tee height accordingly.
Slant That Tee
A common method to tee up a golf ball is to forward slant the tee in the ground a little, then place the ball on it. The forward slant gives you a feeling of sweep direction (at the hole) and provides less resistance from hitting the tee itself.
Tee Height
When you tee the ball for a driver shot, put the tee height at the middle of the driver´s face, this puts half the ball above the driver. This is the recommended height for driving.
Back to Menu
(224).."HOOKING CURE"
A player who hooks the ball usually has a downswing path that starts from too far inside the target line and travels through the ball too far outside of the target line (See Picture). The way to tell if you are making this inside move is to look at the golf shaft when it is parallel to the ground during the back swing. If at that time the shaft is pointing behind you a little and "not" parallel with your target line, then you are setting your self up for the inside-out swing.
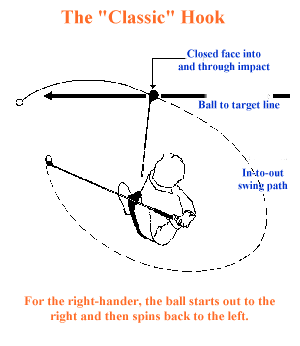
To cure the hook, the player should concentrate more on trying to swing straight down the target line. Just make sure when the shaft is parallell to the ground it is also parallel to the target line.
Practice hitting shots with the ball below your feet will help change your down swing path from a hooking inside-out swing to a slicing outside-in swing.
Back to Menu
(225).."SQUARE PUTTING"
A common flaw in the golf swing or putting stroke occurs before the swing is made in that the stance is not parallel to the target line and club head is not square to the target line at impact.
Every player should work out what square looks and feels like to him or her and store the images in visual and "Grey Matter" memory.
To see what square looks like, use a square-tiled floor that's near a wall. (See picture below) Place and align the club head/putter along one of the squares and align your feet using the square pattern.
Look down the target line to see what square actually looks like. Now take a practice putt and feel how your muscles move while extending the putter down the target line. Be aware some putting strokes are not straight down the line. Many golfers have in-square-out stroke and not straight up and down the line. Some of the best golfers in the world have this stroke, so don't get excited if yours is this style. The important thing is that the face is square at impact, not how it gets there when making a putt.
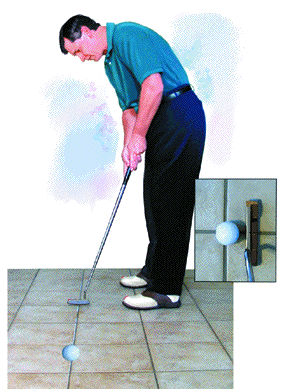 You may do the same with a short iron, just be careful. You will probably want to use lightweight, plastic practice balls for this drill. Now take a full swing and feel your muscles as you extend down the target line. That is what square feels like.
Finally, while facing a wall but standing on a plain floor, swing/putt and attempt to recreate the previous feeling. On the course, try to recreate that same alignment and feeling.
Back to Menu
(226).."HEAT IT UP"
It happens all the time-you have a good round going, you're having fun, you're thinking that this is the day you'll break 80, and all of a sudden you chunk an easy chip shot. Upset, you rush the next chip and skull it well past the hole. Now you're really heated and you make three tension-filled putting strokes and card a 7. You try to take out your anger on the following tee shot and make a hurried over-the-top move and pull-hook your drive into the woods. Now you're seething, your score is ruined and your game is in the tank for at least another two or three holes, and maybe even the rest of the round.
Here are a few tips to keep your mistakes from snowballing into total disaster. Say you cold-top an easy approach shot. First of all, don't be too hard on yourself. Even the best Tour pros on their best days hit far less than half their shots exactly as they'd like, and usually have a couple of out-and-out misses mixed in for good measure. So don't beat yourself up over a bad shot. FACT - If you play golf..you will hit bad shots, take it to the bank.
You will be angry and frustrated after a bad shot. It's only natural. The key is to give yourself some time to cool off before you hit your next shot in order to avoid turning one bad shot into two or three. Even if you're away, ask your playing partner to hit his shot first, and take an extra practice swing or two before playing your next shot.
If you've hit a series of bad shots and it looks as though your game has taken a temporary leave of absence, forget all of the technical swing thoughts that aren't working for you and instead focus exclusively on your tempo. Regardless of the fault that has worked its way into your swing, you can only go so wrong if you're swinging smoothly and rhythmically-you can always scramble around and make a respectable score if your tempo is good.
Here's an easy trick to relaxing and regaining your tempo after a few bad shots. First, take a few deep breaths. Next, take a couple of practice swings with your eyes closed (this will remove the "hit instinct" from your swing and allow you to feel a flowing motion.) As you swing, hum quietly to yourself, focusing on maintaining a quiet, even tone. If there's stress and tension in your swing, you'll hear it as you hum-your hum will rev up like a Harley Davidson! Once you've made a couple of relaxed practice swings, set up to the ball and repeat that same fluid motion.
The next time things go bad on the course, try a few of these tension-reducing tricks. Change your priorities: instead of trying to hit every fairway and green, see how smoothly you can swing and how many times you can get up and down from off the green. Do this, and trust me, you can turn a potential disaster into a pleasant round of golf-and a decent score as well!
Back to Menu