HOW TO MAKE SNOW GLOBES
This tutorial is made using PhotoImpact 10. It should be similar for most of the other versions of it.
This tutorial will not help you if using PhotoShop or PaintShop Pro.
Description: You'll learn how to create a beautiful 3D snowglobe and animate it. This tutorial
does not include making the base since the purpose is to learn to make and animate the globe.
I know this tutorial looks LONG, and it is. BUT it is only this way because I wanted to be VERY detailed with lots of illustrations so that you will be able to do this graphic with little to none assistance. The first time you make a globe it will take a bit. But after that it will be a breeze! I can create a new globe and animate it in a matter of 3-5 minutes! So enjoy, I hope this tutorial helps you out! If you have any questions feel free to email me. The link is at the bottom of this page. Thank you!
ADDITIONAL FILES (Optional, but recommended)
Glass Preset
Globe Bases
LET'S GET STARTED!
PREPARATION
1. Decide on an image for your globe.
2. Download the bases provided (there are 3) or use one of your own.
3. Download the Glass preset or use one from Easy Palette.
4. Unzip the globe bases and the glass preset.
5. Open PhotoImpact. Open the globes and drag them into your Easy Palette for later use.
6. If using the glass preset, Right-click on your Material Gallery\Import. Navigate to the .smp file and click Open. This will add the glass preset to your gallery.
7. Open the image of your choice in PhotoImpact and we're all ready to go.
PROCESSING YOUR IMAGE
1. Using your path tool. Use CIRCLE and set at 2d, any color will be fine for now. Draw a circle over your image, so that it covers what you want to be in the globe.
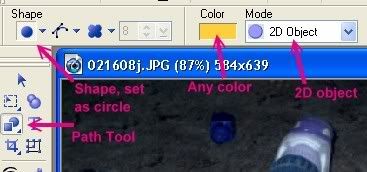
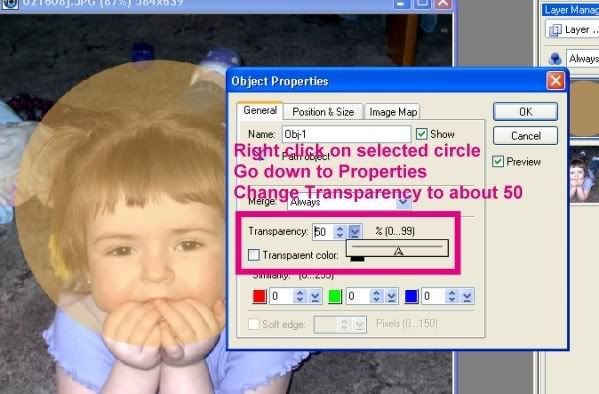
Hint: For better centering, right-click on circle, select properties, set Transparency at 50%. Change transparency back to 0 when you are happy with your selection. You may need to reduce the size of your image to get the image to fit in the circle the way you want it.
2. Open a NEW transparent document. Right-click on the circle in your photo, Duplicate. Use Pick Tool to drag new circle to your new image. We will use this to make the glass globe.
3. With remaining circle selected, go up to MODE and change to Selection. You will now have a dotted circle around your image. If you need to move it around a little more to center your image do so now. It can be moved around even in selection settings.
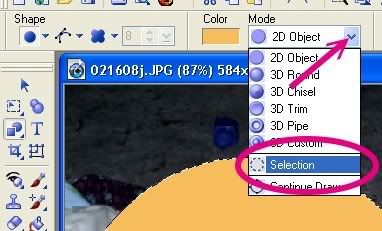
Your image set as SELECTION

4. Right click on your circled image and choose CONVERT TO OBJECT.


5. Use Pick Tool to drag your object off to the workspace with your duplicated circle. Close your original image without saving. You should have one round circle with your picture and one plain colored circle.

ADDING THE GLOBE
1. Drag the colored circle over your image circle. Open the Layer Manager so you can see both images. Hold down Shift Key and select both images. On menu, click Object\Align\Center Both. Now would be a good time to size your globe to the desired size. I normally do no larger than 400 pixels. Also, now would be a good time to save your work as a .ufo file.
2. Select only the color circle, change Mode to 3D Round. In the Material Gallery, double click on either the provided glass preset or select one from the Ulead Glass presets (select Galleries tab in Easy Palette,and then material gallery, and glass). NOTE: Do Not Merge your image!!
3. Select both circles and move towards top of image space, so you can add a base.
ADDING THE BASE
1. Drag the base you wish to use from the Easy Palette into your image workspace. If you're using a two-part base, continue with #2 and #3, otherwise position the base under the globe and go to step 4.
2. Using the Pick Tool, send the back part of the base to the back. You can also open the Easy Palette and drag it down so it's the last image.
3. Using the Pick Tool, position the front of the base so it fits to the back part. Your globe should be inside the base.
4. When you are happy with your arrangement, use the Layer Manger to Lock each piece in place (click the padlock on each layer). This will insure that things don't "slip".
5. Use the Crop Tool to crop out the excess area. This will be the final size of your globe. Save your image again. NOTE: Do Not Merge your image!!
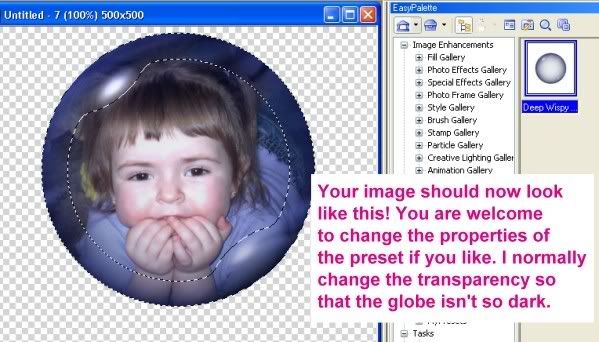
Your image should now look like this:
ADDING THE SNOW
If you want to add your copyright or some other identification to your globe, this is the time to do it. Make any and all changes you want now. If you want to add some gems, jewels, or whatever. Be sure to lock all additions.
1. Highlight your image circle ONLY. Go to your GALLERIES tab and click on ANIMATION GALLERY and then ANIMATION PARTICLE.
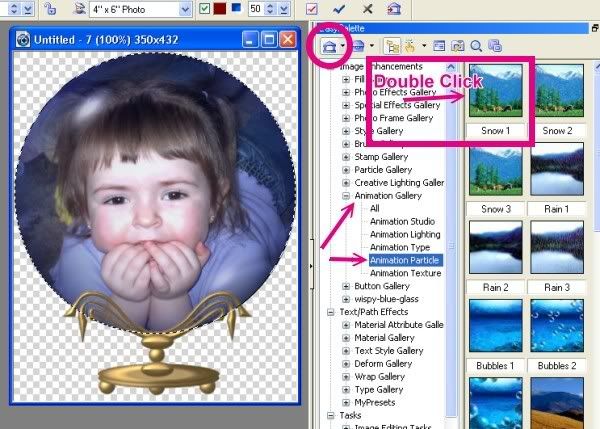
Double click on SNOW 1. The following screen should appear:
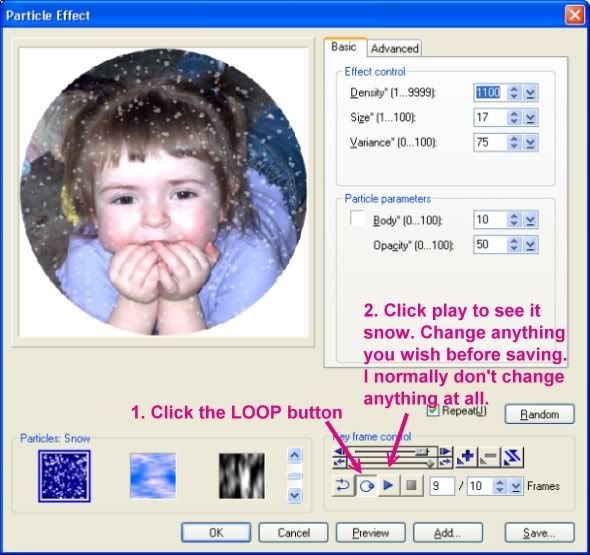
2. Click the LOOP button and then press the PLAY button. Should you want anything changed to the snow you need to do it now. You have the ability to change any of the 10 fames. You can even click the randomized button for each frame. I personally like the way Snow 1 falls all on its own so I generally change nothing.
3. When happy with your snowing picture, click SAVE on the bottom right. Save this as a GIF image someone that will be handy for you to access.
Note: You can animate without the additional steps, but honestly I do not think the flow of things is good without this!
4. Open your GIF Animator program, you can do it manually or click the SWITCH button on the top right of your PhotoImpact screen.
5. Open your snowing gif you just saved. Then go up to FILE and SAVE AS and save it as a PSD file.
6. Open your PSD file in your PhotoImpact program.
7. At this point there are two ways you can get everything together.
a) On your PSD image, you can go to ADJUST and then resize the BASE image to reflect that of your completed image with base and globe. And then drag your globe and base to your snow image. Make sure to select ALL circles (snowing circles, globe circle) and center both. Make sure base is where you want it. And select SAVE, as this is already a psd image. Or you may still select save as and save it as a psd with another name.
b)Or you can select all 10 snowing circles and drag them onto your original image that is still open in PhotoImpact. Be sure to CENTER BOTH with ALL circles so that its all together. You can now delete the PLAIN circle image. Be sure to adjust your layers so that the glass globe is the top layer. Go to FILE and SAVE AS and save this as a psd image.
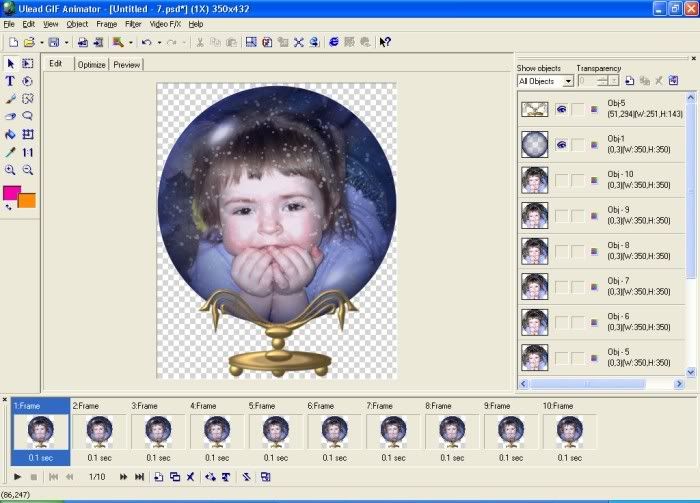
8. Open the PSD image in your gif animator. Add frames until you have 10 frames total. Adjust each frame, click the eye for all objects that should be in a particular frame. For example, frame one should only have the EYE selected on: The glass globe, the FIRST snow image, and the base. Frame two would have the globe, base and 2nd snow picture. Repeat for all 10 frames.
Your gif animator screen should now look like this:
9. Highlight ALL frames and right click and choose FRAME PROPERTIES. Be sure to have the removal method as TO BACKGROUND. Play with the delay speed until you are happy with how the snow falls. Click the PREVIEW tab at any time to check how your image is looking.
OPTIMIZE YOUR ANIMATION!
It is imperative that you optimize your globe. These images & frames take up A LOT of space! Which leaves the file sizes HUGE!
The steps for Optimizing are further explained in my Glitter Fill Names Tutorial.
Example: Here is what my images optimization screen! WITHOUT optimizing my image would take 13 minutes and 56 seconds to download!! AFTER optimizing it would only take 1 minute and 47 seconds! So you can see why it is imperative to optimize!!

Now, Glitter Graphics has a size limitation on all graphics. The maximum size is 593920 bytes. Even with optimization my globe would still be too big!
If your image after optimization is still too large, its easy to fix! You would CANCEL the optimization screen and then select ALL your frames once again. This time go to EDIT and then RESIZE IMAGE. You will need to make your graphic, as a whole, smaller! It is the only way to shrink the size!
After changing the HEIGHT of my image to 350 pixels I can now optimize and be UNDER the limitation for Glitter Graphics approval.
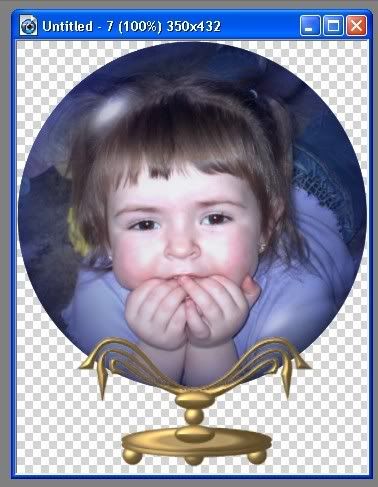
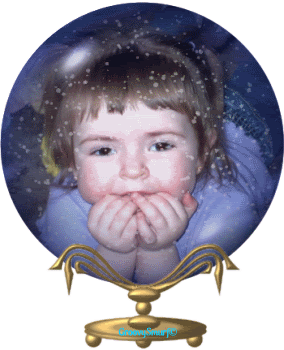
Here is my finished Globe!
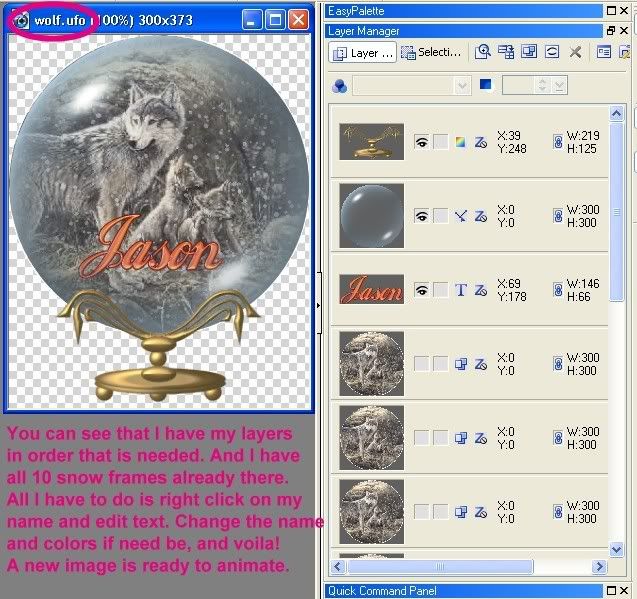
If you know you will be using the same image over and over and just adding text, you can save yourself a LOT of time. Here is what I do!
With your completed psd image still open in PhotoImpact, go to save as and save it as UFO instead of psd. If you save as UFO it will allow you to just edit text and move on. It will make it so you don't have to repeatedly do ALL of the above steps to duplicate an image but adding a different name.
You are supposedly allowed to open a UFO image in the gif animator, which would save you a step. But for some reason mine hates ufo images and crashes instantly when trying to open one! So after I alter my ufo image to change the name, for example, I go to save and save it as a psd again and then do the step in gif animator to animate it like before.
Here is an example of my ufo image in PhotoImpact of a globe I keep handy to easily alter
 Email
Email
Home

