Home Cliff Access: Route D
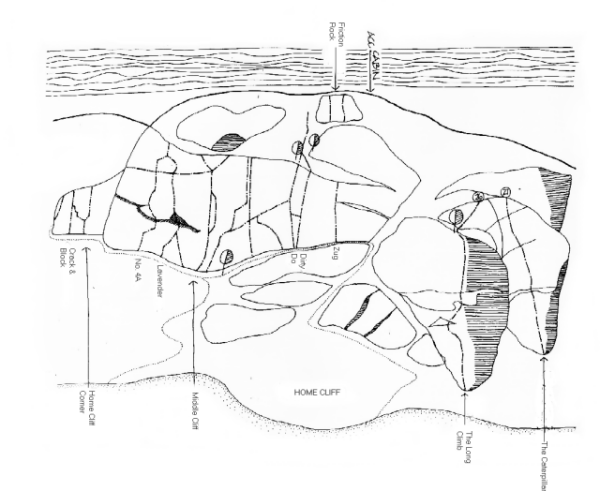 Home Cliff Overview
  Home Cliff Corner
  Home Cliff Middle
Approach:
Character: A stream runs down to the left of the cliff. The main feature on the left part of the crag is a huge corner (Home Cliff Corner). Descent for all the climbs is to the left of this corner. There are numerous slabby buttresses below the main cliff, up which short (l0m or so) routes can be found. The area to the left of Peggy sees more traffic than all the other crags put together and is frequently used for teaching beginners. You have been warned! The climbs are described from left to right .
Cotter crack 5.10
The first good route to be climbed on the rock below the main cliff. From Home Cliff Corner, cross both branches of Cabin Stream at the foot of the waterfall. A few metros past the second branch, there is a clearing and a very obvious crack splitting a buttress. The crack starts as a finger crack and ends as an arm crack.
Scramble up broken slabby rock and climb the crack all the way to the top. Strenuous, but with excellent protection.
The next route is at the extreme left end of the main cliff.
Descent gully
The right wall of the descent gully contains several very short possibilities.
Broken Corner 5.3
Climb the arete at the foot of the descent gully to the top, or branch out onto the left face after 4m.
Crack and Block 5.3
Climb the obvious crack 2m right of the arete.
K5 5.0
Climb up Main Corner to a large ledge. Traverse left along the ledge, exiting 1 afts~rarric
One Up 5.7
Climb a thin crack 2m left of Main Corner to a large ledge. Climb the continuation crack above the ledge.
Main Corner 5.1-5.3
The obvious corner. Various exits from below the final wide crack are possible: left(5.1), right(S.3), or straight up (5.3).
Inside Corner 5.2
Start immediately right of Main Corner. Climb up 12m to a birch tree. Finish either directly behind it or up the corner to the left (slightly harder).
Back to the Wall 5.3
Climb the face about 6m right of Main Corner, finishing up a short V notch. Innumerable variations are possible.
Arete and REP 5.3
Start just left of the major arete 12m right of Main Corner. Move up and right to a large ledge. Leave it by a crack at its right end. Climb past a prominent pine tree to easier ground.
Direttissisma 5.11
An obvious line of pegs and bolts up the center of the overhanging wall to the left of Peggy. Originally a rather pointless aid route, it now gives a fine very hard frvv
Patriation 5.8
Start as for Peggy. Climb up to a square block. Pass it on the left. From the top of the block, make a rising traverse leftwards to the arete, to join Arete and Ramp. Protection is reasonable, but difficult to place.
Peggy 5.5
A prominent left facing corner 10m to the right of Arete and Ramp. The first move is considerably harder than 5.5.
Climb up to a square block. Pass it on the right, then continue up the corner, using the arete as desired. Finish up a short wall.
Magical Mystery Tour 5.6 A good, sparsely protected climb.
1. Climb the ramp immediately right of Peggy, then traverse back left to belay on top of the square block of Peggy. Friends are useful for the belay.
2. Climb 3m up the corner, then step right onto the arete. Traverse right at more or less constant height all the way to Piton Highway, up which one can finish.
Rupert Bear Goes Hiking 5.9
Both Rupert Bear and Lavender appear extremely lichenous. However, the lichen hardly interferes with the climbing at all.
Start 6m right of the arete of Peggy. Climb up to an overhang. Traverse left on hand jams to a good ledge. Climb a thin crack diagonally right to easier ground. Go straight up to an old faded sling. Go slightly left and then up to the top.
Rupert Bear direct start 5.10
Climb straight up the wall midway between Magical Mystery Tour and the usual start of Rupert Bear. Unprotected.
The Original Route 5.9
Start lm left of Lavender. Go straight up to the right-hand side of a cave about 6m off the ground. Move to its left side, then climb up and right to surmount the roof. Traverse back left and up to join Rupert Bear. Follow Rupert Bear. Finish direct on superb jugs.
Lavender 5.9
Start lm right of Rupert Bear. Climb up and right to an overhang.
Pull round it and step left to a thin crack.
Follow this direct to the top, with a hard finish.
The climb is overprotected by in-situ pegs.
Piton Highway 5.7-5.8***
After the start of Lavender, the trail at the foot of the cliff becomes narrow and rocky and drops down between broken rock above and a steep slab below. Piton Highway starts at the top of this narrow, rocky section.
Go up to an obvious left facing vertical corner. Climb this direct to a short wall. This can be climbed direct (5.8) or by moving a few feet right to an awkward left leaning crack (5.6). Both options bring you out on a huge sloping ledge with a cedar tree.
Piton Arete***
Start the same as Piton Highway.
Gain the arete and climb bypassing the corner.
Climb this direct to a short wall.
This can be climbed direct (5.8) or by moving a few feet right to an
awkward left leaning crack (5.6).
Piton Byway 5.6
Follow Piton Highway to the first hard moves at the foot of the corner.
Traverse lm right on huge holds.
Go straight up, keeping slightly right of Piton Highway,
until the final wall. Finish as for Piton Highway.
Twinkle Toes 5.4
Start in an area of broken rock, 3m above the trail and 6m right of the start of Piton Highway. The route follows a large right-leaning ramp, below a clump of trees and bushes.
1. Ascend a broken wall to the foot of the ramp. Follow it to its end, and a tree belay.
2. Climb more or less straight up to the top.
Rothery Traverse 5.0
Start 6m right of the start of Piton Highway in an area of broken rock.
1. 42m. Move up and right to an obvious large flake on the right skyline.
Continue traversing right past a cedar (possible belay).
Hand traverse a huge flake, then move up and right past a tree to
a rap station/belay.
2. Easy scrambling to the top, past the remains of an old log chute.
50m back from the top of the log chute is Friction Rock,
which gives several short easy climbs.
Cracked Jug 5.6
Follow the trail down past the rocky section to a wide earthy part.
Start at its left-hand end.
1. 5.6 Climb straight up the steep wall.
The lower part is unprotected for twenty feet.
Belay at the first large flake on Rothery Traverse.
2. 5.6 Make a rising traverse to the right, to gain a large
sloping ledge directly above the cedar tree on Rothery Traverse.
Climb a steep crack at its right-hand end,
then go diagonally left to the tree belay of Twinkle Toes.
3. 5.0 Finish as for Twinkle Toes.
Turkey Vultures 5.5
Start about 6m right of Cracked Jug, directly beneath a cedar tree 10m up the cliff. A lozenge shaped overhang slopes up the cliff from right to left, underneath the cedar.
1. 5.4 Climb straight up until underneath the overhang. Move left, then straight up to join Rothery Traverse. Belay at the tree.
2. 5.5 Step right onto a huge flake. Go up lm, then traverse lm right. Make steep moves up, until it is possible to step right to gain a rightwards slanting crack. Follow it up to its end. Climb up easy slabby rock to an oak tree belay. Easy scrambling remains.
Turkey Vultures variation
l(a). 5.8 Start as for the normal route and climb straight up to the overhang, directly beneath the cedar tree. Climb through the overhang, using a crack. Climb up to the cedar tree. Belay as for the normal 1 route .
Walk on the Wild Side 5.10
Start as for Turkey Vultures. Break through the overhang low down, at an obvious weakness. Climb straight up the wall above to join Rothery Traverse to the right of the huge flake. A good belay spot is directly above the flake. Various much easier options lead off the cliff.
April Fools 5.0
Poorly protected.
Start immediately right of Turkey Vultures, on top of a large flat topped pedestal. Pull onto a right-sloping ramp, and follow the curving weakness right, until it intersects the groove of Crapaud Clinq. Follow the groove to the top.
Crapaud Cling 5.6
Start at a prominent boulder beneath a big groove,
30m right of Turkey Vultures.
Move up behind the boulder (hard for the first 3m).
The angle eases and the route follows an obvious groove which exits
at the tree at the end of Rothery Traverse.
Belay at the rap station
Ivy Traverse 5.3
Start as for Dirty Do. Climb halfway up Dirty Do, then move left on an obvious hand traverse, around a corner and into a groove. Climb the groove to the tree at the end of Rothery Traverse.
Dirty Do 5.2
Start at the foot of a dirty looking chimney.
1. Climb the chimney for 3m, then climb right over the nose,
onto a steep ramp, good holds. After l0m this steepens to a slab.
Move onto a grass ledge and belay at a tree 6m up the slab.
2. Scramble up to the top, as for Rothery Traverse.
??? A1
Thin crack, about l0m right of Dirty Do. No pins needed. Take some small wires.
No Face for a Termagant 5.6
Start as for Toot. Climb straight up the wall. A long reach near the top increases the difficulty considerably for short people.
Toot 5.4
Start 35m right of Dirty Do, on top of a large stubby pinnacle.
From the left side of the pinnacle, climb up and slightly right, to finish via a notch.
Zug 5.4
Start 50m right of Dirty Do, where the wide, earthy ledge fades away, at the foot of a left-facing broken corner.
1. Climb up the corner, then traverse diagonally right on big ledges, and straight up to a bushy ledge with three small oak trees.
2. Various exits are possible
Long Climb 5.0
Start at the foot of the lowest buttress of Home Cliff.
1. Climb a prominent arete which levels out to an easy angled wall. Peg belay on a large ledge.
2. Climb over or around the steep wall behind the belay. Go up a ramp and climb the slanting flake above it.
3. A third pitch can be climbed by walking back left to an isolated 7m high buttress (Friction Rock), which can be climbed by a variety of routes.
Inverted Caterpillar 5.0
To the right of Long Climb there is a large expanse of broken rock. Numerous easy possibilities exist here.