
Signature Analyzer
Kouhei Hashiguchi
Salah Bule
CNT 1B
The Signature Analyzer
What is the Signature Analyzer?
All IC chips have signatures on their nodes, usually on the pins. They are denoted by a hexadecimal code. For example, H3U9 may be a pin 6 signature reading for a certain IC. The signature analyzer is a trouble shooting device that tells the user whether these nodes are functioning properly. It starts off by providing a go, no-go test by reducing the complex data streams to a verifiable four digit signature. If the signature obtained matches the expected signature in the manufacturer's service manuals, the node is functioning properly. If a signature is found which does not agree with the one documented, the signal path is then traced back until a correct signature is found. This localizes the fault. Once the faulty node is found, the bad component on that node becomes apparent. The signatures on a signature analyzer are right or wrong, they are not almost-right. Like your own signature, it is very unique and must comply when writing cheques or signing documentation. The chance of obtaining a correct signature when a fault occurs is almost non-existent. The process of signature analysis is a procedure which requires little understanding on the operator's part of the circuit being tested. With its relative ease of use, unskilled personel can troubleshoot a large number of systems fairly quickly. It is a cost effective means for troubleshooting microprocessor based systems in a high volume environment.
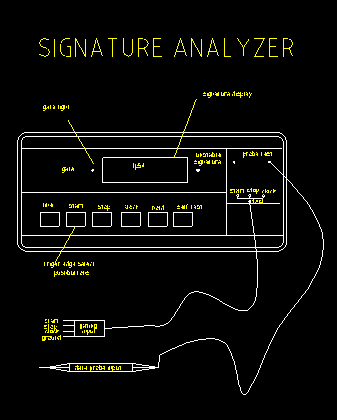
The Front Control Panel
The Hewlett-Packard 50004A is a typical signature analyzer. This instrument is relatively simple. By looking at the signature analyzer diagram, there are two sets of probes: a Data probe for sampling the individual nodes and a control pod for controlling the data capture process. The Data probe has a lamp towards the tip, which states the value of the node being tested. For example, if the lamp is on, that designates a logic high. If the lamp is off, that signifies a logic low. If the lamp is dim, there may be an open circuit or a bad level. The other probe appears on a flat card control pod and consists of Start, Stop, Clock and Ground.
With these probes combined together, they take signals required by the signature analyzer to generate a signature. The connection points for these inputs must be specified in the service documentation for the product under test.
The panel on the front of the signature analyzer contains buttons for controling the operating parameters and a four-digit seven-segment readout for displaying the signature. The most important buttons are those labelled START, STOP and CLOCK. They are used to select trigger modes of rising edge or falling edge on the Start, Stop, and Clock input probes. By pushing the button 'in', one will get a falling edge trigger, while leaving it ‘out’, will give a rising edge trigger.
Signature Analysis Concept
There are three main aspects to the signature analysis process:
Stimulus
Stimulus is used to create state change activity on the system nodes. This activity is essential for the signature analysis process. One type is called free running. It is a hardware-based stimulus which allows the microprocessor to cycle through its entire addressing range, allowing the operator to test and troubleshoot the bus system, address decode logic, and ROM: the "kernel" of the system. Free running is important since it requires only the microprocessor IC to be functional in order for it to run. With it we can debug enough of the system for it to run sophisticated circuit stimulus.
Data Capture
During data capture, the signature analyzer reads in the bit-stream information being generated by the stimulus. The period when the analyzer is reading data is known as the measurement window, or gate. There are three main signals used for control of the data capture process: start, stop and clock. The start signals tells the analyzer to open the measurement window so that data can be read in. The stop signal closes the windows, signifying that data capture is complete, and the signature is displayed. The clock signal synchronizes the analyzer’s sampling cirucuitry to the unit being tested. The gate is actually controlled by the clock and not by the start and stop signals themselves. The start and stop inputs are sampled on the active clock edge just as the data probe input is. Sources for the start, stop, and clock signals will also vary according to the application. Generally, these signals can be obtained from hardware such as address lines, chip selects, and read and write strobes. By setting these connections up, we can use the Data probe to check out various circuit nodes. For example, IC pins. We can compare the signature observed, with the reference list produced when the system was fully operational. Follow any incorrect signatures through the circuit until correct signatures are observed. There may correct signatures entering the IC, but incorrect signatures appearing on the output pins. Thus indicating a faulty IC. This is the basic procedure that must be followed in testing. The signature on ground line is always going to be 0000. However the signature on Vcc will be variable, it will depend on the type of test program being executed.
Data Compression
Data compression reduces a bit stream into the four-digit number known as the signature. It is implemented in hardware using a 16-bit shift register with linear feedback.
Remember, even the smallest circuit modification will often cause a signature list to be inaccurate for a set of test programs. A new set of reference signatures should be produced. Therefore there is always a need for accurate documentation covering circuit upgrades. By performing some of the lab exercises, signature analysis will become quite clear and easy to understand.
SIGNATURE ANALYSIS LAB 1
(Using the microprocessor lab)
In a free-run mode the path between the data bus and the microprocessor is broken, this allows that all the devices such as the RAM, ROM, AND I/O ports to be read, while the address bus is incrementing without affecting the microprocessor’s function.
NOTE: if the signature doesn’t match the signature in steps B and D, the setup is incorrect, or there is a fault in the kernel (the crystal, the test switch, the power supply, the circuit connected to the microprocessor control pins).
TABLE 1
|
Data Lines |
Address Lines |
|
D0 X |
A0 UUUU A8 HC89 |
|
D1 X |
A1 5555 A9 2H70 |
|
D2 X |
A2 CCCC A10 HPP0 |
|
D3 X |
A3 7F7F A11 1293 |
|
D4 X |
A4 5H21 A12 HAP7 |
|
D5 X |
A5 0AFA A13 3C96 |
|
D6 X |
A6 UPFH A14 3827 |
|
D7 X |
A7 52F8 A15 755P |
SIGNATURE ANALYSIS LAB 2
The signature analysis (SA) test loop is a program permanently stored in the m lab’s ROM mainly to provide a controlled stimulus for signature analysis. The SA switch is connected to an interrupt line on the microprocessor. This test mode also turns all the display segments and output port LED’s on. They indicate the m lab is running the SA test loop program. This loop provides stimulus signals to devices that the microprocessor talks to, for example, the output port, and display port.
TABLE 2
|
Data Lines |
Address Lines |
|
D0 937H |
A0 UU3P A8 9P91 |
|
D1 C072 |
A1 209C A9 0765 |
|
D2 F5A5 |
A2 HHCO A10 0000-B |
|
D3 UA0P |
A3 85A9 A11 1P3H |
|
D4 51H6 |
A4 6F64 A12 1C32 |
|
D5 AUBU |
A5 7A21 A13 7A26 |
|
D6 2PPH |
A6 A2UC A14 0000-B |
|
D7 H011 |
A7 3483 A15 9678 |
The SA READ test mode procedure is basically the same as the WRITE mode except that the clock lead is moved to the READ slot.
Summary
In the above experiments we have learned how to minimize and isolate the fault location, incorporating a free-run mode and SA test loop program. To perform the task we only require the power supply, the test switch and the circuit directly connected to the microprocessor control pin to be functioning. Once this system is verified the SA test loop program is used to test some of the devices that can not be tested by the free-run mode.
Questions
Answers
