|
||||||||||||
Modeling Boats Written by: Matthew Sebring |
||||||||||||
| Before being able to start creating boats
for Virtual Sailor you must first be able to read and
understand a "line drawing" or the style of
plans used to plot various points on the surface of a
hull. Through a combination of various view and angles, a
line drawing can tell its examiner almost anything from
the overall appearance of the boat to the particulars of
constructing it. One can even calculate a boat's
performance on the water just by taking various bit of
information into mind. For all of the examples appearing on this page I am using a simplified drawing of a "pram" that was based on my memories of the Nymph, a small boat designed by Phil Bolger. Prams are simple utilitarian rowboats with a transom, or blunt end, at each end. They are a fairly popular design which appears in forms ranging from the "Optimist", an extremely popular racing class of sailboat, to the typical "Johnboat" with which all hunters and fishermen in America are familiar. Prams are not typically round in cross-section but instead have several corners or "chines". The Nymph was originally designed to be built from a single sheet of plywood and so was extremely small, measuring a mere seven and a half feet from stem to stern and two feet in beam (width). For simplicity I have extended my version to a length of eight feet and a beam of thirty-two and one half inches. The Nymh is also what is referred to as doubled chined which means that there are two pairs of corners along the boat's cross section. |
||||||||||||
The Views |
||||||||||||
| All line drawings are divided up into three basic parts, each of which displaying the same hull from a different angle. Each of these views contains unique measurements and it is only from combining them all that one can get a real working craft. | ||||||||||||
|
||||||||||||
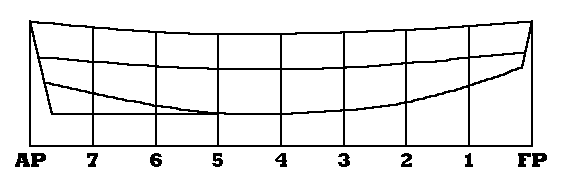
| The illustration above shows the profile, or side view. As you can see, the perspective point for this drawing is from the right (or starboard) side and so the bow (front) is located on the right side of the drawing and the stern is located to the left. Along the bottom of the drawing is a horizontal line known as the base line and it is from this point of reference that the heights are measured. Heights are measured from the baseline, along a vertical line know as a station line to the point where it intersects the point of the boat we are trying to measure. In the above example the height from the baseline to the top edge, or sheer, of the boat along station line 4 is 21.42 inches. This amount is recorded in what is called a Table of Offsets about which I will go into more detail in a short while. The only other point in the above drawing which needs mentioning is the labels "FP" and "AP". FP simply refers to the fore-point or front of the boat and the AP is the aft-point. | ||||||||||||
|
||||||||||||
| The perspective above is known as the plan view. This looks from the top of the boat down and only covers one half of the boat as one half of the boat is just a mirror of the other and so all measurements taken along the same point of reference are duplicated. Like the profile view all measurements are taken vertically along station lines which grown from a baseline though in this case the baseline is also the centerline of the boat. As you can see from the illustration at the top of this page that the station lines in this view are just an extension of the ones in the profile and so are spaced exactly the same. This is important as the same point is measured in both views and it is by plotting those measurements that a 3D model is generated. All measurements taken in this view are referred to as half-breadths as they measure one half of the width of the boat. The half-breadth of the sheer on station 4 is 16.25 inches. This information is also recorded in the table of offsets. |
Table of Offsets |
|||||||||||||||||||||||
Heights |
|||||||||||||||||||||||
AP |
7 |
6 |
5 |
4 |
3 |
2 |
1 |
FP |
|||||||||||||||
Sheer |
23.84 |
22.72 |
21.82 |
21.36 |
21.42 |
21.72 |
22.18 |
22.93 |
23.89 |
||||||||||||||
Chine 1 |
17.02 |
16.15 |
15.30 |
14.73 |
14.62 |
15.02 |
15.82 |
16.90 |
17.97 |
||||||||||||||
Chine 2 |
12.14 |
10.09 |
7.80 |
6.34 |
6.12 |
6.84 |
8.40 |
11.61 |
15.03 |
||||||||||||||
Half-Breadths |
|||||||||||||||||||||||
Sheer |
10.00 |
12.29 |
14.28 |
15.70 |
16.25 |
15.72 |
14.31 |
12.30 |
10.00 |
||||||||||||||
Chine 1 |
10.00 |
11.88 |
13.94 |
15.41 |
16.00 |
15.47 |
14.04 |
12.04 |
10.00 |
||||||||||||||
Chine 2 |
5.00 |
6.51 |
8.25 |
9.50 |
10.00 |
9.55 |
8.33 |
6.63 |
5.00 |
||||||||||||||
| The above table is probably the most important part of a line drawing. It is in this table that each measurement is dutifully recorded in it's corresponding place. While the above measurements are recorded in inches and their decimal parts a more common theme is to use a feet-inches-eighths format. In other words, using this method the measurement of three feet, two and one quarter inches would be recorded like this: 3-2-2. When the measurement is taken to the sixteenth a + or - is added to the end to denote adding or subtracting the sixteenth. For example, the value four feet, one and three sixteenth inches is recorded like this: 4-1-1+. To clarify the measurements appearing in the table of offsets refer to the following illustration. | ||||||||||||||||||
|
||||||||||||||||||
| It is through the values recorded in the table of offsets that a third view entitled the body is plotted. In this drawing everything to the right of the centerline shows how the boat appears from the bow looking aft while everything to the left shows the boat from the stern forward. The illustration below shows the body plan of my adaptation of Nymph and it is with this drawing that I'll conclude my briefing on lofting. At this point I would suggest examining my illustrations and getting a working grasp of what they represent. Look closely at the body view and see how each point is plotted by measuring it's height along the centerline and then measuring out perpendicular to the line to plot it's half breadth. The method by which we reproduce the boat in 3D studio is very similar to this. | ||||||||||||||||||
|
||||||||||||||||||
| Before I conclude this section I want to make it clear that I have only covered chined boats. That is, only boats with corners are plotted exactly in this manner. In drawings for round-bottomed boats some additional lines of reference are added in order to handle the complex curves but otherwise the method of recording the values in the table of offsets and then plotting those values is the same. | ||||||||||||||||||
Creating Boats in 3D Studio |
||||||||||||||||||
| Modeling boats in 3D Studio is time consuming but by no means difficult. Like actual boat building, the key to a well-made hull is precision and patience. In fact, the act of creating a boat in 3D Studio is very similar to the basic concepts of boatbuilding in that there is a set list of things needed to be done in order for all to turn out well. For our purposes I have laid out the following list. I have tried this method and have found that it works well as can be seen in my model of the very plans I have drawn up. I will go into a detailed description of each list item shortly. | ||||||||||||||||||
| Step 1: Convert each number in the table of
offsets to inches with the decimal carried our two
places. For example, the value 3-2-3+ would be 36.44. Step 2: Multiply each number by one hundred and record it in a new table of offsets that you can either print out or hand write to make it referable during the modeling. With the exception of the new numbers in each space the table should be as close as is possible to the original in appearance. Step 4: Start 3D Studio and set the following variables: Click Views>Drawing Aids and set the snap to x, y, and z at 1.0. Click Views>Unit Setup and set it to inches and decimal. Step 5: Set the viewports to top in the top left, top in the top right, left at the bottom left, and user in the bottom right. This is done under Views>Viewports. Step 6: Select Create>Cylinder and set the number of sides to four times the number of chines and the number of facets to one less than the number of stations. Step 7: Select a faceted cylinder for a hard chined boat or smooth for a round-bottomed boat. Step 8: Place the axis on the 0,0,0 position of your drawing window. Step 9: With the axis marking the center of the cylinder draw out its radius to slightly larger than the highest half-breadth number as laid out by the table of offsets. Draw the cylinder length out to one hundred times the number of inches in boat length. Step 10: While working in the end view window delete the upper half of the cylinder by removing both the edges and vertices. Step 11: While still working in the same view delete the lower right corner of the cylinder in the same fashion. Step 12: Rotate the cylinder as is necessary to make viewing it as easy as is possible though only rotate the cylinder about the axis. Do NOT change the layout of the viewports. Step 13: Move the profile view up or down to position it's baseline along the zero axis. Step 14: Beginning with the sheer and working your way down raise or lower each vertex in order to put it in it's correct position according to the table. Step 15: Position the plan view so that the centerline corresponds to the zero axis. Step 16: Beginning with the sheer and working you way in raise or lower each vertex as you did in step 14. Step 17: Mirror the half hull and then attach the two halves together. Step 18: Create a transom by constructing a small box and then deleting the edges to reduce it down to a flat surface as you did in step 10 and 11. Step 19: Divide each edge and weld it to the points on the hull. Step 20: Reduce the hull three dimensionally to only one percent of its original size. Step 21: Apply the textures and mapping and enjoy! You now have a finished hull. If you want to add a deck do it in the same manner you made the transom. |
||||||||||||||||||
| Now that I have given a brief rundown of each step necessary I would like to go back and explain each step with more detail to clarify the intention of the step and more importantly explain why it is done the way it is. | ||||||||||||||||||
| First of all we convert the values to a decimal value to make handling them in the precision oriented 3D Studio far less cumbersome. If we multiply all of the number by one hundred to eliminate the decimal and then produce a model one hundred times as large as it needs be then, with care, the modeled boat will be accurate to the line drawing to the hundredth of an inch. This is also the reason why, in step three, we set the snap values to one for with the scale we are working with the one represent the original hundredth of an inch. | ||||||||||||||||||
| For modeling the boat we need to reproduce the line drawing in a 3D environment and so it is necessary to make our setup as similar as is possible to the original. To do this, we create a different viewpoint in each viewport, each corresponding to one of the views in the plans. The user view in the bottom right is added as a place to manipulate and rotate the boat so that it's possible to determine what one is looking at when it is necessary. | ||||||||||||||||||
| Ok now it gets a bit tricky. First, we are working with a cylinder as it is naturally as close as is possible to cross-section of the finished boat. The number of facets should be equal to one less than the number of stations because in actuality it will count the extra end. For example a two faceted cylinder will have three points in which it can me manipulated, the ones at each end and the one in the middle. Now, the assumption here is that all the stations will be evenly spaced as the frequently are on a boat but if they are not then at some point, and it doesn't really matter when, manipulate the vertices as is necessary to make the station layout correspond to the spacing on the line drawing. | ||||||||||||||||||
| While it may seem strange to set the number of faces on the cylinder to four times the number of chines, the explanation is actually quite simple. Consider the illustration to the right and see why we want this to be so. This view represents the nymph as seen from the end while it is still in the cylinder stage. As you can see if you get rid of the top three sides, this cross-sectional view is almost identical to the body plan of our line drawing. |  |
|||||||||||||||||
 |
Well! It seems we are already to step ten! You are well on your way. It is at this point that we start to really mold or boat. First of all we need to start removing sides, and we do this to further emulate the line drawing. We reduce the entire thing to just the lower left corner because, like the original plans, we will just build half of the boat and let the mirror function do the other half of the work for us. After your creative clipping you should be left with a shape similar to the one illustrated on the left. Note that in the illustration the bottom piece has also been removed. This is because if we mirrored it and attached it to itself as it stands the bottom panel would be twice as big as it should be. Instead, for flat-bottomed boats, add the bottom piece in the same manner I will describe for adding the transom. | |||||||||||||||||
| At his point we have a blank similar in cross section and set to the same length as the boat. We had to multiply the length in inches by one hundred to bring it to the same scale as the rest of our measurements. At this point, determine which of the viewports contains the profile view. In the case of the nymph this view will be similar to the illustration below. In that drawing I have marked each of the vertex in red as well as started to manipulate them so that further on in the text I can explain the manipulation process. | ||||||||||||||||||
 |
||||||||||||||||||
| As you can see in the above illustration that the bow is starting to take shape. At this point I am going to talk you through the process using one vertex as an example. Before we start, you must make sure that the baseline of the drawing reads as close to zero as possible when the cursor is placed over it. I can't tell you which axis it will be because it depends on which viewport you are working but it's the number that will raise or lower when moving the mouse up and down. From here on out the snap also needs to be turned on. Each vertex requires just a few simple steps which listed in order are: | ||||||||||||||||||
| Step 1: Using the zoom window, zoom in twice
on the vertex you will be manipulation. In this view the
snap should work well ensuring accuracy. Step 2: Place the mouse cursor over the vertex and type in the value on a calculator (set it to the memory, as this first value will remain constant as long as you are working on the same line). For example, this value could be 2000. Step 3: Look at the space in the table of offsets which corresponds to the vertex with which we are working. For example, the number under Heights>FP>Sheer reads 2389. Step 4: Subtract the second number from the first to see how much of a difference there is. In the example we are using the difference is -389. Step 5: Select modify>vertex>move and press tab until the arrows indicate that only vertical changes are being made. Step 6: Select the vertex in question and move it either up or down as is needed. If the value derived from step five is a negative then move the vertex up into place otherwise it goes down. Disregard the number in the decimal place as these measure our to the thousandth and ten-thousandth which is a level of accuracy beyond what we need. If you positioned the baseline exactly on the zero axis then there will be no decimal. Continuing our above example, we would need to move the vertex up 389 to put it in the correct place. Step 7: Press Ctrl-Z to zoom out and center the drawing and then repeat the process for the next vertex along the same line. |
||||||||||||||||||
| After completing the above process for each point along the sheer, move down to the next line and do it over again. This needs to be done for each horizontal line. After completing this entire process the profile view should match the original line drawing exactly. Repeat this whole process in the plan view and you will have a finished half hull model of your boat. | ||||||||||||||||||
| After you have finished making a half hull model of your boat you need to mirror it and attach it to the original using the Create>Object>Attach feature to produce the finished hull. | ||||||||||||||||||
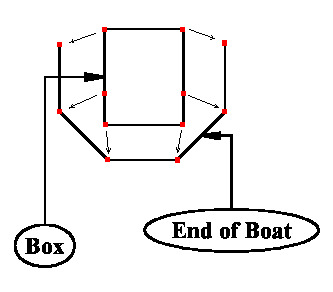
| To add a transom, deck, or bottom to the boat a simple process of producing a rectangle and then clipping it into place is used. Look at the illustration and follow the simple steps to make a perfect and seamless attachment. Note that the drawing has been over simplified to make the process obvious. Also, if the surface you are adding is curved (like the bottom of the Nymph) begin with a cylinder with the same number of segments as the cylinder you used to create the boat instead of the box the following directions recommend. | ||||||||||||||||||
| Step 1: Draw a box which is smaller than the
opening to which you are attaching it. Step 2: As you did for the cylinder, delete the edges to make it a single square. Step 3: Select Modify>Edge>Divide and add an extra vertex wherever one is needed. In the illustration you will note the extra vertex on each vertical line. |
|
|||||||||||||||||
| Step 4: Select Create>Object>Attach
and attach the newly made square to the existing boat. Step 5: Select Modify>Vertex>Weld and weld the vertices to their correct places. To illustrate this further, look at the above drawing and note where the small arrows are pointed. If you weld them correctly you will get a perfectly fitting transom. |
||||||||||||||||||
| That's all! You should now have a perfectly made hull that duplicates the original drawing exactly! Enjoy the boat building process, it may be time consuming but the end result is truly something to be proud of. Also, as somewhat of a postscript you will notice I didn't go into detail on round bottomed boat construction. The process is almost identical though there are some differences in the line drawings. I challenge the reader to figure out how to do well-formed round-bottomed boats but I assure you it is possible. | ||||||||||||||||||