ADDING PICTURES
The first thing you should know about putting pictures online is that you can only have images that are JPGs, GIFs, PNGs, etc. No BMPs! Yeah I know, that's what you probably have a bunch of on your computer and it's a shame you can't use them, but it's not the end of the world.
You can't just change the name of the picture to make it display online. For example, you wouldn't change sunshine.bmp to sunshine.jpg or sunshine.gif to make it display online. You need a program that would save a Bitmap (something.BMP) as a GIF (something.GIF) or JPG (something.JPG). You can find Irfan on download.com if ya search for it there, but that's not a very good program for actually EDITING the picture. Most of those you need to pay for. Grr. BUT for those who have a scanner, my scanner came with a really good image editing program, which could save an image as GIF, JPG, PNG, anything, so maybe yours would too. (My scanner's a Microtek SlimScan C6 and came with Ulead PhotoImpact 4.2. Good stuff.)
Another really important thing you need to know to add pictures to your site is that they must be UPLOADED from your computer to your webshell. If you're still using that advanced editor we've talked so much about, press the Save button below it's text area and you'll return back to your normal ol' webshell. When you've returned to your webshell, it's time to upload an image or 10. I suggest you click on where it says /images and click Open near where it says Directory. Tis better to put the images there then to leave em scattered around all over the place, eh?
Note: The picture below has nothing to do with this paragraph, but the next.
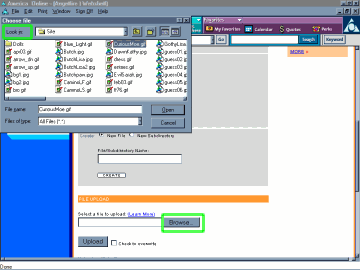
To upload a picture (or anything for that matter), click Browse (shown in the second little green box), and a window like the one on the upper-left of the picture will pop-up, pretty much asking you which one to upload. You can find some other images by clicking the drop box to the right of the first green box. When you find the one you want, select it and press Enter on your keyboard. Now the pop-up will go away and you can click Upload, which is right near Browse (which I put in a little green box).
Once Angelfire uploads that image for ya, it'll take you back to your image directory (which would be /images, unless you changed it). You can also go to a page where you can upload 10 images the way I showed ya, by clicking the link under the Upload button. Now that the image is saved there, we have to go to the editor for the page you want it to display in and well.. make it display!

