
Note: All pipes are 3/4" except for the handles. I decided to use 1/2" pipes for those so that I could put a good padded grip around them without them becoming too wide. You could use 3/4" if you want to.
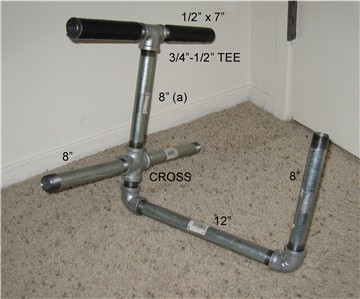
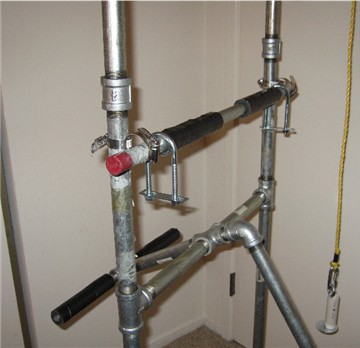
1. Assemble the weight carriage as shown. Tighten as much as possible. A pipe wrench is a needed item for this project. Also, use leverage. Use some of the other longer pipes temporarily for leverage. Put your weight into tightening the pipes. At the same time, try to keep the configuration of the assembly as pictured. Once things are tight, you can then square things off. Because all parts oppose each other in this design, don't worry about turning things back a quarter or half a turn.
You can add grips as shown in the picture at any time, or none at all. I made my grips from a couple of cut-to-size mouse pads and then wrapped them with electrician's tape.
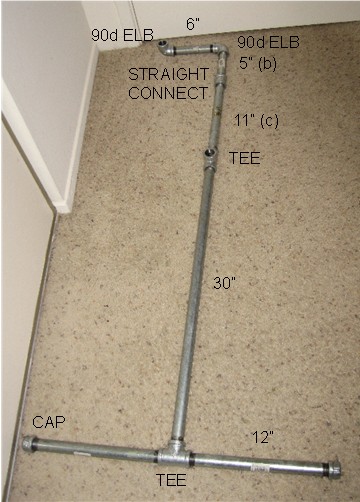
2. Assemble both sides as shown. Each side should be a mirror image of the other. The side shown here is to hold the PVC Wrist roller. If you choose to use the alternative wrist roller (see below), you will not have pipes sticking out at 90 degrees at the top, you will have one 1"-3/4" reducer at the top.
While assembling the sides, try to tighten them both up evenly. There are actually six connections to each side, and you don't want to end up with the top elbow higher than the other.

3. Cut a 16 1/2" length of 1 1/4" PVC pipe and drill a hole in the center the same diameter or slightly larger as the rope you are going to use. Feed some rope through the hole and when it comes out the end, tie a tight knot and secure it with some elecrician's tape. Pull the rope back through the hole until the knot is up against the hole inside the pipe. The 16 1/2" length will give you just enough room to get in there with a pipe wrench on one end or the other of the 18" pipe as you assemble this device.
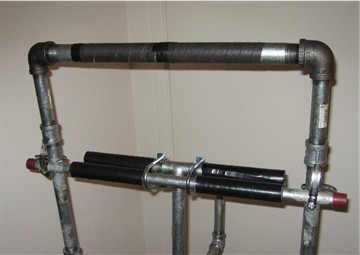
ALTERNATIVE WRIST ROLLER: Instead of installing the wrist roller on this machine, you might want to do what I ultimately did, which is to simply have a pipe running across the top. You grab hold of this pipe and screw it into one elbow, hand over hand, as tightly as possible, and then grab hold of it with both hands and turn until it is screwed into the elbow as tightly as you can possibly make it. Then you loosen it and screw it into the other elbow, again, as tightly as possible. Go back and forth continuously a few times and see how your forearms feel! I find this to be extremely effective! This works both the tops and undersides of your forearms. Spray some WD-40 on the threads to allow you to get the pipe screwed in as far as you can.
I got this idea when I suddenly realized that after taking apart and reassembling this contraption a half a dozen times, my forearms felt like balloons. So, I removed the top 90 degree assembly and replaced it with two 1�-3/4� reducing elbows and a 1� x 18� pipe. I wanted a wider grip than the �� pipes afford. I wrapped the pipe with some tennis racket overgrip for a real tacky grip to grab hold of.

4. Lay one of the sides down and spray some WD-40 or apply some oil into the top elbow and the tee and then screw the weight carriage into the tee and the 18" pipe into the top elbow. Tighten them both up as much as possible. We want a lotta thread in those connections. Remember to place the PVC wrist roller over the pipe before attaching the other side, if that is the design you are going with.
Now comes the fun part. Your mission is to connect the 18" pipe and the weight carriage to the other side while retaining as much thread in each connection as possible. The best way to do this is to stand both sides up and align the unconnected side with the threads of the weight carriage and the 18" pipe. Stand perpendicular to the side with the pipe and carriage attached and brace it against yourself. With pipe wrench ready in one hand, reach out with the other hand and cup the elbow at the top of the other side and guide the 18" pipe into it. Now hold that elbow as you loosen the 18" pipe on one side to thread it into the other. Try to make a connection as early on as you can. You don't want to loosen too much of the pipe before it has begun threading into the other side. If this happens, tighten the pipe back up again and start over. This is a once in a lifetime operation, so get it right.
Once the connection is made, keep turning the pipe until the weight carriage has been drawn up to its tee, and then start screwing that into place, again getting that connection going from the start. Go back and forth between the 18" pipe and the weight carriage, turning them both until there is an even amount of thread showing on each side of those items.
What you are doing is loosening the pipes from one side as you screw them into the other side. It doesn't matter that the connections are now a bit loose. You want the weight carriage to be able to swing. The 18" pipe is a bit longer than the two 8" pipes and tee on the weight carriage, so it has a deeper thread connection on both sides. You will be stabalizing the device in the next step, anyway.
I successfully performed this operation by myself, but it sure would have been nice to have had someone there to help me.
Now do the final squaring and adjusting.

5. Open up a hose clamp and place it through another hose clamp and then attach it to the approximate location on the vertical pipe where you will be placing your hands. You can determine that by rotating the weight carriage up. Tighten the clamp on the vertical pipe just enough to hold it there. Tighten the other clamp up until its diameter is slightly larger than the 1/2" x 24" pipe that you will use as the stationary handle.
6. Assemble two U-bolts. Use stop nuts instead of the nuts that came with the U-bolts. U-bolts come in all sizes and lengths. When buying your U-bolts, select a size that best suits the purpose. The U-bolts I got are 1-3/8" x 3-11/16". This particular size may or may not be available to you.
Place the assembled U-bolts over the 1/2" x 24" pipe and slip the ends of the pipe through the two hose clamps. Evenly position the pipe on the device and then tighten the hose clamps on either end of the 24" pipe.
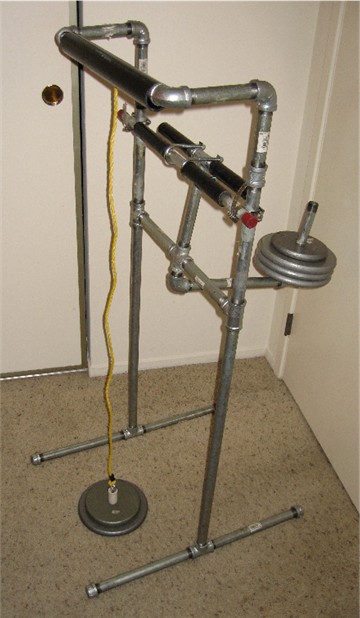
Rotate the weight carriage up and slip the other ends of the U-bolts over the weight carriage handles and then slide them towards the center. Now, using the picture at the top for refernce, locate your 24" pipe where you want it and tighten the hose clamps around the vertical pipes.
Concerning pipe lengths - Looking back over the pictures, you'll see that three pipes are labled a,b, and c. These are personal preference lengths. At my height, 5'-9", my forearms are pretty perpendicular to the floor when I grab hold of the gripper, which is just how I want them. The 8" length of pipe 'a' is just right for me. If you are taller, you may want to use a longer pipe on the weight carriage, in which case, you might need a longer pipe 'c', as well. If you are particularly tall, you might want to use 36" pipes at the bottom rather than 30" pipes, and a shorter pipe 'a', and so on. Keep in mind that the longer pipe 'a' is, the more leverage you have and the more weight is needed. The shorter that pipe, the less weight you need. As reference, my grip bar is 42" off the floor @ center.

7. Here's how I made a weight stack for the wrist roller. Assemble a 1/4" eyebolt of any length of your choosing with a 3/4" length of PVC cut to size, a stop nut, 1/4" washer, and fender washer as shown. You could also make a weight stack from a 1" wooden dowel as seen at the top of the Grip l page.
ok. So you're done.
I've loaded my machine up with a hundred pounds, and it's working just fine. I can, therefor, vouch for the machine's strength up to that weight. However, I can't say how much stress this machine will ultimately withstand. Now that I'm using it, I will STRONGLY suggest the following changes:
1. Use 1" piping instead of 3/4". For all I know, I could load another 100 lbs. on this thing and it will hold up just fine, but I think I'd feel more comfortable if it were made of 1" pipe. A 3/4" pipe looked like the strongest thing in the world while holding it in the hardware store, but seeing it now supporting 100 lbs., those pipes look just a bit spindly. You will need a 1"-3/4" reducer on the end of the weight bar to attach a 3/4" pipe for a weight stack. For some mega-grippers out there, I'd go with even heavier pipes.
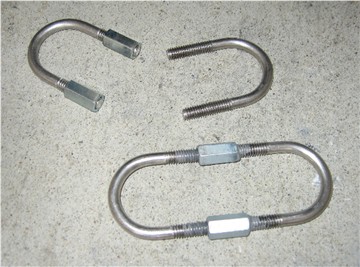
2. The steel plates on the U-bolts have bent a bit. That could simply mean that they have conformed to the contour of the pipe and will go no further. At any rate, I made a solid, strong link by combining U-bolts with coupling nuts and JB Weld, as shown. Go to the Useful Info page for directions.
3. Use 18" pipes instead of 12" pipes at the bottom on the side of the machine that is supporting the weight, to insure that the machine won't tip over.

4. Instead of using hose clamps to attach the grip handle, use the method shown here which is much more secure and strong. A description of this is found on the Useful Info page.
5. Add a 3/4" x 24" pipe as a safety bar 6"-8" below the weight carriage running horizontally and attached to the vertical side pipes. Attach it in the same manner as the grip handle using the right angle coupler as shown in the pic. Attach the pipe on THE SAME SIDE OF THE MACHINE THAT THE WEIGHT IS ON. Take a look at where that weight bar is headed if the carriage were to ever break loose.
o.k. So, knowing all of the above, you could follow the instructions as shown, just incorporating the recommended changes. I am going to continue using my machine, but I plan to rebuild it using 1" pipes at some point in the future, and when I do, I will replace the pictures shown here.
