
My Ivanko now has a nice, comfortable grip enabling me to use more resistance.
I was going through our kitchen cabinets to get rid of some stuff, when, lo and behold! There appeared from the back of the top shelf an old coffee cup surrounded by a 6" x 1/4" soft rubber casing! I slipped that casing off the cup and cut it to size and then laminated it to the handle of my Ivanko gripper with rubber cement! Realizing I could also use some padding on the other side, I took an old mouse pad, cut it to size, and laminated that.

Don't move up to the next Captain of Crunch Level until you are really ready!
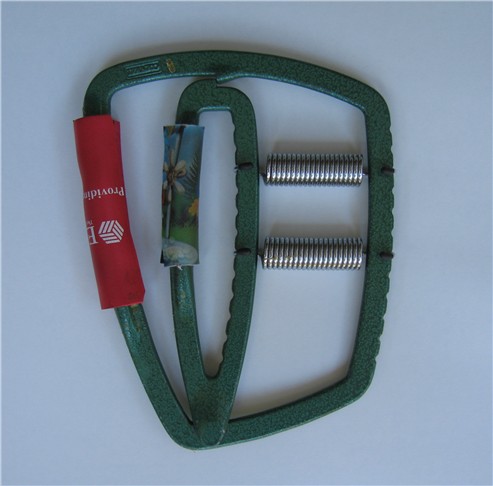
By simply tightening a hose clamp at the top of the spring of your C.O.C. Gripper, you can increase its resistance by up to 75%!
- contributed by BLOBERT

Here's a real effective leverage exerciser! Run a 40" rope through two 9" long 3/4" PVC pipes and secure the rope at the ends of the pipes. You could slip the ends through a couple of washers and tie a knot, or simply tie a large knot. Make sure that the edges of the PVC are thoroughly smoothed and rounded with sandpaper, inside and out. From the center of the rope, suspend a carabinger and attach a weight to it. Grab hold of the PVC pipes at the bottoms and rotate your hands outward, lifting the weight. Invert the pipes so that the bottoms are facing upward, grab hold of those ends and rotate your hands inward.

carabingerTo make a weight stack, drill either end of a 6" length of 1" dowel for guide holes. On one end, attach an eye screw. On the other end, attach anything with a hole in it for a support - a fender washer, a piece of wood, a sanding disc mount.
See the Miscellaneous page for hand grip ideas.
- gruntbrain

My Personal Ultra Deluxe Super Kick-Ass Two-Fisted Leverage Machine
Leverage 2

My free standing Deviation tool. I just walk up to it, lift it, and perform hammer to the front leverages. And then I back into it, lift it and perform hammer to the rear leverages. Having it free standing makes it easy to pick it up for the rear work. Every little bit you can do to save the hassle of getting set up for an exercise makes your workouts more efficient.
Leverage 3

I call this
THE HAMMERHEAD
3/4" (I.D.) pipes - 6" handle, 12" length, and (2) 3" extensions held together with a 45 degree elbow and a tee. Stack plates on either extension and perform a myriad of leverage exercises.For this, I wanted a wide, cusiony grip. I first wrapped a length of double-stick foam tape around the handle. Next, I wrapped a sheet of 1/4" thick soft rubber (not foam rubber) around the foam tape. And then I wrapped that with tennis racket wrap.
Leverage 4
Pronation Machine

What you do with this exerciser is to grab hold of the two handles and hold the device in front of you with your forearms parallel to the floor. From there, rotate your fists inward for pronation exercise. The advantage to this machine is that the handles are held in place as they rotate around piping nipples attached to the elbows of the 12" central pipe.
Here's how to make it:
All pipes and connections are 3/4".

1. Screw an elbow to either end of a 12" pipe so that the open ends of the elbows are facing the same direction. Screw the elbows on as thightly as possible.
It is advantageous to have a couple of long pipes and extra connectors on hand to use for tightening pipes and connections together using leverage. Note that there are caps on the ends of the long pipes. That's so that when you lay this assembly down on a flat surface, all connectors will be on the same plane. After tightening elbows to the 12" pipe, lay the assembly with the temporary long pipes on a flat surface, and then step on it to flatten everything down and square things off. Remove the long pipes.

2. Put together the assembly shown to the left with all components screwed together as tightly as possible. Again, using long pipes as leverage, makes this possible. First, attach the elbows to the 2 1/2" pipe and tighten as much as possible, and square off that assembly. Then add the nipple and third elbow, tighten and squre off.

3. Screw nipples hand tight into the elbows on the ends of the 12" pipe. Screw the assemblies to the nipples, just one or two full turns. You want theses assemblies to be able to freely rotate.

4. Connect a 12" pipe to a 4" pipe with a straight connector. These components do not have to be tightened together as much as possible. Hand tight with a possible further nudge with a pipe wrench is fine. Make two of these.
5. Using the picture at the top as a guide, finish the exerciser. Cut two 6" lengths of foam piping insulation and slip them over the two 12" pipes for handles. hand tighten these 12" pipe assemblies into the two open elbws. Hand tight or pipe wrench tight is fine. Slip weight plates over the 4" pipe and hold them in place with end caps.
Sledge Hammer

This custom Medeival Monster is easy to make. Just screw three lengths of 3/4" piping into a tee. The handle can be any length you want - 12", 24", 30", 36". You can use any lengths of pipes for the weight stacks and pile on as many plates as you want. Use a good amount of thread tape and make the connections tight! You wouldn't want the head flying off of this thing while flinging it around. The caps are more or less for a finished look, although they wouldn't be a bad idea to have on the ends of a threaded pipe just in case the hammer should land someplace unexpectedly.

You could also make a one-stack hammer by using a straight connector instead of a tee, and stack plates on the end.
You can use any type of collars you want. The ones depicted are made of 1" lengths of 1" dia rubber utility hose secured with hose clamps. These won't budge! Tighten them with a wrench for maximum compression.

Make a permanent weighted hammer. Select pipes of lengths such that when the plates are added, the end plates extend partially into the threads. Epoxy caps to those threads.
For a grip, see the Useful Info page for ideas. The graphic shown here depicts a wrapped leather handle For that Norse feel.PLEASE NOTE!: This device is meant to be used as a leverage exerciser, not a bona-fide hammer.
- contributed by BLOBERT
The Ultimate Adjusto-Club


Materials: one Spinlock barbell, from Play It Again Sports or other used place, or maybe Craigslist. One extra set of spinlock collars, (which they actually gave me, although you could also get one spinlock DB handle with collars and use that.) Two clevis pins (5/16" pin with spaced holes) two clips to hold the pins. Scrap piece of 1 1/4" (I think) black iron pipe for thickening handle. Tension pins for holding the sleeves on. Two wooden balls from a craft store.
Cut the ends off of the barbell, leaving about 10" of bar on each end for a handle. Put on a sleeve of black iron pipe and epoxy and pin it in place. Leave about 1 1/2" of original barbell sticking out for the ball end. Drill out the wooden balls to fit the ends and epoxy them on as well. At the end of the spinlock threading, drill a 5/16" hole for the clevis pin. Cut the clevis pin to length so just enough sticks out to put a clip on it. This is necessary for my safety obsessiveness. If the collars start to get loose you'll hear the plates rattling before anything awful happens, but this pin makes it ABSOLUTELY impossible for the collar to spin off the end and allow the plates to go flying. See the second pic for how this works.
That's it. Each barbell makes a matched pair of clubs. I like them a lot. The long threading makes it possible for you to keep the same weight but vary the leverage by moving the plates closer or farther away. You can also choke up on the handle. The handle is extra-long so that you can load up a very heavy club and go two-handed on it. This is also why you can't rely just on epoxy for the iron sleeve; you MUST drill and pin it in place.
I might add that the reason I made it so overdone safety-wise was so that you could do all of the ballistic (swinging, etc) Indian club moves with it, in addition to the obvious wrist leverage stuff.
- contributed by Jeff from NC
Wrist Roller


This is one of your major forearm developers and it is so easy and inexpensive to make. Cut a 16" length, or so, of 1 1/2" PVC pipe (or 1", if you prefer) and drill a hole in the center the same diameter as or slightly larger than the rope you are going to use. Feed some rope through the hole and when it comes out the end, tie a tight knot and secure it with some elecrician's tape. Pull the rope back through the hole until the knot is up against the hole inside the pipe.
For a weight stack, you could make one from a 1" wood dowel as shown near the top of this page, or you could simply assemble a 1/4" eyebolt of any length of your choosing with a 3/4" length of PVC cut to size, a stop nut, 1/4" washer, and fender washer as shown above.
I personally find a wrist roller to be much more effective when used with an arm blaster.
The above finished wrist roller was made by CW
Here's another way to make a wrist roller without having to drill a hole. Wrap a pipe with athletic tape (which provides a grip) and then tie a length of webbing to the pipe with a slip knot. A couple of turns around the pipe, and the webbing is held securely and will not slip. This is especially useful if you are going to have your wrist roller rotate around a pipe or a steel bar. There is no knot inside the wrist roller to create an annoyance.
Here's an example of a wide length of ABS pipe being used as a "jar twister".
Ultimate Wrist Roller
I consider this to be the ultimate wrist roller. The webbing is attached to a central 3/4" plastic threaded pipe with fender washers on either side which keep the webbing centered in place as you roll the weight up. The handles are 1 1/2" pipes wrapped with tennis racket wrap. Using a wrist roller with an arm blaster gives it a whole new dimension of hurt.
Wrist Roller

This is a forearm worker thing. The lowest plate, which holds the stack of plates, can be removed in seconds by moving the loop to the other side and slipping the cord and ring back through the hole. Then the other plates can be removed/added.
Alternative - I've made an improvement on the retaining end of my forearm strengthening twister/rollup thing. Installing the piece of 1/2" ID x 4.75" PVC makes changing plates exponentially [sic] faster. If the old way took 6 seconds, this way only takes as long as needed to turn the PVC pipe to slide through the hole. Maybe one or two seconds, tops. So slick!
- mikey
Hand-Held Wrist Roller

After having made several hand-held wrist rollers utilizing various materials and designs, I have finally put together the ultimate wrist roller!This puppy meets all of my stringent requirements:
- Unlimited Resistance. You can tighten it up to the point to where it cannot be budged!
- It will not slip or lose resistance while being used!
- The action is smooth and unbinding!
I have always had an affinity for hand-held wrist rollers, as they provide a powerful forearm workout, allowing overhand and underhand wrist curls simultaneously. And you can pack them for a vacation. Because of this, I was always on the lookout for that perfect wrist roller. I went through six commercial wrist rollers and each one of them has had its flaws - either they would loose resistance while being used, or they couldn't provide enough resistance, or the mechanisms would fail, or they would snag and bind, or all of the above. A couple of them weren't even worth the cost of postage.
The wrist roller pictured above has none of these flaws and I can confidently say that it is the best wrist roller you'll ever wrap your mitts around!
Materials for this exerciser cost around $20.
Here's what you need to make it:
1) 3" length of 1 1/2" ABS pipe
Approximately a foot of 1 1/2" webbing, or two sheets of Dr. Scholl's Moleskin - there are three sheets to a package.
1) 3" x 1 1/2" pipe clamp
2) 1 1/2" x 8" stainless steel sink tailpieces for the handles
Tennis wracket overgrip (or any other grip material of your choosing)
1) clamping knob (optional)
Here's how you make it:

Cut a 3" length of 1 1/2" ABS in half, lengthwise, and then laminate 2 lengths of 1 1/2" webbing, side by side, to the insides of each half. All you need are a few dabs of Super Glue - just enough to hold the webbing. Be careful not to overlap the webbing, and that the webbing doesn't extend up past the sides of rhe ABS. After cutting the webbing to the proper lengths, singe the cut edges with a flame to seal them.

ALTERNATIVE TO WEBBING: I recently made another device using Dr. Scholl's padded Mole Skin, found in most pharmacies or Walmart, on the inside surface of the ABS instead of laminating webbing. This seems to work just as well, so use whichever is easiest for you to obtain. The mole skin doesn't have to be padded, it just happens to be what was available.
Here is the best way I found to cut the two halves:

Cut a length of 1 1/2" ABS so that it will fit snugly in a mitre box. This way it will be held firmly in place while you cut the pipe lengthwise. For the first cut, cut a slot 1/8"-1/4" wide, as shown, and then one cut on the other side to cut the pipe in half, lengthwise.

Cut the halves to 3" lengths. De-burr the cut halves and sand the rough edges.
Continuing on:

Tape one edge of the two ABS halves together. You can use any kind of tape you want. I just happened to use athletic tape.

Enclose the ABS around the stainless steel pipes and then place the pipe clamp around the ABS.

You could either put the whole thing together as shown in the picture above using the nut that was provided with the pipe clamp to adjust the resistance, in which case, you'll want to keep a wrench on hand, or you could saw the carriage bolt to a length of 2 1/8" (measured from the upper flat surface of the head of the bolt, not the overall length), as shown to the left, and use a clamping knob to adjust the resistance. Note that I have placed the nut on the bolt while I cut the bolt with a hack saw. This is so that I can turn the nut back and forth over the cut end, ensuring that I will be able to screw the clamping knob over the bolt.BTW, the Babco vice shown cost me about thirteen dollars at OSH and has come in handy for scores of projects.
I found that different manufacturers of pipe clamps use different sizes of bolts. I found one clamp on which the bolt was 7/16". The clamp that I bought from Ace Hardware has a 3/8" bolt. I was also able to find a 3/8" clamping knob at Ace. If I had been unable to find a clamping knob of the right size, I would have made one by gluing a coupling nut to the center of a cap with Super Glue, and then filling the cap with plastic resin as shown here.
- Shenandoah
Leverage Roller

This device combimes 6 different exercises into one unit. Hold the straight handle like a screwdriver, out away from you, with the handle unit towards you. Grab hold of the handle unit, and rotate it back and forth for pronation/supination exercises. Hold the device straight out in front of you and do overhand/underhand curls with the straight handle while rotating the handle unit up and towards you, and then down and away from you for ulnar/radial deviation exercises.
Click Here to see how to make the Leverage Roller
- Shenandoah
Pipefitter Forearms

This guy is a Mega Forearm blaster. The 1", padded tennis racket grip wrapped pipe is screwed into the 1"- 3/4" reducer elbows on either end so that as soon as you start loosening it from one elbow, it starts tightening into the other elbow. It works both your overhand and underhand wrists. It's effectiveness lies in the ever increasing resistance as you tighten the pipe into an end, which then goes to an isometric, and then you need all of your hand strength to break it free. I'm hard pressed to do more than ten reps back and forth at a time. You can also stand on one end and turn the pipe back and forth with one hand like a screw driver. I got the idea for this once when I had screwed a whole bunch of pipes together by hand. My forearms felt like they were going to explode.
Anyone thinking of making this, it is important that the heights of the stand-ups be the same on either end. As well as clamping it, as shown above, you could mount the flanges to a surface, or to a board which could be mounted to a wall. Mounting the flanges to a board would also enable you to clamp it down to surfaces you don't want marred - a table top, a counter top. You could laminate rubber or felt to the underside of the board.
Pipefitter Forearms II

To use this device, you grip the plastic 1" pipe on the left with one hand, and the steel 1" pipe on the right with the other hand. Turning the steel pipe with an underhand curl, tightly screw the pipe into the top elbow. With an overhand curl, break the steel pipe free (good luck with that) and continue turning the pipe until it is tightly screwed into the bottom elbow. As the pipe is loosened from one elbow, it tightens into the other elbow, and the plastic pipe has to be gripped tightly while turning the steel pipe. Continue screwing the steel pipe back and forth into the elbows until your forearm reaches a critical state of pump and burn. Switch hands and repeat.

To make this forearm destroyer, first tightly screw 1"-3/4" elbows onto the ends of two 3/4" x 6" (or shorter pipes, if you prefer) plastic pipes. Make sure that the elbows are aligned with each other and that the elbows on the two pipes are the same distance apart.

Apply a liberal amount of Goop cement to the threads of a 1" x 6" plastic pipe and tightly hand screw it into an elbow. Tightly hand screw a steel 1" x 6" pipe into the other elbow. Align the elbows on the other 3/4" plastic pipe assembly with the 1" pipes, liberally apply Goop cement to the threads of the plastic pipe, and screw that end into the elbow (unscrewing it from the other elbow), while at the same time, screwing the steel pipe into the adjacent elbow. Stop when both pipes are evenly screwed between one elbow and the other. This will result in the steel pipe fitting loosely between the two elbows and will enable it to be screwed back and forth into its elbows. Allow the Goop to set before using.
Plastic pipes are used because, structurally, there is no need for steel, they cost less, and are lightweight. The steel pipe is used because it turns smoothly into the threads of the elbows.

I wrapped my handle with chap leather for a grip. Tennis racket wrap would work great.
Pinch Roller

Take about an 18" long 4 x 4 and cut a groove around the middle of it so that the center of the 4 x 4 is relatively round. You could use a round file, or a rotary tool, or even a lathe, if you've got one. Drill a hole through the middle of the groove, slip a rope through the hole, tie a knot on one end to hold the rope onto the 4 x 4, and attach weights to the other end.
Use thumbs and forefingers to roll the weight up.
- Contributed by Fred Hutchinson
Puck Pinch Blocks

In Canada we have many hockey pucks, and they are one of our most treasured natural resources.
Here, I have modifed two such hockey pucks with a couple of eye bolts and 2 washers to make a pinch grip block, and a hub pinch block.
- contributed by WildGorillaMan
Pinch Knobs Here's a great forearm strengthening device made by phxbigdog. Using a drawer knob, he fasioned this powerful exerciser. Notice also his homemade weight stack. Go to The Big Dawg's site, Poor Man's Corner to find more of his creative ideas.


Deloading Platform

I screwed 4 eye bolts into the corners of a piece of wood. I tied rope to the bolts, then ran it through two pulleys attached to either side of a squat rack. Pulleys suspended from a ceiling would also work. Just put a fixed object (like the Blob or the Inch) on the platform, then tie weights to the other ends of the rope. You're always lifting the actual object you're training for, and you remove the counterweights as you get stronger.
As well as utilizing pulleys as shown, the ropes could also be simply looped over the pins of a power rack.
This same concept could also be applied to dip or chin assists.
- contributed by SqeezeMasterFlash
Aikido Grip
(New and Improved!)

I'm calling this Aikido Grip because this device will build tremendous tensile strength in your fingers as well as ripping your forearms to shreds in the process. Ideal for Martial Artists involved in the grappling arts! This device will build those finger and forearm muscles that are directly used in grappling. Great for building pinching strength! What you do with this device is to is take hold of the handles with your thumbs and finger tips and twist them back and forth in opposite directions. This thing is the ultimate in "Jar Twisting"!The materials and mechanisms used for the Hand-Held Wrist Roller found on the Grip I page are perfect. I applied the same mechanism to this device. Unlimited resistance! You can tighten this baby up 'til the cows come home! It will not lose resistance while being utilized, and it will not slip or bind
The device seen being demonstrated in the above picture is an older version. The new Aikido Grip is a vast improvement!
Click Here to see how to make the Aikido Grip
- Shenandoah
Aikido Power Grip

This device puts a whole new spin on both the Aikido Grip and a DynaFlex! For those who use a DynaFlex or a Powerball know, a tremendous amount of gripping power is required once that gyro is spinning at top speed. Imagine the power needed when using only your finger tips! This device will most definitely build tremendous pinching power and tensile strength in your fingers.
Click Here to see how to make the Aikido Power Grip
- Shenandoah
The LWC
The Leverage Wrist Curl
Here's a piece of equipment that combines the best elements of wrist curling and leverage into one mega forearm buster. The materials for the device shown below cost less than $20 and took 4 hours to build.
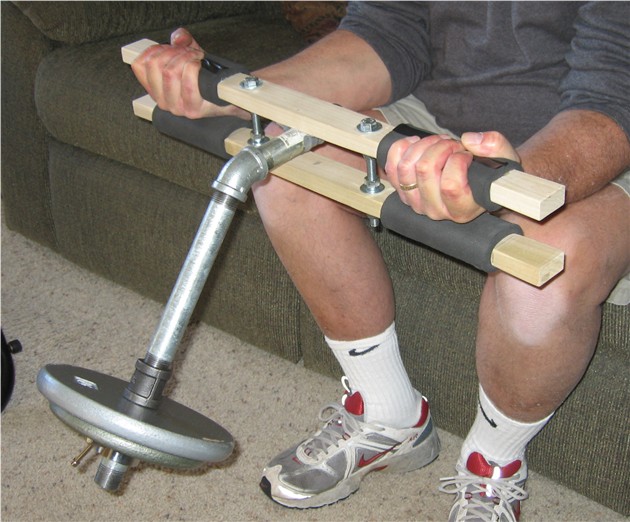
The advantage of this device is that the wide, flat grip together with the outward/downward pull of the resistance places all of the stress at the outer edge of the lifting bar, maximizing the effectiveness of underhand and overhand wrist curls. Either one or the other padded grip bar braces the backs of your hands, holding the device in place while you perform wrist curls. Grab hold of the bottom handles for overhand curls.
There are two key features I like about the above design. One is that the grips are wide enough to utilize the LWC principal, yet are just narrow enough to get your hands around. The other is, by using bolts as spacers, the spacing can be precision adjusted to suit.
Click Here to See How This LWC was Made
- Shenandoah
More LWC�s!

This fine piece of precision equipment was built by BLOBERT from over at Power & Bulk . True to the ethical standards of the home equipment builder, the wood came from a scrap pile. And note the duct-taped towels. Hey! Using whatever works and can be found around the house is the very essence of home fitness equipment building in its finest tradition!Sophie isn't a part of the structure.

In building this sturdy LWC, aptdwler opted for a bold splash of vibrant colors accented with a frivolous swirly sort of pattern. Being an iron-pumping animal doesn't mean you can't also have a keen sense of aesthetics.Actually, aptdwler is Lord and Master of the Other Homemade Equipment Site with Tons of OUTSTANDING homemade fitness ideas. Go to his site to see how he made his LWC as well as to find a whole myriad of great ideas.

This LWC built by perrymk is the very essence of simplicity. It cuts right through the maze of piping and goes straight for the extended resistance. And no collars to remove. Simply stack plates right over the pipe. The three holes on the extension allow for the same weight to be used at three different resistance levels. Those who are familiar with leverage know the significance of micro-weight.Also, the top board has been wedged from behind, causing it to tilt forward to conform to the thicker back end of a person's hands

The pachyderm influence is clearly evident in this design by Norrin. Instead of flush mounting the piping to the face of the LWC, the center board is extended out to form a platform and the piping is mounted to that. Ingenious.
LWC II


This is too easy. Use 3/4" pipes and fittings. The handles can be any length you want. I'm using 12" pipes for the handles simply because I had them on hand. You could even build this LWC from PVC if you wanted to. For the padding, I used 1/2" thick soft rubber (not foam rubber). To attach the rubber, I cut four sheets to size, ran a bead of Crazy Glue along one edge, pressed it down on the pipe until it dried, rolled the other edge up and around and glued that.
Incredible! Materials for this device cost next to nothing, it took virtually no time to make, and it is the most effective wrist curling exerciser you'll ever get your hands on!
HAHAHAHAHA! This is my "Rube Goldberg" LWC ll. I put this together just to show that I could match any commercial exerciser of this type. The only difference between this one and the one pictured above is the 45 degree relationship between the upper and lower handles. Other than that, the two function exactly alike.
This is it, LWC fans! This structural marvel built by perrymk has out-rubed Rube Goldberg and deserves a classification all its own - The LWC lll!
As it turns out, the "Rube Goldberg" LWC ll shown above is actually more effective and better balanced than the original LWC ll, but with all those connections, it's virtually impossible to get all the pipes tight and straight. So, Perry has taken our design and applied one of the world's greatest bargains - PVC!


Click Here to See How the LWC lll Was Made
Shenandoah's Cheap Knock-Off
I'll not be outdone on my own site!! The materials for this engineering masterpiece cost $5.44

For the deluxe model with end caps as shown below, add another two dollars


The lengths of 3/4" PVC are; handles: 18", body: 6", extension: 8", weight stack: 4". The padding is 3/4" pipe insulation. The handles are connected to the body by 3/4" pipe hangers. All areas to make contact were roughened with a file.
The handles are, center to center, 2 1/8" apart on the horizontal. They were attached to the body by liberally packing JB Weld on all surfaces that make contact, both body and handles, especially on top of the body and under the pipe hanger extensions, and then fastened to the handles with sheet metal screws. I had previously aligned the pipe hangers, center-punched the screw locations, and "tapped" the holes using the screws, themselves.
For the extension, Goop was applied liberally to the inside surfaces of the connectors, the PVC was inserted, pushed in and out a couple of times and rotated around within the connectors to evenly spread the Goop.
The two assemblies were joined with Goop and put up in a safe place to cure for 24 hours. The weight stack is detachable in case I want a longer or shorter length.
Addendum: The ends of the handles need to be connected. You could connect them as shown on Perry's LWC lll up there, or you could simply wrap duct tape around them which would maintain the integrity of that cheap knock-off look.


Be afraid. Be very afraid.
The Turbonator Carbine
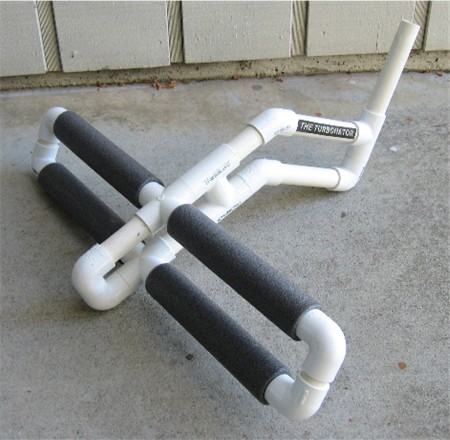
Light. Maneuverable. Strong.
Click Here for Instructions on Making The Turbonator Carbine
The Ultimate LWC

This is it, LWC Fans! This is the one. The evolution of the LWC has come full circle. After having built several LWC's of varying designs, I have put together all of the most effective features of each to create the ultimate LWC. Here are the features that make this LWC the ultimate in effectiveness:
- The handles are wide and flat, forcing the flats of hands to be used.
- The handles are offset from each other so that the bottom handle is squarely braced against either the backs of the hands or the palms, depending on whether overhand or underhand curls are being performed.
- The weight is straight down from the handles rather than being angled outwards. I've noticed with the angled stack that resistance is reduced as the weight ascends past the level of your hands. By keeping the weight low, the greatest resistance is realized when the hands are curled to their furthest extent. The extensions sticking out behind the weight stack is to keep the LWC standing upright while stacking plates.
This baby is a Monster Forearm Wrecker!
Here's how I made it:
I cut two 20" lengths of 2 x 4's. I would have rounded and smoothed the edges where the rubber padding would be attached, but a cabinetmaker friend of mine gave me a 2 x 4 with those edges already rounded. Otherwise I would have rounded only those areas where my hands would be placed and the rubber attached.
With the edges already smoothed, I went on to the next step which was to drill and countersink four holes in the center of each 2 x 4 for 12 x 2 1/2" flathead wood screws which would attach the handles to the center block of wood. The center block of wood, also given to me by my friend, is 3 1/2" wide x 2" thick (not 1 1/2"). This suited me perfectly because 2" just happened to be the spacing I wanted between the handles. A distance of 2" works when each handle is padded with 3/8" thick soft rubber (not foam rubber).
After drilling the holes, I attached the 6" x 6 1/2" rubber pads to the ends of the handles with Barge Cement. I applied the cement only to the sides of the handles and to the edges of the rubber pads. The 6 1/2" lengths wrapped around the handles.
Next, I cut a 5 1/4" length from the the 2" thick block of wood. If I didn't have this block of wood I would have either used a 2 x 4 and added a 1/2" thick spacer to it, or ripped a 2 x 4 down to 2". The center block cut to 5 1/4", offsets the 2 x 4 handles 1-3/4" apart when the handles are secured flush to each end of the center block. I had determined this distance by first clamping the handles to the center block of wood and trying a few distances until I liked the feel (it is coincidental that 1-3/4" is half the width of the 2 x 4's).
I next spread wood glue on the center of one of the handles and then clamped it to one end of the center block. I allowed this setup to dry for an hour before removing the clamp and then screwing in the screws. I then glued and clamped the other handle to the other end of the center block and allowed that to dry before removing the clamp and adding the screws.
Lastly, I attached a 3/4" pipe flange to the front of the handle assembly, centered between the top handle and the center block, using 12 x 1" flathead wood screws, followed by attaching the 3/4" pipe assembly as shown in the pic. The long vertical pipe is 12".
PVC Power Forearm Bar

In general, the hand sections are 6 inches long, 1.5 inch ID. Between hand section 1 and hand section 2 is a 45 degree angle. At the other end of hand section 2 is a 22.5 degree angle. The left and right side lay flat.
I originally made the weight loading pin to come out in the same plane as the hand sections (point 3). I soon learned that I should have angled it down. Instead of starting over I just inserted a 45 degree elbow to angle it down.
The angled down piece has two holes drilled in it to accomodate the loading pin, a smaller piece of PVC.
It is best used standing. Hand section 1 is for palms under grip to work the flexors. Hand section 2 is for a palms over grip to work the extensors. I really like the feel of this bar, especially compared to a straight bar. We'll see how well it holds up to regular use.
Buying everything, including glue, is less than $20.
- perrymk
Steering Wheel Wrist Roller
What you see here is a 1" I.D. rubber utility hose, cut to hand width and slit down the middle on the convex radius side of the hose. Just slip it over the top of a steering wheel, and then while commuting, grab hold of it, squeeze it, and rotate it back and forth around the top of the steering wheel. This will provide an awsome forearm workout on those long drives. Caution: for use on straight aways only. Not recommended on twisty-turny roads.
On to Grip II >>>
Navigate:Questions? Comments? Discussion? Contributions? visit