Today is . Page created 05/01/06, updated 03/12/07
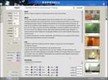 Image Upload Preview Image Upload Preview 
|

Valid file types are "bmp","gif","png","jpg" and "jpeg"
TThis script is intended for forms where the user needs to upload an image to a Web site. The image is displayed on the page for previewing before uploading. The display will be resized if needed so as not to break the page layout. Valid file types are set in the script; others will be disallowed. Works only in Internet Explorer but degrades gracefully.
We have tested the code in IE7.0, IE6.0, Firefox2.0.0.1, Opera9.10, Netscape8.1.2 and AOL Explorer1.5. This script worked in IE6.0 and AOL Explorer1.5 only. In all other platforms tested including IE7.0, it will "Not" work. It degrades well and you will not get any error messages.
![]() For your Information:
Before we begin, we feel obligated to advise you that the above form is for all intensive purposes a "Stand Alone" script. In other words, it really does not do much of anything anything other than what you see. In order to make it function as designed, you need to incorporate it into a valid working form. If you do not have a good solid knowledge of HTML coding, javascripts, forms and reconfigurations, please do not attempt this until you are proficient in the aforementioned areas.
For your Information:
Before we begin, we feel obligated to advise you that the above form is for all intensive purposes a "Stand Alone" script. In other words, it really does not do much of anything anything other than what you see. In order to make it function as designed, you need to incorporate it into a valid working form. If you do not have a good solid knowledge of HTML coding, javascripts, forms and reconfigurations, please do not attempt this until you are proficient in the aforementioned areas.
D epending on your knowledge of HTML and javascripts, this "Stand Alone" form is an easy two part copy and paste code that goes in both the <HEAD> and <BODY> (Incorporated into a valid form) sections of your document with minimal reconfigurations in each section. At this point, we shall explain where and howto reconfigure the form itself. We shall not get into the incorporation into a valid form.
Reconfigurations In The <HEAD> Section
/***** CUSTOMIZE THESE VARIABLES *****/
// width to resize large images to
var maxWidth=100;
// height to resize large images to
var maxHeight=100;
// valid file types
var fileTypes=["bmp","gif","png","jpg","jpeg"];
// the id of the preview image tag
var outImage="previewField";
// what to display when the image is not valid
var defaultPic="spacer.gif";*
/***** DO NOT EDIT BELOW *****/
T he above is quite self-explanatory. The maxWidth=100; and the maxHeight=100; are how large a preview image will appear under the form. the var fileTypes=["bmp","gif","png","jpg","jpeg"]; can be added to, left as is or some removed. This is up to your needs.
![]() For your Information:
You can only add valid image extensions, text files, document extensions etc. "Will Not Work".
For your Information:
You can only add valid image extensions, text files, document extensions etc. "Will Not Work".
* Notice in the above, the reference to the calling of the spacer.gif. The spacer is for all intensive purposes a clear image that serves the purpose of being (for a lack of a better phrase) "In the right place at the right time". You don't see it but it is there. In this case it performs the function of being there if an image does not load or it is an invalid image file extension as defined in the above section. Since the height and width are not defined, it defaults at 5px for both height and width. Below is the spacer you need to save as then upload it into your editor. If you upload it into a different directory, then just change the path in two (2) places, one in the <HEAD> section and one in the <BODY> saection.
The below is a "spacer" gif image. Save it to your hardrive and then upload it to your editor. It is necessary for the script.

|
Reconfigurations In The <BODY> Section
<div align="center" style="line-height: 1.9em;">
Test it by locating a valid file on your hard drive:
<br>
<input type="file" id="picField" onchange="preview(this)">
<br>
<img alt="Graphic will preview here" id="previewField" src="spacer.gif">
<br> <div style="font-size: 7pt;">
The only reconfiguration that can be made here is if you upload the "spacer.gif" into a different directory. Then you need to change the path to reflect where the "spacer.gif" is being housed. For example if you upload the spacer.gif into your /images directory then it would look like the below:
<img alt="Graphic will preview here" id="previewField" src="images/spacer.gif
">
<br> <div style="font-size: 7pt;">
![]() Note Of Importance: If you do upload the spacer.gif into a different directory, don't forget to reflect the change in both the <HEAD> and <BODY> sections of the code.
Note Of Importance: If you do upload the spacer.gif into a different directory, don't forget to reflect the change in both the <HEAD> and <BODY> sections of the code.
W
e hope our tutorial was easy to follow and we covered everything in detail. If you would like to add this effect into your pages, grab the respective below link and you are there. If you have any problems with this or anything else, feel free to consult our [ FAQ ] and if you can't find the answer there, [ contact us ].
[ Get Code Here ]
[ Rate This Page ]