Patti's Pond

 Hi all,
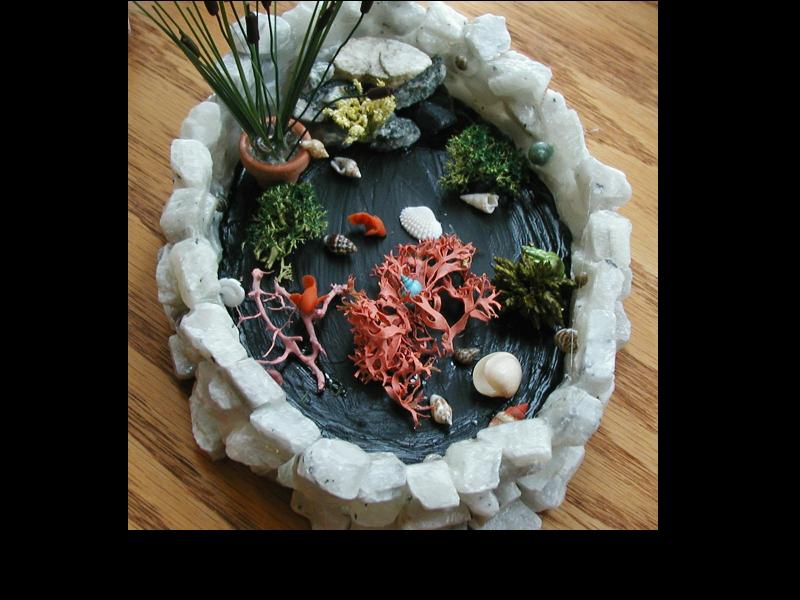
This is the first step on making my pond. I know there are many other directions on the web and other "water" use but I do prefer the Scenic Water as it does have a more realistic look. This is my opinion. Others do not care for a black bottom, I do. I think it really shows the details of your additions, fish, shells, plants, etc.
I don't like a "foggy" pond as the one we have, life size, is clear and the gold fish are able to be seen. They feed from my husband's hands! A more natural looking pond that would not
be man built would have green algae growing on the top, and most likely, be much larger than I am making, so you would not see the details. But, this is my opinion. To each his own.
This is for an above ground pond built with white marble stones
that you can get rather cheap at any garden shop or Home Depot.
Pick out the flattest stones for the pond. You will also need a
bottom which can be a cut off heavy plastic container, picked
to what size you want. I used Polypro cut into an oval shape.
You take your base, and glue the stones all around it. I use
E-6000 glue for this. Do one layer at a time, going around the
rim of your base. Let each layer dry and then build up the back
for the waterfall. Keep adding the stones until you have a look the you are happy with. Let it dry well.
Now you have to seal the pond so that your water will not flow
out thru the rocks. I use the clear silicone that comes in the
large tube. It's water based so it's easy to do. I seal all around
the crevices of the rocks and the bottom. I use my finger to spread it all over. You can do a light coat at first and a second coat to be sure it is water tight. After this dries, run some water
in it. If it leaks, seal it again. You will see, basically, where you
would need more sealant. After all is dry and no leaks,(the silcone will be clear) paint
the bottom ONLY with black acrylic paint or your choice of color.(Second Picture)
The sides of the rocks will show thru the Scenic Water, which
is the real effect. Let that dry. See pictures below.
Pond with Silicone
 Black painted bottom

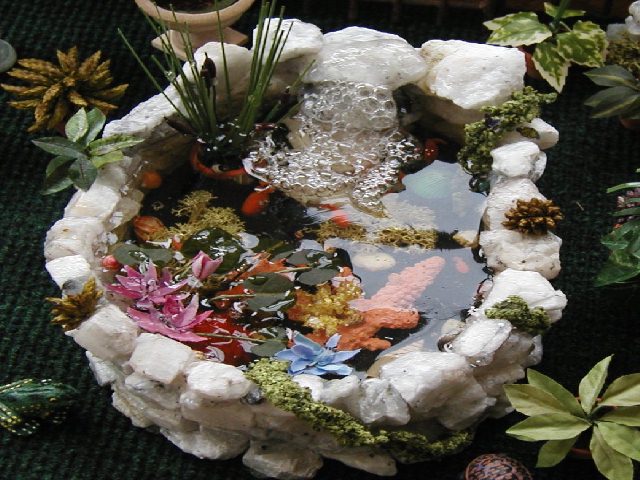
I make my gold fish using bread dough. I'm
sure the users of Fimo and Sculpey can
do the same. The cattail plants are bread
dough rolled around a piece of green florist
wire, not the covered wire. I place them
in a small clay flower pot with some high
grass greenery that can be cut from silk
or plastic. I would not use paper here.
Glue them into the pot in a natural look.
The water lilies are made from silk flowers cut individual
petals and glue them to a small circle of
florist tape. I use crysantamums as they have a
natural curve pointing up as lillies do.
I cut the lily pads from silk leaves and glue them to covered
floral wire, cut in different lenghts.
Glue the pot to the base of the pond.
I have glued the gold fish on a diagonal
to look like they were feeding at the bottom.
One is glued on the top of the coral.
Place your items as you like. Don't glue
all of your fish in yet as they will be layered
to look as they would in a real pond.
Let this dry overnight.
fish, shells, coral, plants, glued on bottom
Time to pour on the Scenic Water.
You may need 2 or 3 jars of this,
depending how deep you want your pond.
Melt it as directed on the jar.
Pour on top of your glued items until
they are covered and a bit more for
the effect of layering.
Let this dry.
When dry you can glue the rest of your
gold fish to the top of the water, positioning
them as they would look naturally swimming
in different directions.
Let dry.
Melt more Scenic Water and pour over
the fish, filling your pond to the depth
you want.
Don't cover the lily pads, or flowers they are
supposed to float on the top.
You can add droplets of water on them later.
Let this dry.
With Scenic Water

Add some greenery around the rocks,
attaching it with glue.
Pond Another View

Almost finished!
Melt some Scenic Water and using
an eyedropper, pull some into it.
Pour some down the back of the pond
where the "falls" would be. Take the
eyedropper and squeeze it in and out.
You will see bubbles form. Do this until
you reach your satisfaction. You can always
add more.
If something is confusing, email me
using the link below.
Good luck!
Bubbles Falls
 Pond Question