Box Stock (Accurized)
Revell/Monogram kit 3617 (Colonial Viper), Millennia Models International
(MMI) kit 1017 (Viper Launch Rail), MMI 1001 (Viper Cockpit Detail Set),
MMI kit 1011 (Seated Female Viper Pilot), MMI kit (Viper Wings and Fin Set),
MMI kit (Viper Main Atmospheric Scoops), MMI kit (Viper Turbo Thruster Nozzles),
Evergreen styrene, K&S Tubing, copper wire
|
Model Specifications:
Viper
Scale = 1/32
Length = 27.5 cm
Width = 14.8 cm
Height = 10 cm |
Model Specifications:
Launch Rail
Scale = 1/32
Length = 39 cm
Width = 7.2 cm
Height = 6 cm |
| |
|
|
 |
|
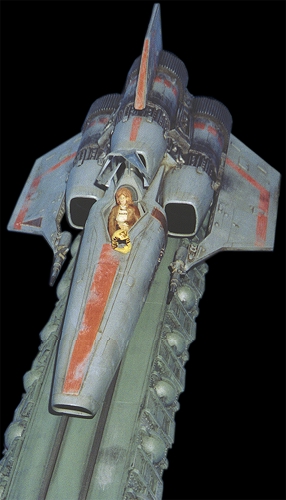
The Viper is a fighter from the movie and TV series: Battlestar Galactica.
I've always liked the Viper, having built several as a teenager. Now with more advanced skills, I wanted to do one up right. The MMI products and the scribed panel lines greatly add to the appearance of the Viper. I just hope MMI can complete their Viper Launch Bay set to actually finish off this model...(OK, I am
lazy).
|
| |
|
|
 |
|
Prior to assembly, all panel lines were scribed and the parts sanded smooth. The back of the Forward Atmospheric Scoop was cut off and replaced with sheet styrene and modeling mesh. The cockpit and Viper fuselage were then assembled in accordance with
instructions. Sheet plastic strips were cut and glued in place where reference photos indicated raised
detail on the fuselage. The canopy was left off until final construction.
The wing bottoms were cut off the Left and Right Engine Housings. The wing mounting supports on the Lower Engine Housing
were reshaped and thickened to allow fitting of new MMI wings. The Display Base mounting hole in the bottom was filled and sanded smooth. The Engine Housing was then assembled.
The insides of MMI's Main Atmospheric Scoops were painted Flat
Black. The three Gaseous Matter Intakes were painted with
Gunmetal and then treated with a black wash and drybrushed with
Flat Aluminum. These parts were assembled and fitted to the Engine Housing. The scoops were masked for later painting of the
main color.
|
| |
|
|
 |
|
MMI's Turbo Thruster Nozzles were fabricated based upon the full scale studio mock up, and thus, the Engine Housing required some
modification to allow for proper fitting. A new back plate was cut
from 0.06" thick plastic and was fitted prior to the Nozzles. The back plate also serves to support and position the Nozzles. With new wings, the kit's Laser Cannons need to be replaced as they look out of proportion to the wings when compared to reference photos. New Laser Cannons were fabricated using K&S Metal tubing with Evergreen plastic strip for details.
The model was assembled with the exception of the Turbo Thruster Nozzles, Laser Cannons,
Canopy and the pilot. The nozzles and cannons were added after painting and the canopy and pilot were installed after weathering.
The Viper Launch Rail was assembled in accordance with MMI's instructions.
|
| |
|
|
 |
|
Unless noted, I used Testor's Model Master enamels and for clear coats I used Testor's Model Master acrylics.
The model was painted overall Dark Ghost Gray. Using templates made from photocopies of the decal sheet, the bands around the Atmospheric Scoop were masked and painted Aggressor Gray. It was not until the model was complete that I realized that these two
colors should have been Light Ghost Gray and Dark Ghost Gray respectively; my model appears a bit dark as a result. Other panels were then masked off and painted with differing shades of gray, some panels were even painted with a rust overtone. Once the paint had dried thoroughly, the model was sprayed with a clear gloss coat and the decals applied. If I had not been pressed for time (CANAM CON III was about a week away), I would have used the decals as templates and
would have painted the Viper striping with a less brilliant
orange. Once the decals were applied the model was sprayed with a few good clear semi-gloss coats.
|
| |
|
|
 |
|
Weathering started with a couple of washes of Burnt Umber, which I find makes
grays appear less dirty and grimy than a black wash. Unfortunately, the wash did little for the brilliant orange of the decals, so I dry brushed Dark Ghost
Gray over the entire model and more liberally on the decals. This gave the orange striping a more of a worn off look. I then applied a couple of more Burnt Umber washes to even out the effect. Drybrushing a couple of lighter
grays and Flat Aluminum over the model completed the weathering
of main part of the Viper. The canopy was also weathered at the same time.
The industrial areas of the Viper were treated with a black wash with a couple of drops of Steel added. This gave a very metallic look to these areas, which were accented further with dry brushing of Flat Aluminum, Gold and Copper. The areas directly behind the industrial area of the Engine Housing were drybrushed heavily with Flat Black and lightly with Flat Aluminum.
The Turbo Thruster Nozzles were painted with Gunmetal and treated with a black wash and a drybrushing of Flat Aluminum.
|
| |
|
|
 |
|
The
Launch Rail was painted overall with Matt Russian Blue (Humbrol 115) which was purposely chosen to contrast the Viper. Individual details were picked out with various
colors and then the whole Launch Rail was treated with Matt
Clear. Unlike the Viper, I wanted the Launch Rail somewhat grimy, therefore I used a couple of black washes over the entire
Launch Rail followed with a drybrushing of Flat Aluminum. The drybrushing was applied fairly heavily on the side panels. Using the black wash with a couple of drops of Steel, I dripped a few drops along the upper surface of the
Launch Rail to simulate fluid leaks from the Viper.
The pilot was painted in accordance with MMI's instructions,
except that I prefer redheads. The helmet was painted with Light Buff (Humbrol 7) which appears to match photo references almost perfectly. The eagle was painted Gold and the black lines were added with a 0.02mm marker.
|
| |
|
|
|
Photos
by Bill E.
|
|
|
|