15. On this same layer using
white again, click on your Draw
tool, Antialias and Vector checked, line width 2.
Draw a single line above the rectangle and
extending past the edges of the egg. When you
have it where you want it go to the layer palette
and convert to raster layer. Rename Top White
Lines. Again don't worry about the overhang.

16. Right click on the Top White
lines layer and duplicate. Go to Image>Flip.
With your Mover tool move the
lines into place at the bottom of the squares.

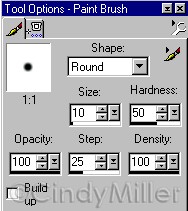
17. Add a layer and name it blue
dots. Set foreground color to blue #4040FF. Click
on your Paintbrush tool, go to tool options and
use the same settings as before. Shape-Round,
Size 10, Hardness 50, Opacity 100, Step 25,
Density 100 Click to place a row of dots
across the egg in the white rectangle box. Space
them evenly as you can. Do this for the bottom
box too.

18. Add a new layer and name
Yellow dots. Set foreground to the yellow we used
before #FFFF40. Click on your Paintbrush tool and
change the Size in Tool Options to 7, keep other
settings the same. Place a row of dots between
the white rectangle and white line. I placed mine
to fall between the blue dots. Do this for both
top and bottom. This is how your egg should look
so far.

19. Add a new layer and name it
Yellow line. Click on your Draw
tool, in Tool Options choose Straight Line, width
of 2. Antialias checked, Vector Not checked. Draw
a line straight down between two of the middle
squares. About 56 in length. Use the Mover
tool to place it if necessary . Turn this layer
off.

20. Add a new Raster Layer and
name it Yellow scrolls. Keep the same Yellow for
stroke and Null for fill. Click on your Preset
Shapes. Choose Ellipse, Antialias
checked, line width 2. Holding down on the shift
key, make a very small circle about 12 x 12. Go
to Edit>Copy. Go to Edit>Paste as a New
Selection. Place the second circle right beside
the first one just barely touching.

21. For this next step Zoom
in so you can select a small area of the two
circles to delete. Click on your Selection
tool. Select a small area of each circle as shown
below and press delete.

Turn the yellow line layer back
on. With your Mover tool move
the scroll into place at the end of the yellow
line. If you need to trim the yellow line switch
to that layer and trim. Now, back to the yellow
scroll layer. Go to Edit>Copy, then
Edit>Paste as a New Selection. Place it at the
opposite end of the yellow line. While still
selected Go to Image>Flip. While still
selected move it into place. Deselect.

22. Turn off all layers except
the Yellow line layer and the Yellow scroll Layer.
Right click on one of the layers and
Merge>Merge Visible. Rename Yellow Scroll.
Right click on the Yellow Scroll layer and
Duplicate. Turn all the layers back on. Using the
Mover tool move the new Yellow
Scroll into place between the other two squares.

23. In the layer palette, turn
off the egg layer and background layer if you
have one. We want to merge our egg decorations.
Right click on one of the layers and
Merge>Merge Visible. Rename it Deco. Turn the
egg layer back on. Click on your Magic
Wand and click the background of the egg
layer. Go to your Layer Palette and click on the
Deco layer. Press delete to remove all that
overhang. Deselect.
What are you looking for egg-xactly?
24. Now, go back to your egg
layer and click on the background again with the Magic
Wand tool. Go to Selection>Invert.
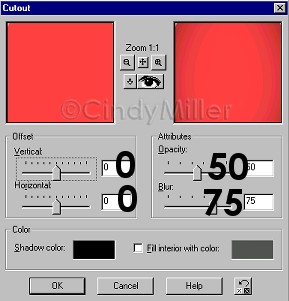
Now add a new layer and name Shadow. Go to
Effects>3D>Cutout. Apply the same cutout as
before.Horizontal and Vertical = 0,
Opacity = 50, Blur = 75, Shadow black.
Deselect. Now go to your Layer Palette, move the
Deco layer below the shadow layer. Now
Merge>Merge All Visible. If you would like to
tube it now is a good time before the drop shadow
is applied.
25. I added a Drop Shadow with
these settings: Vertical and Horizontal=0,
Opacity =75, and Blur= 4.9. You're all done.

Here is another egg I created.

Contact Me
Tutorial Index
Home
©Copyright 2002-2010 Cindy Miller.
All rights reserved.
The graphics you make from my
tutorials are yours for your personal use only.
All graphics, text, and files are not to be
copied, sent through email, linked to, profited
from, or archived in any manner without my
written permission. By using my tutorials you are
agreeing to my terms.

