
For this tutorial you will need:
Jasc Paint Shop Pro 7. Get it here.
My files. Get them here.
I am using a technique for
selection files that I saw used on several other
tutorials. I thought
it worked out well. The image file has the
selection files saved to it. You will need to
load
them from the Alpha Channel instead of from the
Disk. You might want to Shift D and
close the original psp file in case you need it
again. I put a completed screenshot
of my Layer Palette at the end of the tutorial so
you can refer to it for Layer placement
Let's get started!!
Remember to Save often!!
1. Open the PSP file. Add a
layer and name it WellBase. Open and minimize the
Limestone tile I included in
the zip. In your Fill Pattern choose the
Limestone tile.
Set the Scale to 25% and the
Angle to 0. Flood Fill the selection.
Selections>Float,
Effects>3D Effects>Cutout
and use these settings.
Horizontal and Vertical 0,
Opacity 70%, Blur 7.5, color black. Deselect.
2. Add a layer and name it
WellRim. Load from Alpha Channel cm-wellrim.
In the Fill box , choose
Pattern, Driftwood, Scale 10%, Angle 0. Flood
Fill the selection.
Float selection and apply the
same Cutout changing the Opacity to 80%. Deselect.
Now, Colors>Colorize> and
put 30 for both Hue and Saturation.
3. Add a layer, name it Well
Inner Rim. Load from Alpha Channel cm-wellinnerrim.
Selections>Modify>Feather
of 2. Flood fill with Color #808080.
Selections>Float
and apply the same cutout
leaving Opacity at 80%. Deselect.
4. Add a layer and name it Roof
Supports. Choose the Driftwood pattern with these
settings,
Scale 10 and Angle 90. Flood
Fill then Colors>Colorize settings of 30 and
30 again.
Selections>Float and apply
the same Cutout with the 80% Opacity.
5. Add a layer and name it Roof.
Load from Alpha channel cm-roof.
Flood Fill with the Driftwood
Pattern changing the Scale to 40 and the Angle to
180.
Colors>Colorize> and use
the 30/30 setting again. Selections>Float and
apply the Cutout
as before with the 80% Opacity.
Deselect.
6. Add a layer and name it
Lines. Load from Alpha Channel cm-boardlines.
Flood fill
with Black by clicking twice in
the selection. This makes them a little darker
than
just one click. Deselect.
7. Add a layer and name it
Nails. Load from Alpha Channel cm-nails. Flood
fill with
Black, again click twice to
make them a little darker. Deselect and apply an
Inner Bevel
using the Round Preset.
8. Add a layer and name it
Handle. Load from Alpha Channel cm-wellhandle.
Flood Fill with
the Driftwood Pattern with
Scale set at 20 and Angle 0. Then
Colors>Colorize and use
the 30/30 setting again.
Selections>Float and apply the Cutout except
change the Opacity
to 70% this time. Now drag this
layer below the Roof Support layer in the Layer
Palette.
9. Now we need to do some
detail work using the Retouch Tool. Click on the
Retouch Tool
and use these settings.

Let's start on the Well Base
Layer. I darkened both sides and some across the
bottom.
Then making sure you are on the
Roof Layer we need to darken both sides and
across the bottom. I also
darkened the corners a little bit. See the sample
below.
The edges I darkened are marked
with red. I also ran it once along the boardlines.
 
I added a layer at this part
right above the Well Base layer and named it
wellbase
aging. I then loaded the cm-wellbase
from the Alpha Channel and used
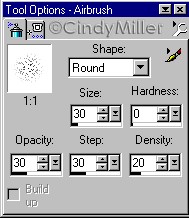
the Airbrush Tool to spray a
little green, Color # 6D7361 on the base.
I used these settings for the
Airbrush then I applied a Gaussian Blur of 1.50.
10. Add a layer and name it
Well Wall. In the Layer Palette drag the Well
Wall layer below
the Well Base layer. Load from
Alpha Channel cm-wellwall. Flood Fill
with the Limestone pattern
Scale set at 15% and Angle set at 0.
Selections>Float and apply a
Cutout with these settings.
Vertical and Horizontal set at
0, Opacity 80%, Blur at 23.8. Deselect.
11. Add a layer and name it
Well Bottom. Load from the Alpha Channel cm-wellbottom.
Flood Fill with the Limestone
Pattern using the same settings as the Well Wall.
Selections>Float and apply
the same Cutout except change the Blur to 7.5.
With it still
selected, Selections>Invert
and apply a Drop Shadow using these settings.
Vertical 3, Horizontal 0,
Opacity 80, Blur 12.3. Deselect.
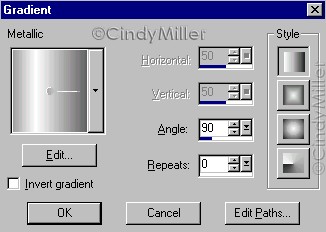
12. Set your Stroke to the
Limestone Pattern with
Scale set at 20% and Angle set
at 0. Set the Fill to Gradient and chose the
Metallic Gradient
with these settings.
Hide the Well Base layer and
click on Preset Shapes. Choose the Rounded
Rectangle with
Antialias and Vector checked,
Line Width of 2. Starting at the upper left
corner
of the Well Wall, draw a
rectangle all the way to the bottom covering the
Well Bottom.

In the Layer Palette reduce the
Opacity to 50%. When you have it how you want
Convert to Raster Layer and
rename Well Shadow. Make sure it is right above
the
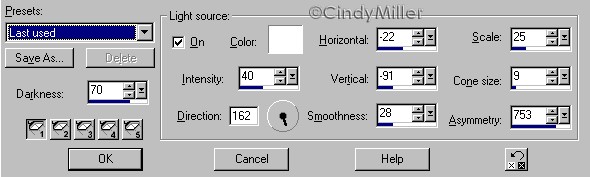
Well Bottom Layer. Now to apply
the lights setting.
Effects>Illumination>Lights.
Use these settings. Go ahead
and make the Well Base visible now.
13. Add a layer and name it
Underground. Load from Alpha Channel cm-underground.
Set
your Fill Pattern to Granite 3,
Scale 40 % and Angle 0. Flood Fill the selection.
Deselect and
in the Layer Palette drag the
Underground Layer below the Well Wall Layer.
14. Add a layer and name it
Grass. This Layer should be right above the
Well Shadow Layer in the Layer
Palette. Load from the Alpha Channel cm-grass.
Click on the Picture Tube tool
and choose Lawn. Set the Scale to 60 %.
Now keep clicking inside the
selection until it is filled with the lawn.
Deselect.
15. Add a layer and name Mud.
Load the cm-grass again from the Alpha Channel.
With
the Picture Tube Tool set on
Lawn, set the Scale to 40%. Turn off the Grass
Layer so
you can see better. We won't be
filling the whole area this time. Just click in
about 4
different places around the
well. Deselect. Colors>Colorize and set the
Hue to 30 and
the Saturation to 20. Turn the
Grass layer back on. Now to lighten the mud.
Colors>Adjust>Brightness/Contrast
set Brightness to 40 and Contrast to 15. I
touched
up the mud a bit by using the
Eraser Tool. I clicked on spots to weaken the
opacity and
let the green show through a
little. These are the settings I used for the
eraser.

Now back to the Grass Layer. I
used the Retouch tool set on Smudge to fluff up
the grass
along the top edge. Hold the
mouse button down and push the cursor out in
little short
strokes. Don't go too far past
the edge. These are the settings I used.

16. Open the Rope file and in
the Layer Palete drag that layer over to your
well image.
It should create it's own layer.
Name it Rope Bucket and make sure it is at the
top.
The bucket isn't all there so
it will look like it is in the well. Make any
adjustments to placement that
it may need.
17. For the sky I Flood Filled
a layer with Color #9BCAE8, then used the Picture
Tube
Tool and put a couple of the
clouds in the sky. I used a Scale of 60%. This
should
be the very bottom layer. I
have a screenshot of the finished Layer Palette
below.
18. Now you can take your
Retouch tool with the same settings as before and
darken the Underground layer
where it meets
the Grass Layer and any other
places you think might need it.
19. I added a layer right above
the well base aging and named it grass blades.
Click on the Picture Tube Tool
and find Grass Blades. I used a setting of 10%
and put a few clumps of grass
around the well base. They will show up below
the edge so load the cm-underground
selection and press Delete once. This
should trim them off even with
the underground layer.
20. Last we need to put that
Kitty in the Well so click on your Picture Tube
Tool and
find the Black Cat tube. I used
a Scale of 15. Add a Layer and make sure it is
right above the Well Bottom
layer.
Here is the way my layer
palette looks.

I hope you enjoyed this
tutorial!!!
Tutorial Index
Home
Contact Me
©Copyright 2003-2010 Cindy Miller, All rights
reserved.
The graphics you
make from my tutorials are yours for your
personal use only.
All graphics, text, and files are not to
be copied, sent through email, linked to,
profited from, or archived in any manner without
my written permission.
By using my tutorials you are agreeing to my
terms.
|

