For this tutorial
you will need: The inspiration
for this tutorial came from a PI tutorial Remember to save often! 1. Open a 300 x 300 transparent image. Click on Preset Shapes. For this one I chose Star 3. Line width of 1. Vector and Antialias checked.
Now you need to decide what color you would like to make your star. I chose a gold color, #D5C18B. With the gold color as your Fill set your Stroke to Null. I like to hold down on the shift key to keep the star proportional. You can do what you like best. I also like to use the vector setting so I can make any minor adjustments if necessary after I have drawn it out. Now draw out you star leaving a little extra space at the top. When you have it like you want, convert it to a Raster Layer and rename Star.
2. Next let's make a small loop at the top of the star to hang it by. Click on Preset Shapes and choose the Teardrop shape. Vector and Antialias checked, Line Width of 4.
You need to set the Stroke for the gold color and set the Fill to Null. Draw out a small rounded loop at the top.
Then we need to rotate it so choose Image>Rotate and use the settings below. Make sure "All Layers" is unchecked.
Now with your Mover Tool, and you may need to zoom in here, move the loop onto the top of the star's point. If the point shows up past the loop you may need to erase the point of the star a little. This is what it looks like now. Merge Visible layers and rename Star.
3. Making sure you are on the star layer, apply the following Inner Bevel.
4. Click on Preset Shapes and choose Star 3 again. Leaving the Line Width at 4 and Vector and Antialias checked. Make sure your gold color is still the Stroke color and the Fill is set to Null. Draw out a smaller star inside of the large star.
When you have it like you want convert it to a Raster Layer and rename Outline Star. 5. Making sure you are on the Outline Star layer apply the same Inner Bevel as before. Now you are going to make the lighter colored star inside of the outline star. Set your Stroke to color #F1E9D4 or color of your choice, then click on the Magic Wand and use these setting.
Making sure you are on the Outline Star layer, click once inside the star. Then Selections>Modify>Expand 1. Click on New Raster layer and name Inner Star. Click on the Flood Fill tool and fill with color.
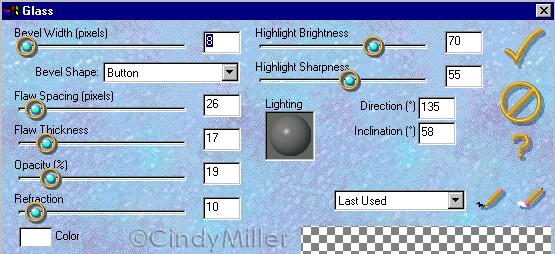
Deselect. In the Layer Palette drag this layer under the Outline Star layer. Apply the same Inner Bevel as before to the Inner Star. 6. Now to give it a glassy look. Use the following Eye Candy 3 Glass settings and apply it to the Inner Star Layer and then to the Outline Star Layer.
Now merge all three layers and apply the same EC Glass setting to the merged layer. That's it, you are ready to apply these same techniques to other shapes. Have fun and experiment! I hope you enjoyed this tutorial. If you have any questions please feel free to contact me at the link below.
The
graphics you make from my tutorials are yours for your
personal use only.
|