|
|
| |
| Mini 4wd
racing has been a hobby of mine just recently (August 2000). I
find it very absorbing with all the small tweaking on these
miniature cars. Consider it, my Lego.
|
| |
|
~~ The Bastard Blade
~~ |
|
|
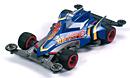
| This is the first of
them cars i bought in Filbars Megamall. It is equipped with
wide small-diameter wheels as you can see in the
kit. During the latest moments of its life,
it lost its top fin because of the nasty crashes. It
never seen real competition because i had fun just running it on the tracks. But
I do take pride that it had great potentials. Perhaps
i'll re-set up this one for the hi-speed circuits only
... |
| |
|
modified Phantom
Blade body
Super X-Chassis
1
Aluminum down-thrust
1 Aluminum rear plate
1 Rear brake
set
2 9mm ball bearings for the front
2 13mm gold double
rollers at the back
2 Narrow
small-diameter one-way with narrow
rubber wheels for the front
2 Narrow large-diameter one-way with narrow
rubber wheels for the rear
2 Hollow axles
1 Hollow
shaft
4 Hexagonal-hole bearings for the axles
4:1 Gear Ratio
Atomic Tuned Motor /
Hyper Dash
2 Motor
1.2v
1000mA Ni-Cd
Batteries (National) /
1.2v 1600mA Ni-MH Batteries (Sanyo Twicell) |
| |
|
Mods. The large diameter wheels on the
back actually doesn't fit the Phantom Blade body. So what
happened is that i had to cut some portions off and then smoothen it
with sandpaper. And when the fin on top lost its hook, i made
a vertical slit on top just so it won't look ugly without the
fin.
I placed the double ball race
rollers on the middle hole at the rear plate and extended the screw
on the outermost hole of the brake set.
Performance. I think it
is light for its weight and did pretty well in a complex race
track. However, i have problems adjusting the breaks because
the screw adjustment is covered by the rear plate. It seems ok
in zigzags because of the small over-all width with the front and
rear rollers on the same level. Power loss ain't noticeable in
curves because the acceleration is handled well by the
one-ways. When i used the large-diameter lock nut wheels, it
tends to really slow down in zigzags. So i think it would be
better if i use small diameter lock nuts
instead.
This set-up had
problems when landing from leaps as the tires on the rear really
bounces half the time. So one alternative was to use
reston sponge. But since there ain't any, i had to use
those gray sponge tires that had low grip. It also has
problems dealing with long curves unless i place
stabilizers.
This set-up i think,
could only do a little above average to poor in
hi-speed and in technical. If you don't have something to stick the one-ways
to the axles, it might come off in hi-speeds. |
| |
|
~~ The Synchro Ravster
~~ |
|

|
| This is my latest
car. I've been test running it and it will be using non-Tamiya parts.
This I will plan to run in competitions. It has a funny looking
set-up if you read on. This one i plan to
use in the complex and techinical circuits. |
| |
|
Synchro Master Z9
body
VS Chassis
4 Aluminum side extension for the front
1 Sliding damper
(hard spring) with break set for the rear
2 19mm ball race
rollers for the front
4 13mm ball bearings for the
rear
2 Very wide
small-diameter one-way with wide rubber wheels for the front
2 Wide small-diameter one-way with narrow rubber
wheels for the rear
4 Hexagonal-hole bearings
for the axles
5:1 gear ratio
Atomic Tuned Motor /
Hyper Dash 2 Motor
1.2v 1000mA Ni-Cd Batteries (National)
/
1.2v 1600mA
Ni-MH
Batteries (Sanyo Twicell)
|
| |
|
Mods. I modified
two of the front side extensions by bending it forward. That
way, it will function as my
'down-thrust'.
Placed in front also are
the other two side extensions under the modified side ex
and will act as supporters. I was thinking if i should use the
frp plate instead, but the complexity of the bent side ex forced me to
use such. Note however, i didn't use the normal set-up
holes for side extensions. Instead, i used the two
middle holes in front for mounting and used the third
hole from the outer edge of the side ex for the other. Last
time when i used spacers to raise the front rollers, the side extensions bent
badly from a crash. So this set-up should be more
durable.
Performance . As you can
see from the set up, my car looks like a tadpole with the VERy wide one
ways in front. At first i used that at the rear and it
didn't do very well with the evil leaps. The reason i had the
wide tires is because there ain't no good supply of narrow ones
here. I took my chances with other brands last time and i
found out that at times it's not functioning as one way because the
pinion gears inside gets stuck. Figure it out with those
imitation brands. Anyway, it had some advantage. When
landing from nasty leaps, the extra width that wasn't covered
by the tires spares the front rollers from pain. And because
it is rotating, the car moves back to the course that much
faster. It seems to have more balance too. Combined
with the 5:1 gear, acceleration is no
problem.
But like i said, it looks really
funny. |
|
| |
|


