

 |
  |
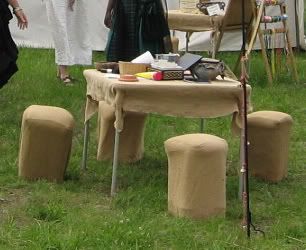
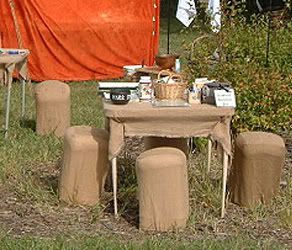
DIRECTIONS FOR MAKING CUSHIONED TUB STOOLS |
when I came up with the AMAZINGLY FANTABULOUS IDEA of creating TUB STOOLS to serve as REN FEST FURNITURE – using the many empty 25-Pound KAT LITTER TUBS I had collected over the years. (Hello! FOUR KATZ!) |
|
 |
Since then, many folkz have copiously complemented my Tub Stool creations, and
expressed a sincere interest in MAKING THEIR OWN TUB STOOLS.
THUS, in May of 2008, as I am about to RE-MAKE the EIGHT TUB STOOL COVERS
I need for my Unofficial Nebraska Wenches’ LUST MUSTER POYNTE,
I decided to create and post these DIRECTIONS!
On this WEB PAGE, are Directions with LOADZ of Explanations, Pix and Tipz.
 AT ITS END, you’ll find a LINK to a FILE (PDF) containing JUST the
 INSTRUCTIONS for you to PRINT and Work From!
STUFF YOU’LL NEED FOR MAKING
CUSHIONED TUB STOOLS!
Any ITEM DESCRIPTIONS and PRICES quoted on this page
were obtained in May of 2008 – mostly from the website of Jo-Ann Fabrics & Crafts.
But, they ought to reasonably represent common prices at ANY Fabric Store!
FIRST:
You’re going to need some kind of CHAIR-Worthy, strong, plastic TUB for each Tub Stool.
Obviously, TUBS other than KAT LITTER TUBS could be used!
But, I can only provide you directions for making Tub Stool Covers based upon the dimensions
of the 25-Pound Kat Litter Tubs I use for MY Tub Stools.
Whatever KIND (or SIZE) of TUB you use;
YOU’LL NEED ONE TUB per TUB STOOL.
 |
|
KAT LITTER TUB DIMENSIONS: (such as the 25-Pound tubs found at SAM’S CLUB WAREHOUSE and similar bulk stores) ARE:
|
Each Bulk Kat Litter Tub is INVERTED:
|
|
 |
WHATEVER KIND OF TUB YOU USE:
Remove the Wire (or Plastic) HANDLE from each Tub Stool TUB.

ONE 12'' x 12'' PILLOW FORM for each TUB STOOL:
It really doesn’t matter what brand you buy, as long as the Pillow Form is 12'' x 12''
The average “Regular Price” per 12'' x 12'' Pillow Form is about $6.49
ONE ROLL of BLACK ELECTRICAL TAPE (that’s enough for ALL Tub Stools!)
ONE LARGE SAFETY PIN per Tub Stool Cover’s Drawstring.
 |
|
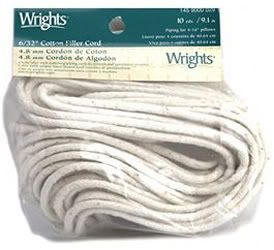
for each TUB STOOL: This particular brand, “Cotton Filler 6/32'' Cord” has a Regular Price of $3.99 per 10 Yard package. Since you’ll need 5 feet of cord for each Tub Stool Cover, one 10 yard (30 foot) package will be fyne for SIX Tub Stools!
(Yes! Cotton cord will SHRINK when washed. |
In 2003, when I made my original Tub Stool Covers, I Zig-Zag-sewed
along the CUT ENDS of the fabric pieces before assembling the covers.
But, with the very FIRST washing, I began to suffer small SEAM BLOW-OUTS!!!
 |
|
later (2008), there now are SO MANY BLOWOUTS, that it will take more werk to REPAIR THEM than to make 8 NEW Tub Stool Covers! |
|
 |
 |
|
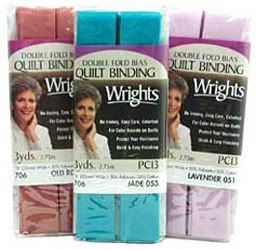
Bias Quilt Binding 7/8"
If YOU use Double Fold Quilt Binding
(Be sure you get the 7/8" wide Binding.)
When using 48" Wide fabric, you’ll need |
|
    “Many Colors!” 3 Yards (per package) Regular Price: $2.65 (per 3 Yard package) |
THREAD:
I have no idea how many yards of thread is needed per Tub Stool Cover!
For less than 4 Tub Stool Covers, get ONE spool of STRONG THICK THREAD.
For more than 4 Tub Stool Covers, get TWO spools of STRONG, THICK THREAD,
and see what happens! LOL
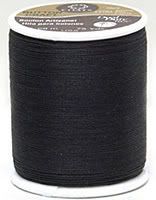 Dual Duty |
|
DUAL DUTY EXTRA STRONG THREAD 75 yds (per spool) Regular Price: $1.49 OR
Coats & Clark |
|
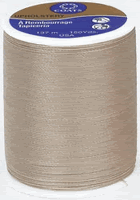 Upholstery |


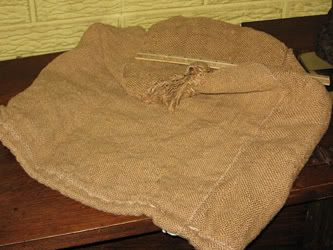
TUB STOOL FABRIC!
I Prefer the Appearance and Texture of BURLAP FABRIC for my REN TUB STOOLS!
Often, only the darker and lighter “Natural” Burlap colors are available.
But, some fabric stores have DYED Burlap = black, blues, greens, purples, reds and the like!


 |
|
– a perfect width for making Tub Stool Covers for 25-Pound Kat Litter Tubz!
“Handwash separately, |
|
“Made in USA. |
If you don’t want to use BURLAP, at least be sure to use some kind of STRONG
but NOT-TO-STIFF fabric – like “DUCK CLOTH!”
 |
|
“Made in USA. Can be painted.” [That might be fun!] “Assorted colors” “CONTENT: 100% cotton”Regular Price: $6.99 per yard Duck Cloth usually comes in bolts of “59" wide” fabric.
NOTE!: You’ll have to do your OWN FIGURING of fabric amount |
FIE ON THAT!
HOW TO FIGURE THE AMOUNT OF FABRIC TO BUY
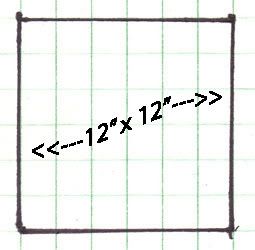
EACH Tub Stool Cover’s SEAT piece needs to start out
(be CUT) as a 12" x 12" SQUARE.
the inverted Litter Tub’s SEAT dimensions – and it’s the SAME dimensions as the Tub Stool’s cushion before sewing.
But, these dimensions create a SEAT PIECE and CUSHION
Thus the SEAT CUSHION will STAY PUT on TOP of the |
|
 |
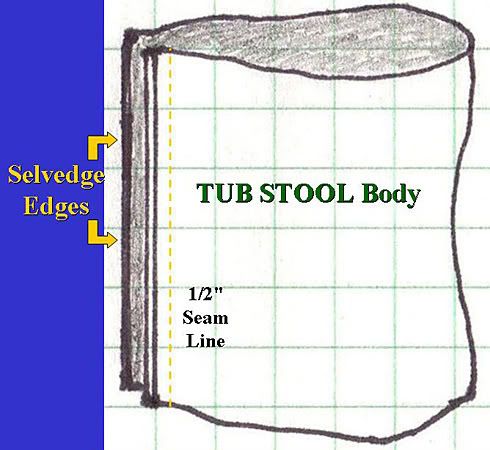
Each Tub Stool Cover BODY PIECE needs to be CUT 48" WIDE.
Isn’t it HANDY that Burlap fabric usually comes in 48" wide bolts?!
That makes the cutting layout easier,
AND allows you TWO SEALED SELVEDGE EDGES
(edges that do NOT require seam binding) per Tub Stool!
Each Tub Stool Cover BODY PIECE needs to be CUT 20" TALL.
Since creating a CASING for the draw string requires folding over at least 2" of fabric;
AND the cushion is going to add extra HEIGHT to the tub;
the BODY piece for each 15" tall Tub Stool Cover needs to be AT LEAST 20" TALL.
When Purchasing Fabric (Such As BURLAP) that is 48" WIDE,
Here’s the amount of FABRIC YOU NEED TO BUY:
These amounts allow for some FABRIC SHRINKAGE (due to PRE-WASHING) prior to cutting!
CUTTING LAYOUT EXAMPLES for PRESHRUNK 48" WIDE FABRIC:
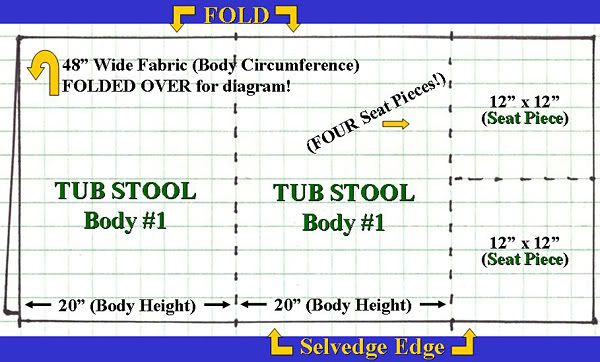
Cut TWO 12" x 12" SQUARES from that 12" wide and 48" long strip of fabric, to create Two Tub Stool’s SEAT PIECES. (Up to FOUR 12" x 12" Square SEAT PIECES can be cut from this amount of fabric!)
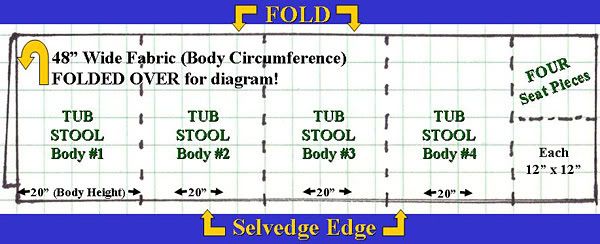
Follow the SAME DIRECTIONS as for the TWO TUB STOOL cutting directions –
But cut FOUR TUB STOOL BODIES before cutting FOUR Tub Stool SEAT PIECES.
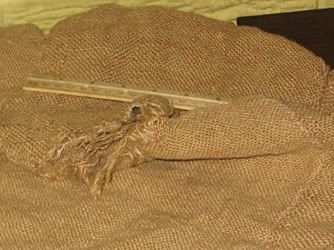
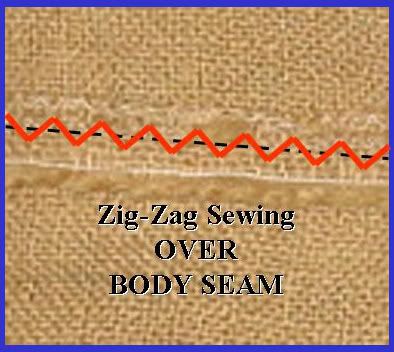
STEP ONE; CENTRAL TUB STOOL BODY SEAM:
 |
|
48" wide Tub Stool BODY together.
Most Burlap doesn’t have a
Sew a SEAM 1/2" from |
SELVEDGE edges, you’ll NOT need to cover this seam’s edges with Double Fold Quilt Binding
But! It is wise to |
|
 |
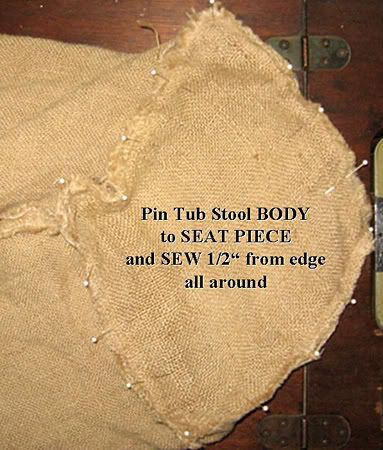
STEP TWO; ATTACH THE SEAT PIECE:
 |
|
pin the Tub Stool BODY to the Tub Stool SEAT PIECE.
Sew a seam 1/2" from the edge,
“SANDWICH” these seams between
Sew a straight line along the binding,
Then ZIG-ZAG-Sew ON TOP OF the
I think we CAN!] |
STEP THREE; CREATE THE DRAWSTRING CASING:
“SANDWICH” the Tub Stool Body’s BOTTOM EDGE between Double Fold Quilt Binding.
[I’m sorry! Since I haven’t done this yet, I don’t have pix of it!]
Sew a straight line along the binding, JUST INSIDE its seam-side edge.
Then ZIG-ZAG-Sew ON TOP OF the Double Fold Quilt Binding NEXT to the seam edge.
BOTTOM EDGE of the Tub Stool Body Fabric UP, OVER its body – WRONG SIDES together! PRESS (iron) to create a crisp FOLD.
Sew a seam 1/2" from the FOLDED edge
Sew another seam 1 and 1/2" from the FOLDED edge
1"-WIDE DRAWSTRING CASING all the way around the BOTTOM of the TUB STOOL COVER; with a SMALL OPENING to use for inserting THE DRAWSTRING! |
|
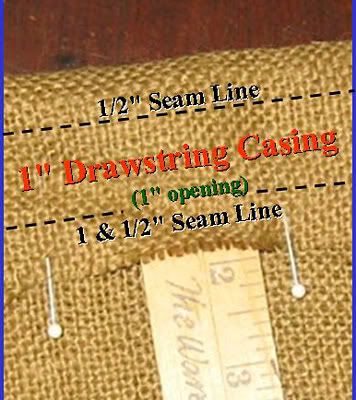 [Again! You have to IMAGINE that the bottom edge of the Tub Stool Body (the edge the PINS are going through) is sandwiched between Double Fold Quilt Binding in this PIC!] |
STEP FOUR; MAKE THE DRAWSTRING(S):
Cut about a 1" length of BLACK ELECTRICAL TAPE,
and TIGHTLY wind it around the DRAWSTRING cord at its END.
Cut TWO MORE 1" lengths of BLACK ELECTRICAL TAPE and
“PARK” them on your sewing table edge.
 |
|
TIGHTLY WIND a 1" length of BLACK ELECTRICAL TAPE
TIGHTLY WIND the other 1" length of BLACK ELECTRICAL TAPE CUT BETWEEN the two wound strips of ELECTRICAL TAPE. The ELECTRICAL TAPE keeps your cord’s ENDS from unraveling! |
STEP FIVE; INSERT THE DRAWSTRING:
Buy a Drawstring Threader!!!
This is a Dritz, but
Until you get one, you can
Any brand will do.
Use the old directions, below.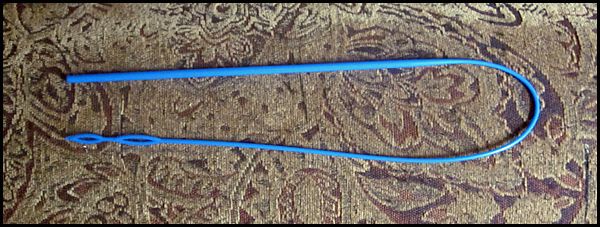
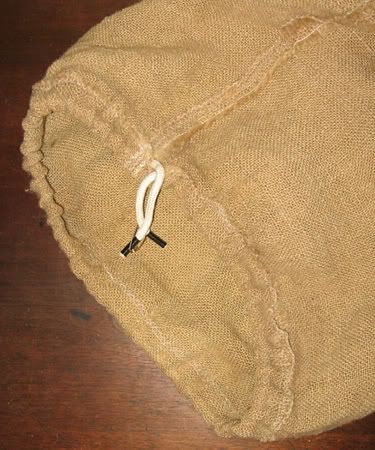
Insert that PIN into the OPENING of the
Scrunch the PIN through the DRAWSTRING CASING,
Do NOT let the UN-PINNED end of the DRAWSTRING
Once the PINNED end of the DRAWSTRING |
|
 |
OK. In REALITY, you’ve just finished PERUSING this PAGE!
That means, you should go to the PRINTER-FRIENDLY Instructions FILE now!
CLICK HERE to open the PDF INSTRUCTIONS FILE
For your PRINTING PLEASURE!
But, WAIT! There’s MORE!!!
[HEY! All the following is ALSO in the PDF file!]
Take 1 Tub Stool Cover, turn it UPSIDE DOWN and keep it open.
Put a Pillow Form into it, pushing the pillow down to the
SEAT END of the Tub Stool Cover, and CENTER it.
Invert the TUB and put its SEAT END into the UPSIDE DOWN Tub Stool Cover,
CENTERING it on the Pillow.
Pull the Tub Stool Cover Body UP and OVER the TUB, so that the
DRAWSTRING Casing is PAST the open end of the TUB.
Grab BOTH ends of the DRAWSTRING TOGETHER and
PULL them OUT OF the CASING, tightly drawing the
Tub Stool Cover Opening more and more CLOSED.
(The Tub Stool Cover’s opening should become tightly drawn
INTO the TUB’s open area.)
Adjust the CASING’s gathered bitz so that it is equally distributed
about the Tub Stool’s opening.
Take the LARGE SAFETY PIN out of the DRAWSTRING ENDS,
and insert it into the bottom of the Tub Stool Cover’s FABRIC (for “STORAGE”).
TIE the DRAWSTRING ENDS into a KNOT or a BIG DOUBLE BOW to secure it.
UP-END the Tub Stool and SET IT ON THE GROUND!
But, WAIT!
There’s STILL MORE!!!
UNTIE the Tub Stool DRAWSTRING.
Remove the LARGE SAFETY PIN from the Tub Stool fabric and
SAFETY PIN THE DRAWSTRING ENDS TOGETHER!
Trust me! You don’t want to let either end of the drawstring
get SUCKED into the CASING!!!
OPEN-WIDE the Tub Stool Cover.
Remove the TUB from the Tub Stool Cover.
Remove the PILLOW from the Tub Stool Cover.
Repeat this process for ALL TUB STOOLS. (LOL)
Use ONE Tub Stool Cover to store ALL PILLOWS in.Use ONE Tub Stool Cover to store ALL other TUB STOOL COVERS in.
STACK all NAKED TUBS together!
That’s IT!!! I’m SHUTTING UP NOW!!!”
 chas@novelholiday.com
