|
Make Your Very Own Jetpack Races. Using Paintshop Pro. |
|
|
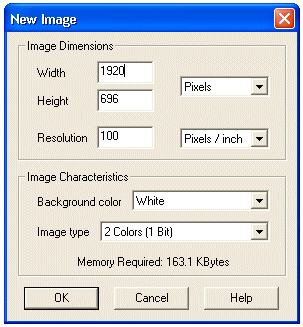
Step 1: Make a new terrain. - Select File > New. - Your New Image properties should match the ones shown in the picture to the right. - Save your new file as a .bmp file in the Import folder in the User folder of your Worms directory. - You should have a basic idea what your circuit should look like. Do you want to race on an existing racing circuit or do you want to design your very own track? |
|
|
|
Step
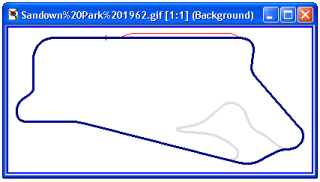
2: Making an Outline of the Map.
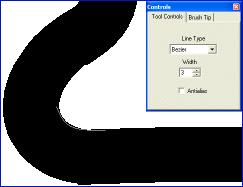
- If you are making a worms-version of a real racing track, check the internet for pictures of the course (Picture on top). I added a small links section on the bottom of this tutorial to sites covering pictures of the outlines of many circuits. - Resize (SHIFT + S) the picture you took from the net to fit 1920x696 format, usually this requires 300 to 400% of the original picture. It may take a few tries to make it fit perfect, but make sure the track doesn't come any close to the borders and make sure to make the color of the road on the preview black, otherwise it may not be shown on your 2-color terrain. - Now that you have an outline of the track in your picture, you must make the road wider to permit worms to fit through easily. Select your Line-tool and edit it's properties (Control palette, see picture below).
- Change the Line Type to Bezier and the Width to somewhere between 50 and 60 (second picture to the left). Now cover the whole course with lines, using a new line for each corner (See bottom picture). - If you have designed a map of your own, you can skip most of Step 2 up to the Line-phase. However, make sure your track is good to race on, don't make it too complicated, too narrow, or too easy to race through and make sure you know roughly what the track will look like before you start drawing lines. - Make sure you finish this step with the best result possible. You will need to edit any bad spots on the map, so make sure to limit these bad spots to a select few. |
| Step 3:
Finalizing the Course.
- Change your brush size to 3, now check each corner to see if they are perfectly round or in need of any editing. Use the same line trick to make the sides of the track smoother and use the paintbrush (size: 1) to fix any parts in need of editing (Zoom In to get a better view). - If you think the whole map is smooth and finished, add a start/finish line. Select a line (Type: normal, Width: 4) and draw it right where the finish is supposed to be. Now select the Text Tool and type S or Start or Start/Finish next to the start/finish line. Also add an arrow (type -> in text tool and fill the space between the two signs, rotate if necessary) indicating which way to travel. Finally, type the name of the course somewhere out in the open (text size for all these things should be 36 or 72). - Start worms and press the floppy in the terrain editor. Now selected the saved file and click on the small icon above the floppy (the white landscape), click yes and change the terrain options (no water, background terrain: bricks, no objects, no girders). Save the file as .BIT and test the map. Go back to PSP if your circuit needs any editing and save the new version in worms. - Send the .BIT to me and I will add it to the site, so that other players can race on it as well! (I'd be grateful if you send me a preview as well, you can make one by resizing the .bmp file to 300 width, 109 height and save it as .gif). |
|
|
|
Links to sites with pictures of race tracks: |