Basic Training Guide
Author: HHC
Basic Training Part 3: Achieving the Gold Medal.
Rope Skills Grade 2
Destroy 1 target within 50 seconds using the ninja rope.
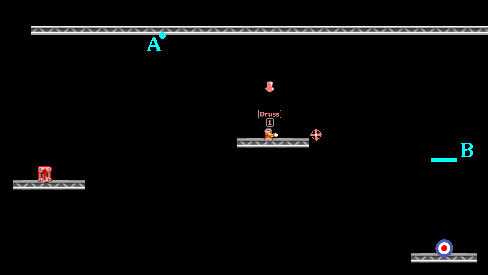
The objective of this training is to collect the crate on the left girder and to use it's content (a dynamite) to take out the target on the right girder. Start by aiming the rope at the top girder with an angle of about 50 to 60 degrees to the left and connect it to point 'A' (see picture). Now that you have connected your rope you can swing your worm to the crate without having to make a single rope swing. Once you have collected the crate, pull up until you reach the ideal roping height (see Rope Skills Grade 1) and make a few rope swings until you arrive at the point right above the target (remember you have only 1 rope, so don't take a break by landing on the middle girder). Once you are hanging above the target, drop the dynamite by pressing ENTER, do so from a safe height (the 'B' line) on the middle part of the girder with the target on it. Now you have exactly 5 seconds to make a safe landing (the exact same time as the dynamite fuse). Don't panic, make an easy rope swing to the left and allow your worm to land on the girder in the middle. Once the dynamite has blown up the target and your worm is safe, the training has been completed succesfully.

By pressing the ENTER key while your attached to the rope you release the weapon selected (as shown in the box next to your worm). This is a very handy trick in worms games because it allows you to stay on your rope until the retreat time has ran out. It also allows you to drop cows and other powerful weapons from a safe distance away from the blast.
Bazooka Skills Grade 2
Destroy 4 targets within 60 seconds using bazookas.
If you were able to complete level 1, this bazooka training won't give you much challenge either. The first two targets are easy shots. Aim straight at the targets and hold space for full power to destroy them. The third target is situated on the girder combination behind your worm's back. Once again you need to curve the zook over your own girder onto the target using the wind. Look at the wind at the bottom right of the screen or look at the falling stars on the background. You can test a few zooks to see how much power is needed and what the best angle would be to hit.
The last one however is situated in a cage like figure of girders just above the water. To take out this target you will have to bounce the bazooka across the water (the 'bouncing bomb'-trick). Aim to the right with an angle of nearly 90 degrees (see picture below) and hold the space for full power. Now be amazed as the bazooka hits the water surface to bounce off and gain new height. The bazooka is now able to reach the cage and fly right into it.

1. An almost 90 degree angle.
2. Where did that come from? The bouncing zook!
3. Mission accomplished!
Grenade Skills Grade 3
Destroy 5 targets within 99 seconds using grenades.
Without a doubt the most difficult training level of the basic training, the grenadetraining grade 3 requires you to make a very hard shot. But first let's focus on the easy ones. The first target falls on the second girder combination to the right, take it out with a 1-second grenade like you did in the previous sessions. The same applies to the second target, it will fall on the first girder combination to the right, 1-sec it and you can move to the third target. The third target falls on the third girder combination, you require a 2-sec nade for this one. It is the exact same shot as the last one of level 2, so this shouldn't be too much problem either if you succeeded in destroying it last time. You should have about 50 to 60 seconds left now to take out the remaining two targets.
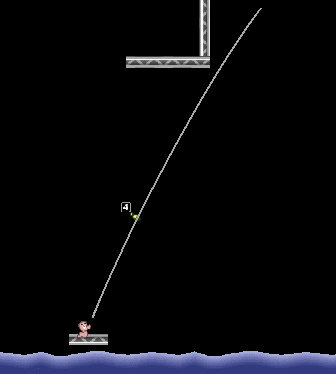
The fourth target is the one that requires quite some skill. The target is situated to the far right of the map, behind the other three targets and can only be reached by a grenade thrown with high angle. The easiest way to do this is to throw a 4 second grenade (press '4') with full power a tiny tiny bit to the right of the girders above you (see the picture below). If you do it right the grenade will fly all the way to the right to bounce on the girder combination with the target on it and explode close enough to the target to destroy it. If it doesn't work, you need to move your aim a little bit closer to the girder above you. It should hit within 3 or 4 tries.

Too bad there's no laser sight for grenades!
Now only one target remains for the gold medal! It's situated in a rather tricky place, right above your head! Be careful the nade doesn't bounce back on your own head. Perhaps the easiest way to do this one is to aim almost straight up and throwing a 2 second grenade on top of the girder. Try not to use a 4 or 5 second grenades, cause they might roll off the girder with devastating consequences. You can also hit the target from beneath by throwing a 1 second grenade close to the bottom of the girder, this will make the target on top of it explode, it's a bit more difficult, but it involves no risk of hitting yourself.
When you have succeeded to take out the target, the training has been succesfully completed and a gold medal will be rewarded to your team! Congratulations! You now have access to all the missions and a secret option will be waiting for you in the options menu (click on the yellow star)!