
Tutorial Ten (B) - Masked Top Border Stationery
Supplies - Mask and Graphic - HERE
You may substitute any bottom mask you have if you don't like this one.
Mask should be placed in your MASK folder in PSP.
The graphic can be saved to your desktop and opened from within PSP.
Let's Go!!!
Open Graphic - Shift D to duplicate and close the original
Resize so that the width is 400 pixels
Click on the layer in your layer palette and Promote Background Layer
Layers, Load/Save Mask - locate the mask you downloaded
Load the mask, make sure you have checked Invert Mask/Adjust
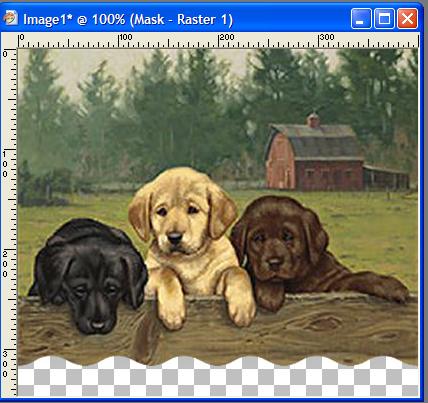
You should now be seeing this:
While the mask layer is still the active layer
Layers - Delete - Yes
Now you can add a slight drop shadow if you like
Layers - Merge Group
Blend the edges of the graphic - Seamless Tile - Edge - Horizontal - Transition 100% - Width 400 (the width of your graphic)
Add a New layer - Layers - New Raster Layer
Layers - Arrange - send to bottom
Image - Canvas Size
Width 400 - height 2000 - Middle top arrow

Flood fill the bottom layer with a contrasting/matching color of your choice
While the bottom layer is still active - seamless tile - width 400 - allother settings as before.
File - Export - JPEG Optimiser - about 10% compression
Assemble in Letter Creator as a tiled background, adjust your top margin so that the text is below the top graphic.
The tutorial was written by Tzeriah, exclusively for the Wendy's Works Learn PSP Beginners class. Any similarity to other tutorials is purely coincidental.
Please link to the tutorial with text "Tutorial by Tzeriah" and mailto:wwpspclasses@yahoo.com.au
