How to use your hand as a nocturnal
Return to the top
The Hand Dial: a Universal Ring Dial
The hand dial is a way to use your own two hands as a
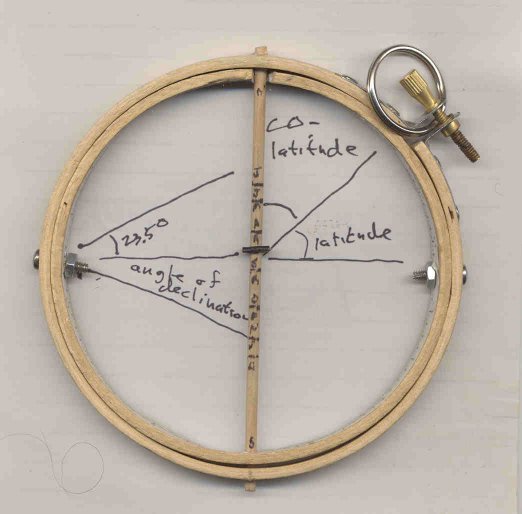
universal equatorial ring dial You can see a photo of a Universal Ring dial below.
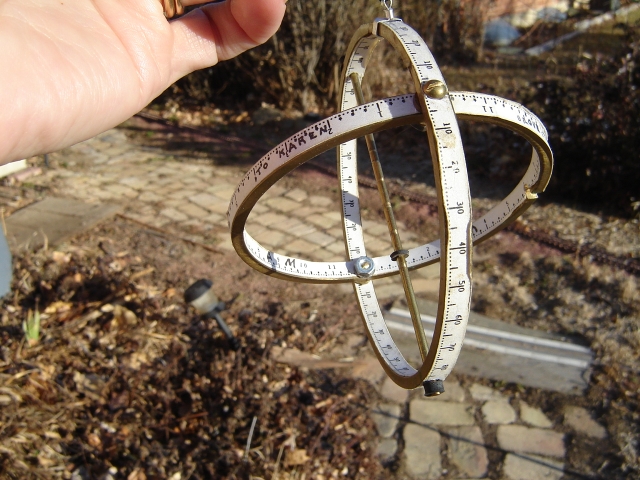
The universal ring dial is a portable dial that can also be
used as a compass. When it is aligned so that the shadow
of the gnomon falls on the dial, is automatically points
north.
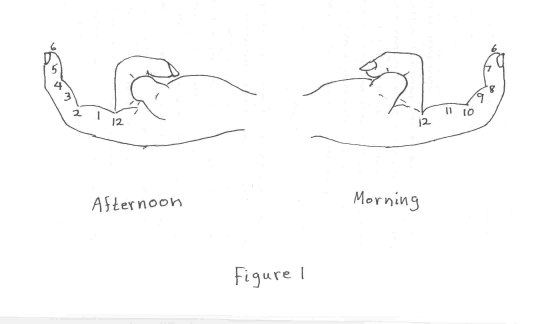
How to make the hand dial
The hand dial uses the forefinger of one hand to form
the gnomon. I will call that finger the gnomon finger. It
uses the forefinger of the other hand to form a quarter of
the ring where the hours are marked. I will call that finger
the dial finger, and that hand the dial hand. In the morning
the dial finger will be the right forefinger, and in the
afternoon it will be the left forefinger. The reverse will
be true of the gnomon finger.
Form the dial hand into a fist, palm up, with the thumb
inside. Stretch the first finger out into a hook.
(See figure 1.)
Curve the finger to approximate a quarter circle. The
creases of the finger form the even hour lines, as marked
in figure 1.
The first finger of the other hand forms the gnomon.
Lay it across the knuckles of the dial hand.
(See figure 2.)
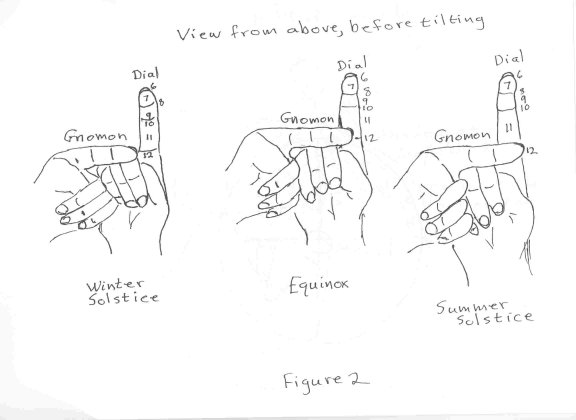
At the summer solstice, the tip of the gnomon finger
should line up with the outside edge of the dial finger.
At the equinox, the tip of the gnomon finger should line up
with the center of the dial finger. At the winter solstice,
the tip of the gnomon finger should line up with the inside
edge of the dial finger. These positions are shown in figure2.
At other times of the year, approximate the position between
the given positions. Adjust the dial finger slightly so that
the gnomon finger passes through the center of the circle.
(See figure 3.)
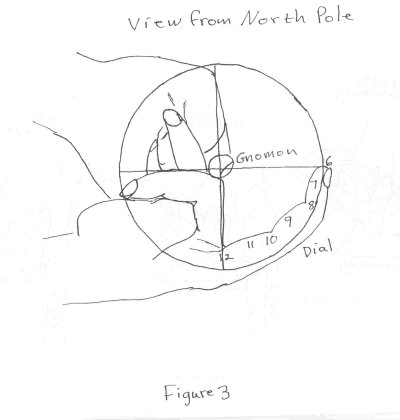
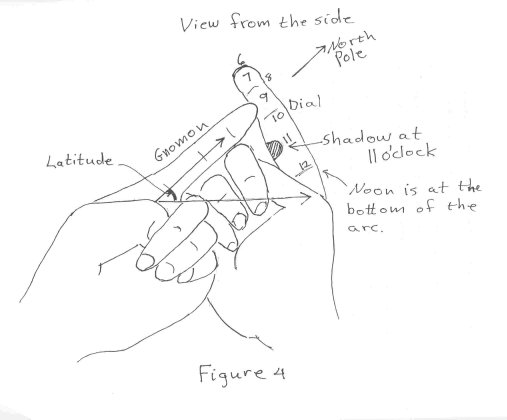
Tilt the hands so that the gnomon finger forms an angle
with the horizontal approximately equal to the latitude.
(See figure 4.)
At the middle latitudes, this is a natural
and comfortable position for the two hands. The plane of
the quarter circle of the dial hand will still be perpendicular
to the gnomon. At the equinox, the tips of the two forefinger
should lie on a horizontal line. This won't quite be true
at other times of the year, but the position of the dial hand
should remain the same. The noon mark should lie at the bottom
of the arc.
Turn your body so that the shadow of the tip of the gnomon
finger falls halfway between the two edges of the dial finger.
(See figure 4.)
The gnomon finger will now be pointing
approximately toward the celestial north pole. From the position
of the shadow, read the time, using the numbers given in the
figures.
If you are on daylight savings time, add an hour. If you are east
of the meridian for your time zone, subtract 4 minutes for each
degree east. If you are west of the meridian for your time zone,
add 4 minutes for each degree west. If you're really picky,
you can adjust for the Equation of Time
This dial only gives the hours between 6 am and 6 pm.
If you want to use it in the early morning or late afternoon
in the summer, you can turn the whole thing upside down to
get those hours. It's awkward, and you have to hold your
hands a little above your head, but it can be done. You still
have to make sure that the gnomon finger forms an angle with
the horizontal equal to the latitude. The 12 o'clock mark
now represents midnight and is at the top of the arc. You
also have to switch hands when you turn the dial upside down.
Return to the top
The Emboidery Hoop ring dial
If you have read the description of the universal equatorial ring dial,
the picture should be fairly self-explanatory.
The embroidery hoop dial is not truly universal, because you
can't adjust for latitude. But a four-inch embroidery hoop costs
less than a dollar, so it's easy to make a new one if you move.
Bolt the two parts of the embroidery hoop together, so that
the arc between the clasp and one bolt forms an angle equal to
the latitude, and the other bolt is 180 degrees from the first one.
You will have to drill holes through the hoops for the bolts.
Drill holes at 90 degree angles from the bolts, and insert a dowel.
On the inside hoop, cut away the wood on one side of one hole, and
on the other side of the opposite hole, so that the inside hoop can
swing out at right angles to the outside hoop.
From one of the bolts, measure the angles 23.5 degrees, 20 degrees,
12 degrees and 0 degrees, using the the line between the two bolts
as the baseline. Measure the same angles on the other side. Mark
where the angles cross the dowel. These represent the declination
of the sun on the 21st day of the following months: June, July and
May, August and April, September and March, October and February,
November and January, and December.
Put a small rubber washer on the dowel. It should fit snugly so that
when you slide it to a place it stays there. You can cut one out of
a sheet of rubber with a leather punch. Slide the washer to the
current date. The washer is the gnomon, which will cast the shadow
and tell the time. Once the washer is in place, glue the dowel in place.
On the inside of the inner hoop, mark the hour lines. Noon is at the
bolt furthest from the clasp. The marks are at 15-degree intervals.
Moving toward the clasp, mark 1, 2, 3, 4, 5, 6, 7, 8, 9. Moving away
from the clasp mark 11, 10, 9, 8, 7, 6, 5.
Open the dial and let it hang from the clasp. Turn it so that the
shadow of the washer falls on the dial. There are two orientations
for which that will happen. You have to know whether it is
morning or afternoon to tell which is correct. Once the dial
is aligned, the gnomon will automatically point north.
If you are on daylight savings time, add an hour. If you are east
of the meridian for your time zone, subtract 4 minutes for each
degree east. If you are west of the meridian for your time zone,
add 4 minutes for each degree west. If you're really picky,
you can adjust for the Equation of Time
I don't have a photo of my embroidery hoop sundial in action, but here's a photo of the sundial my husband made for me of brass. He glued paper scales onto the brass. I copied the design of the embroidery hoop sundial from this one. The photo was taken at 8:40 AM.
This page has several paper sundials you can print out, including a universal ring dial. To get to it, click on the photo of the paper universal ring dial. It's very much like the historical ones, and is very cleverly made out of two pieces of paper. However, like the historical ring dials, it's hard to see the spot of light in actual practice. I find that the rubber washer I use works much better.
UpdateK. Rainer Birk sent me an e-mail with a link to his page describing a dial he made. It also uses an embroidery hoop, but uses CDs, an audio cassette box, and other bits of leftover electronic hardware for the gnomon. He says it solves the problem of having the hoops block the shadow of the rubber washer during the equinox. It's very clever and handsome. You can see it here.
Return to the top
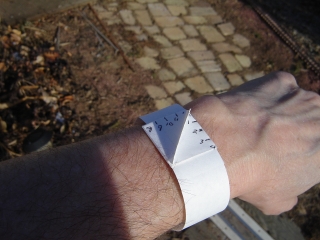
How to Make an Origami Sundial Wristwatch
This is based on a coconut leaf sundial that I read about on a
website from India. The site is here, but the
page doesn't seem to be up anymore. The instructions were pretty
incomplete anyway. We don't have coconut leaves where I live, so I
made a version out of paper. (The folding was a little different
on the leaf dial. For one thing, the gnomon was a separate
piece cut out and inserted into the dial.
In my paper version, it's all folded out of one piece of paper.)
For those who are curious, the instructions for the coconut leaf
sundial were as follows: "You can make a wearable sundial watch out
of coconut leaves. This can be done by selecting a long fresh
coconut leaf. Take one of the strands and use the green part of by
removing the stick from its ends. The leaf needs to be bent at
right angles and wrapped around three times. Then again fold it in
right angle and insert it into one of the folds and pull it out so
that it becomes like a watch with straps on either side. Choose one
of the straps to make the gnomen and insert into the face of the
watch. Use the other one to wrap the watch around your wrist. We
are doing the sketches to make this more understandable and shall
upload it shortly." --colorsofindia.com, October 2000
If you want to experiment with the above instructions and don't have coconut leaves where you live, I've found that the leaf of a spider plant, commonly found in offices, kind of works. But paper works much better.
The sundial is designed for latitudes between about 40 and 45
degrees (the lines are for 40 degrees and the gnomon is for 45
degrees.) It can be used outside those latitudes, but you may have
to tip it a little to get it to work. You could make it more
accurate, but part of the fun of this design is how simple it is to
lay out. I've made it without measuring anything, just eyeballing
things, and it was accurate to within about half an hour.
This dial only tells the time between 8AM and 4PM, fine for midwinter,
but it doesn't work well on a summer evening or morning.
Cut a strip of paper the length of the sheet and about an inch wide.
It will be eleven inches long by one inch wide. The exact
dimensions aren't important. Fold the end of the paper over
(valley fold), about three inches from the end (1).
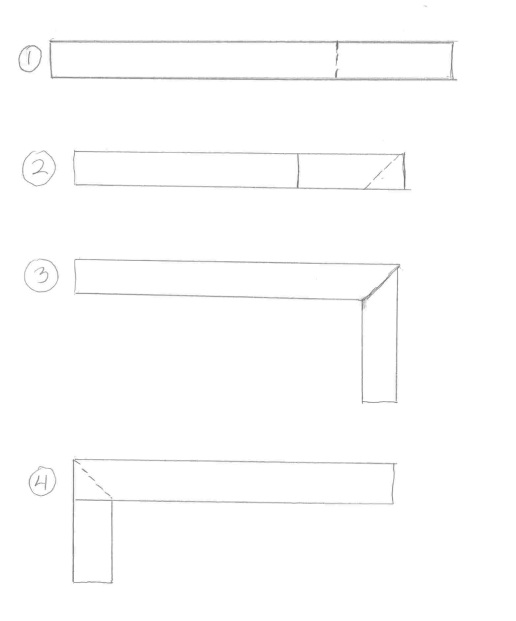
Fold the top part downward diagonally (valley fold) (2). The result
looks like (3).
Turn the paper over (4). Fold the top part downward diagonally
(valley fold) (5).
Fold the longer top layer upward, opening the two layers like pages in a book, so that the triangular gnomon is behind them. See on the diagram where point x moves(6). Turn over and fold the part below the triangle upward. This time it is like closing the pages of a book. The triangular gnomon will be between them. See on the diagram where point y moves (7) (8).

At the center of the bottom of the strip is a triangular piece.
That is the gnomon. Reach in and hold it between your thumb and
finger. Allow the rest to open out. It should look like (9). The
horizonal part is the dial face.
Fold the longer strip under the dial face, using a mountain fold.
This will be the wristband. (10).
Fold the shorter strip under the dial face, using a mountain fold (11).
Tuck the end of the shorter strip into the pocket under the dial
face (11) (12).
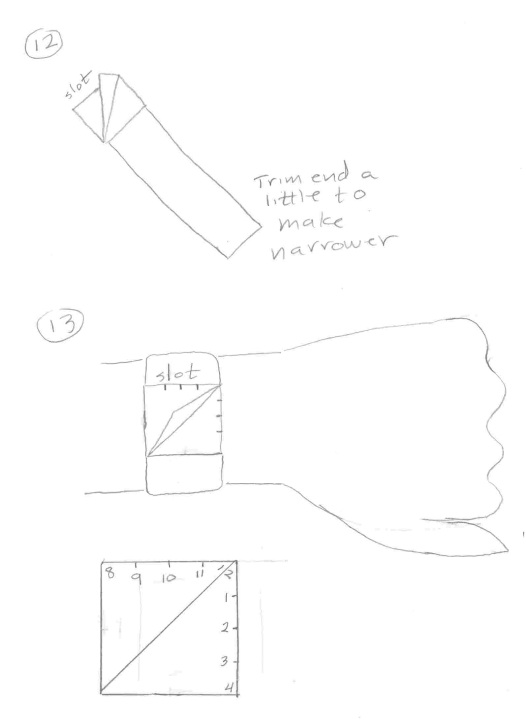
The longer strip is the wrist band. Wrap it around your wrist, and
poke the end into the slot under the dial face. You will probably
have to trim a little of the width at the end of the wrist band to
get it to fit into the slot. Push until it fits snugly on your
wrist. The end of the band should stick out under the watch face. Note how far it sticks out. If it is more than half an inch, take the watch off and trim off the excess. Fold the last quarter inch of the band under with a mountain fold and put it back on. The quarter-inch fold should latch around the underside of the watch and keep it from coming unfastened. You may also find it helpful to put a small piece of clear tape around the side of the dial farthest from your hand. This will help the dial stay flat.
Mark the hour lines. Along the top and right side, put marks
dividing the sides into fourths. You can label the marks
as shown in the diagram, or just remember what hours they stand for.
The three corners and 8AM, 12 noon, and 4 PM.
Stand with the dial horizontal and the 12 mark pointing north, if
you are in the northern hemisphere. (If you are in the southern
hemisphere, you will stand with the 12 mark pointing south. In that
case, you will also reverse the numbering, starting with 8 on the
right and ending with 4 on the left.) The place where the shadow
of the gnomon crosses the edge of the square indicates the time.
Note: The way I have drawn this, you have to stand with your back
to the sun, which sometimes makes it difficult to get the sun to
shine on your dial. You may want to put it on upside down and face
the sun. That will make it easier to read, but I find that I'm so
conditioned to seeing 12 at the top of a watch face that I like to
read it in a way that looks right side up to me.
You do have to know which way is north for this to work. Where I
live, the streets are laid out north-south-east-west, so it's easy
to tell. There's also a range of mountains nearby that runs almost
perfectly north and south. If you don't know which way is north,
try using my hand dial.
Note: If you like, you can cut the strip out of lined notebook
paper, making it the same width as four lines. If you do, the hour
lines will be marked automatically. The only problem is that with
most notebook paper, four lines is pretty wide. The other problem
is that the lines go in toward the gnomon at a different angle from
the shadow, which makes it a little confusing to read. In my
experience, marking the hours on the edge of the square is
better. (A coconut leaf has a natural line down the middle,
so the hours 8,10,12,2, and 4 are marked on it naturally.)
If the wristband is too short, try making the strip narrower.
The first fold is three widths from the end, so making
the strip narrower makes the wristband longer.
Here's the sundial showing 8:45 AM.
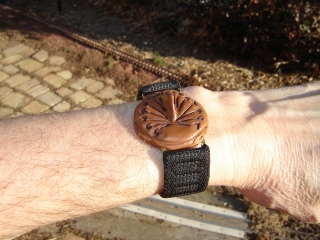
And here's a photo of a wristwatch sundial I made out of Fimo. I used the instructions below to lay out the hour lines. I inserted two brass loops to hold the strap before baking the sundial, and then sewed on an elastic strap.
Return to the top
How to Lay Out a Horizontal Sundial
The horizontal sundial is the kind most of us are used to seeing in gardens, which is why I call it the "garden-variety sundial". Most books on making sundials give instructions for making this dial using complicated tables or trigonomtry. But it can actually be laid out using nothing more than a protractor and a pencil.
Imagine an equatorial dial, with a dial plate parallel to the equator, divided into fifteen-degree hour lines. The gnomon runs through the center of the dial plate, and makes an angle with the horizontal equal to the latitude.
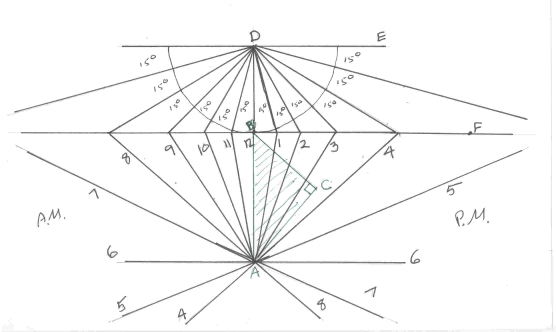
Now imagine laying the dial plate and the gnomon down on the ground. The result will look like the diagram below. The green shaded right triangle is the gnomon, with the angle of latitude at point A. The semicircle is the plate of the equatorial dial. If you were to tilt the green triangle up perpendicular to the page, and fold the semicircle up so that BD lay on BC, it would form an equatorial dial. You can see a nice 3-dimensional picture of what I'm talking about here.
To lay out the horizontal dial, begin by drawing a vertical line through point A. Draw AC at a convenient length, so that AC forms an angle with the vertical line equal to the latitude. Draw a line perpendicular to AC at C, and mark the place where it intersects the vertical line B. Triangle ABC should be a right triangle, with angle A equal to the latitude and angle C a right angle. Call the vertical line AB.
Extend line AB upward, and mark D so that BD is the same length as BC. Draw a horizontal line through D. I call this line DE. Draw a horizontal line through B, and call it BF.
Measure angles from D in increments of 15 degrees, and extend them until they intersect the horizontal line BF. I have drawn a semicircle centered at D with radius DB, so that you can see the 15-degree angles more clearly, but this is not necessary. These lines represent the hour lines on an equatorial dial.
Consider the points where the equatorial hour lines intersect the horizontal line BF. Connect those points to point A. Draw a horizontal line through A. Extend the lines for 4,5,7 and 8 through A and out the other side. These lines represent the hour lines on a horizontal sundial.
Copy the hour lines onto your dial plate. Set up the plate horizonally, with A pointed south and B pointed north. Make the gnomon ABC, and set it up perpendicular to the dial plate, matching points A and B. AC should point to the celestial north pole.
This is all much simpler than my words make it sound. The diagram should be pretty self-explanatory to anyone familiar with sundials.
Return to the top
The Universal Capuchin Sundial
The Universal Capuchin sundial is a generalization of the Capuchin sundial, which is described in detail on the www.sundials.co.uk/projects.htm page. I highly recommend that you read Anders Bergstrom's instructions on that page before looking at mine. The Capuchin sundial is an altitude dial, which tells time by the altitude of the sun above the horizon. It can be drawn on a card, and is very portable.
The Capuchin sundial takes its name from the hoods of the Capuchin monks, which were apparently long and pointed and resembled the design on the sundial. The Capuchin hoods also gave their name to the Capuchin monkey, whose hair resembles the hood coloring, and the Capuchino coffee, whose color and froth also resemble the hood.
Another name for the Universal Capuchin dial is the "Regiomontanus" dial. The name comes from its inventor, Johannes Müller. He lived in Königsberg, which means "King's Mountain". The Latin translation of the town's name is "Regiomontanus". Müller published this dial in 1474.
To draw the Capuchin sundial, you have to incorporate the latitude at which it will be used. The Universal Capuchin sundial, on the other hand, can be used at any latitude, though it is cumbersome above 70 degrees. There is a similar sundial described in this article and this article, but I have been unable to find instructions for its construction anywhere on the Internet, which I why I have posted them here.
I originally read about this type of sundial over twenty years ago in some library book whose name I have long since forgotten. (Update It was "Sundials, their construction and use" by Mayall and Mayall. Highly recommended.) At the time I drew one, and that's the one you see here (apparently I couldn't spell "meridian" back in 1984. Oh, well.):
Using the following instructions, you can print this sundial and use it, but you may want to draw your own, so I will include instructions for laying it out. If you are in the southern hemisphere, you can still use my sundial, but you will have to reverse the dates, exchanging June for December, May/July for November/January, and April/August for October/February. March and September will be the same. Here is a link to a larger image:
Large image of Capuchin sundial
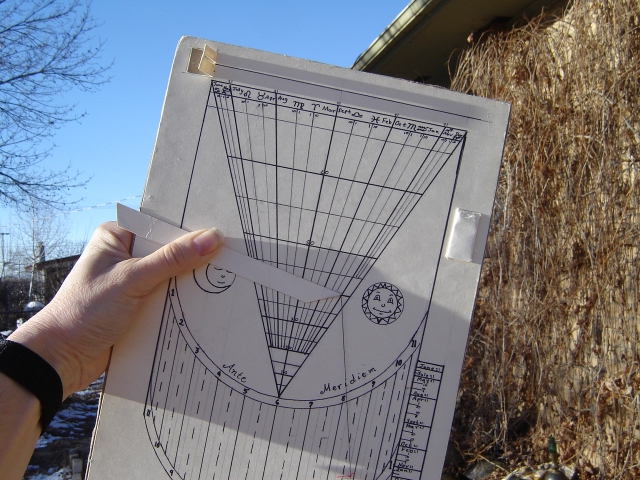
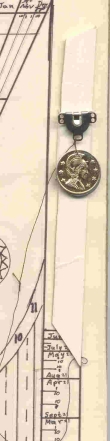
To use the Universal Capuchin sundial, begin by making a pointer of cardboard with a thread glued to the end. [In my photos, the thread has come a little loose in the past twenty years, and doesn't hang from the very end of the pointer as it should. When I have time, I'll try to fix it and redo the photos.] Put a weight at the end of the thread, so that it will hang vertically. I used some decorative coins, but a large button or a small washer would work. Put a slideable marker on the thread. Historically this was a bead, but I had better luck just tying a knot around the thread in a contrasting color of thread.
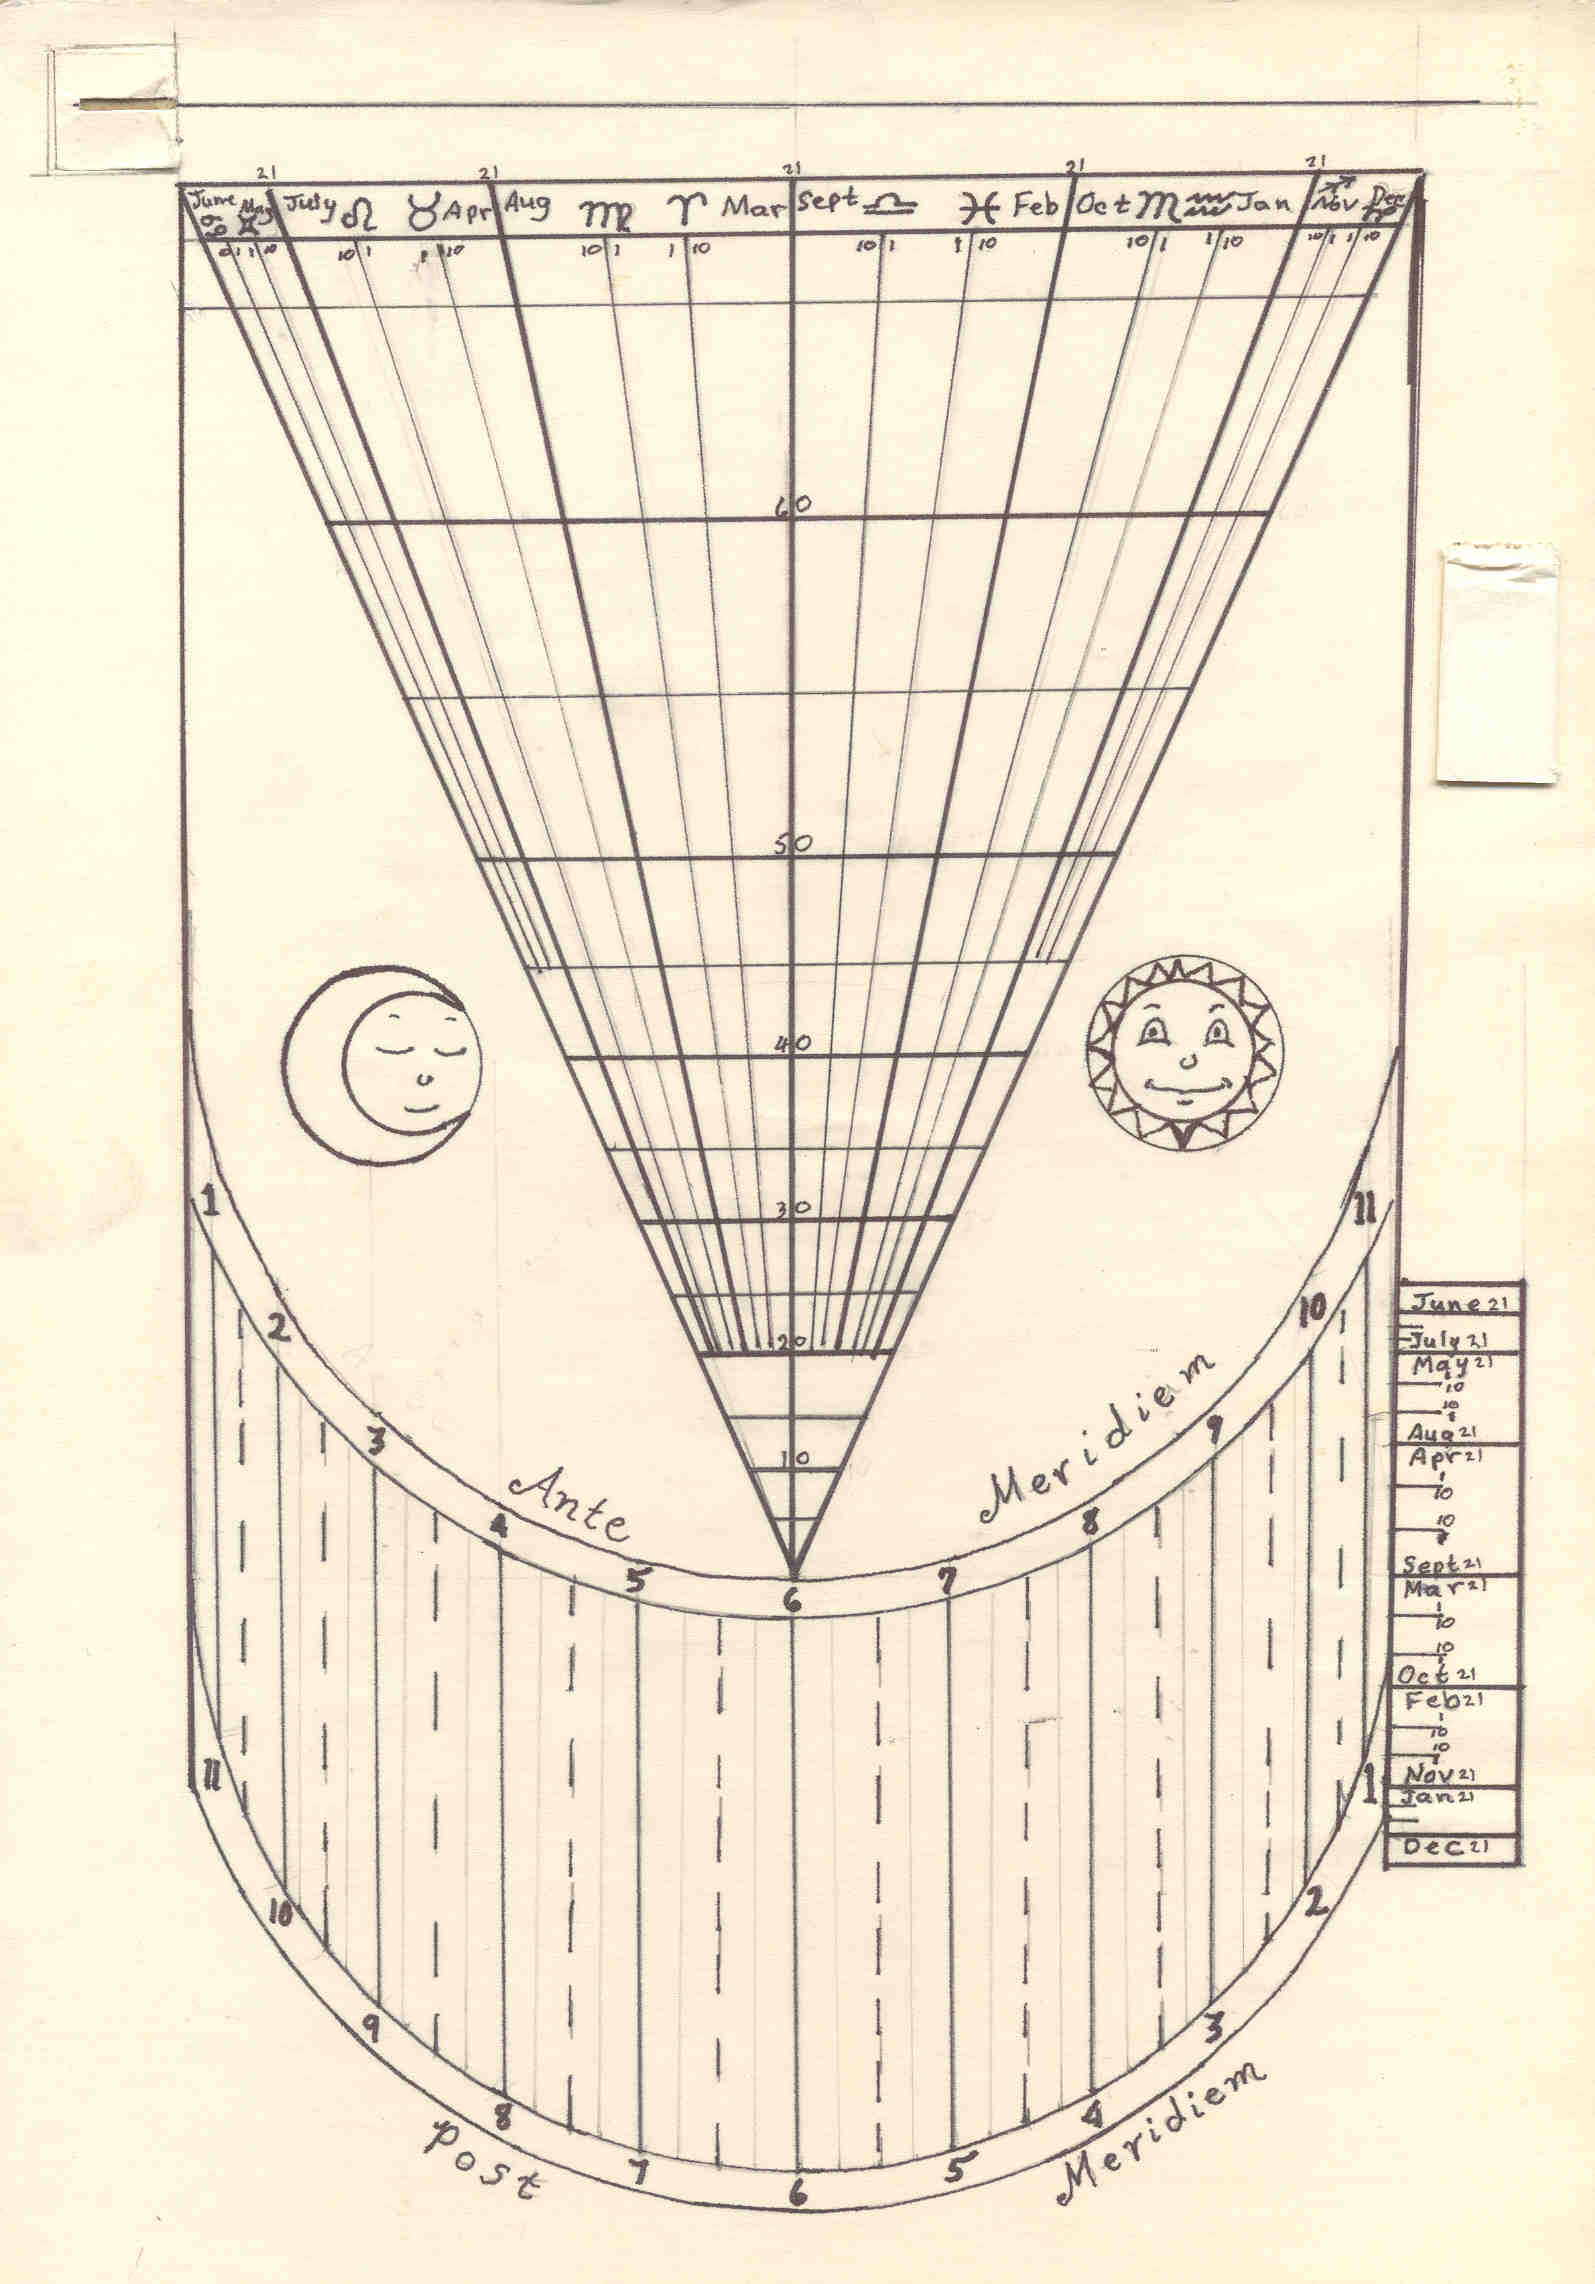
Place the pointer on the dial so that it points to the latitude and the date, as in the figure below. The dates are marked at the top, with the heavy lines representing the 21st of each month, since the solstices and equinoxes are on or about the 21st of their months. On tradtional dials, the dates were marked with the astrological signs. Also, on traditional dials, the pointer was connected to the plate as an articulated arm. I found it much simpler to make the pointer separate, and just hold it in place with my thumb. In the diagram, the pointer is pointing to January 21 or November 21 at 40 degrees latitude.
Pull the bead (or knot) so that it falls on the date on the table at the right of the dial.

The gnomon is at the top of the dial. It is a small flap with a slit in it. The flap pulls out so that it lies at right angles to the dial. Hold the dial so that the sun shines through the slit and falls along the horizontal line at the top of the dial, beside the flap. Note where the knot falls. The hour lines are marked in the crescent shape at the bottom of the dial. At the right is noon, at the left is midnight. (Of course your dial won't work at midnight unless you live above the Arctic Circle, in which case you'll have to extend the latitude chart.) Since the dial is an altitude dial, you will have to know whether it is morning or afternoon. The time in the photo below is either 9:15 AM or 2:45 PM.

This dial becomes more accurate the farther you are from noon. In the early morning or late afternoon, I can find the time to within about five minutes. Of course, to be that accurate, you will have to adjust for the Equation of Time, your longitude, and Daylight Savings time as described above.
Here it is in actual use, showing 8:45 AM.
              How to Lay Out the Universal Capuchin Sundial

The dial is made of five parts:
- The pointer with the weighted thread
- The gnomon
- The hour lines
- The lines of declination
- The lines of latitude
I have already described the pointer with the weighted thread. The gnomon is a rectangle cut on the top, left side, and bottom, and folded on the right side. A slit runs through it horizontally from the right side most of the way, but not all the way, to the left side, as in the photo. A horizontal line is drawn from the slit to the right. The sun will shine through the slit onto this line when the dial is tilted.
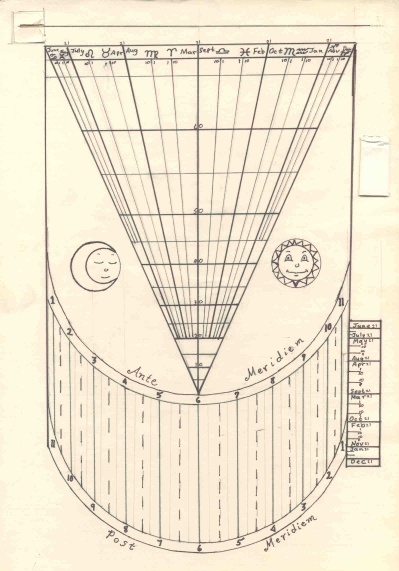
To draw the hour lines, refer to Figure 1 below. Draw the bottom half of a circle. Draw a second semicircle so that it passes through the center of the first and has the same radius. Call the center point of the first semicircle (the one that becomes the lowest point on the second semicircle) the "center of the hour plate". Divide each semicircle into 15-degree arcs. Connect the arc divisions with vertical lines. I have called the resulting crescent shape the "hour plate".

To draw the lines of declination, refer to Figure 2 below. I have included an outline of the hour plate for reference. The declination of the sun is a measure of how far north or south of the equator the sun is on a given day, measured as an angle. On December 21, it is approximately 23.5 degrees south of the equator. On June 21, it is approximately 23.5 degrees north of the equator. On March 21 and September 21, it is on the equator. The declinations for the 21st of February and November vary a bit, but I have approximated them with 20 degrees south. Similarly for April and July at 20 degrees north, February and October at 11 degrees south, and April and August at 11 degrees north. You can find a more accurate table of declinations here.
From the center of the hour plate, draw a horizontal line to the right, and measure the angles of declination on either side of it. Let the horizontal line be 0 degrees, and let down be south and up be north. Mark the places where the angles intersect the vertical noon line.
Draw a vertical line upward from from the center of the hour plate, and measure angles of declination on either side of it. Let the vertical line be 0 degrees, and let left be north and right be south. If you live in the southern hemisphere, you will want to reverse north and south as described above.

To draw the latitude lines, refer to Figure 3 below. I have included an outline of the hour plate and the two outermost lines of declination above the semicircles for reference. Starting with the horizontal line to the right being 0 degrees, measure angles upward in increments of 10 degrees. Mark the places where the angles intersect the vertical noon line. At each place of intersection, draw a horizontal line to the left. The horizontal lines are your latitude lines. When you draw the dial, you will erase the latitude lines outside the lines of declination, as well as the original latitude angles.

When you include all the parts of the dial, it should look like the photo:
I made a little paper loop, like a pocket open at both ends, to store the pointer when I wasn't using it. I put in on the right side of the dial. I also used a fabric hook, (the kind you buy at a fabric store for fastening skirts) to hook the weight onto the pocket so it wouldn't flop around during transport. You can see what it looks like here:
Return to the top
Using Your Hand as a Nocturnal
I got this idea from an article called "Time at Your Fingertips" in the September 2000 issue of Fred Sawyer's sundial magazine "The Compendium". The idea is centuries old; I'll describe it in my own words here.
A nocturnal is an instrument for measuring time at night using the stars. A modern star finder like this one can be used as a nocturnal: you can align the stars with the way they appear in the sky, and read the time next to the current date. But with a little thought you can approximate the time just by looking at the stars, and you can use your hand to help measure the angles. I will describe the "star clock" first, and then describe how to use your hand as a protractor.
In the northern hemisphere, the stars rotate around the North Star, making one revolution in approximately 24 hours. (It is actually slightly less than 24 hours, because the stars move about one degree west from one night to the next.) On March 6, the pointer stars on the Big Dipper (also called the Great Bear, the Wain, or Ursa Major) lie horizonally to the east of the North Star at 6 PM. At midnight they are vertically above the North Star, and at 6 AM they are horizonally to the west of the North Star. The other times are between those in increments of 15 degrees, so for example at 9 PM they form an angle of 45 degrees with the horizontal to the east, and at 3 AM they form an angle of 45 degrees with the horizontal to the west. On September 20 the leading star in Cassiopeia becomes the hand of the star clock.
See the diagram below:

Adjusting for other dates besides March 6 and September 20 is a little tricky. I will try to describe it here. I will call March 6 the "target date" for the Big Dipper, and September 20 the "target date" for Cassiopeia.
Every month the stars move two hours to the west. So two weeks will change the star clock by one hour, and one week will change the star clock by half an hour. Look at the sky and see which constellation is the easiest to see. Figure out whether the nearest target date is in the future or the past. For example, if today is January 1, March 6 is about two months and one week in the future. Two months and one week correspond to four and a half hours. Suppose that the Big Dipper is in the 7:30 PM position. Since the target date is in the future, add four and a half hours to 7:30 PM to get midnight. On the other hand, suppose Cassiopeia is at the 6:45 AM position. If today is January 1, September 20 is about 3 months plus a week and a half in the past, which corresponds to six and three-quarters hours. Since the nearest September 20 is in the past, subtract 6 3/4 hours from 6:45 AM to get midnight. The star clock says that it is midnight on January 1.

To use your hand as a protractor, notice that when you spread your fingers and extend the lines along your thumb and little finger, that they form about a right angle. The angle between your thumb and first finger is about 45 degrees, and the angles between your other fingers are each about 15 degrees. Fifteen degrees represents one hour on the star clock. If you hold your hand so that the base of the palm opposite the thumb is over the North Star, you can use your fingers to figure out how many hours the clock's indicator stars are from vertical or horizontal. You will have to turn your hand different ways depending on where the stars are. See the diagrams below. They show the left hand, sometimes with the palm out, sometimes with the palm in. There are four similar ways to hold the right hand.


To keep track of the fact that March 6 goes with the Great Bear and that September 20 goes with Cassiopeia sitting in her chair, I came up with the mnemonic rhyme "Spring bear fall chair", and extend it to the sentence "In the spring, the bear fell off the chair." Pretty silly, but it works for me.
In the Southern Hemisphere a similar technique could be used, using circumpolar stars. They would rotate counterclockwise instead of clockwise. This site is helpful for finding the celestial south pole. The two pointer stars in the Southern Cross would make a good indicator. March 29 would be the target date for the Southern Cross. On that date it would be east of the south pole at 6 PM, straight up from the pole at midnight, and west of the pole at 6AM. Remember that you would have to use a mirror image for the star clocks that I have drawn. This site explains in detail how to use the Southern Cross as the indicator for the star clock.
If you enjoyed this page, you may also enjoy the Perpetual Calendar on my How To page.
You may also be interested in James E. Morrison's excellent site on astrolabes: http://www.astrolabes.org/ The book he sells on his website is far and away the very best book on astrolabes ever.
Update I just received another book that might be of interest: Yvon Masse's book De l'analemme aux cadrans de hauteur. It discusses the history and construction of several dials of the Regiomontanus type, including a few of the author's modern variations. It's in French, and I don't speak the language, but I was able to make out most of it because of the many diagrams and the fact that many technical terms are similar in French and English. I especially enjoyed his "solar compass", which is a variation on the universal astrolabe.
Return to the top

copyright 2006 by Karen Deal Robinson
Click on the mountaintop to see my other pages.


