Return to the main labyrinths page.
Return to home.
Small Labyrinths you can make at home.


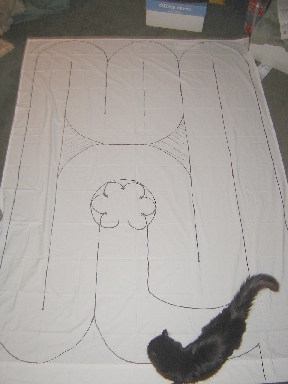
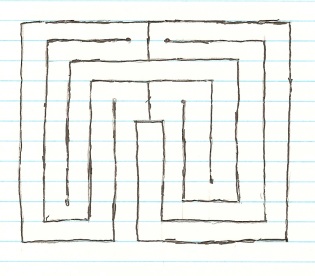
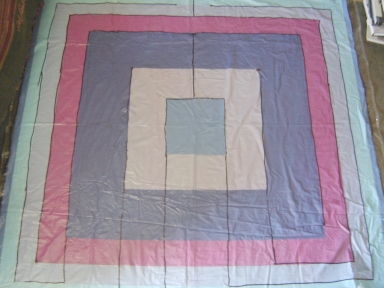
The Half-Chartres Pattern on a Dropcloth
Return to contents
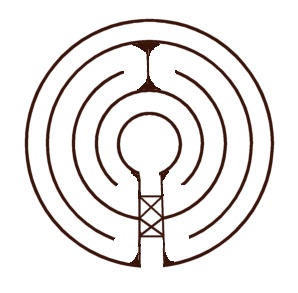
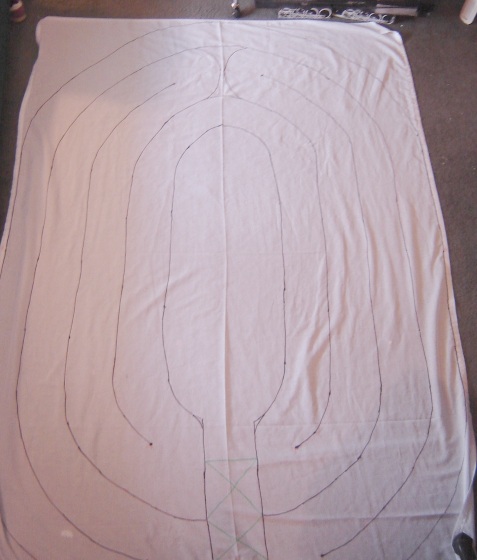
When you walk the Chartres labyrinth, you walk the inside half of it first, and the outside half second. The outside half is almost a repeat of the inside half. The design above is the inside half. (This design appears in mirror image in a church at Guingamp in Brittany, dating from the late 1850s, according to Jeff Saward's book "Labyrinths and Mazes".) If you walk it twice, you get what amounts to about 80%-91% of the full Chartres labyrinth. (80% matches parts of the Chartres labyrinth exactly. Another 11% is very close, but there are a few turns that don't match. See my Labyrinths you can do anywhere page for a more detailed explanation.) It's small enough that it fits comfortably on a 12-foot by 12-foot dropcloth:
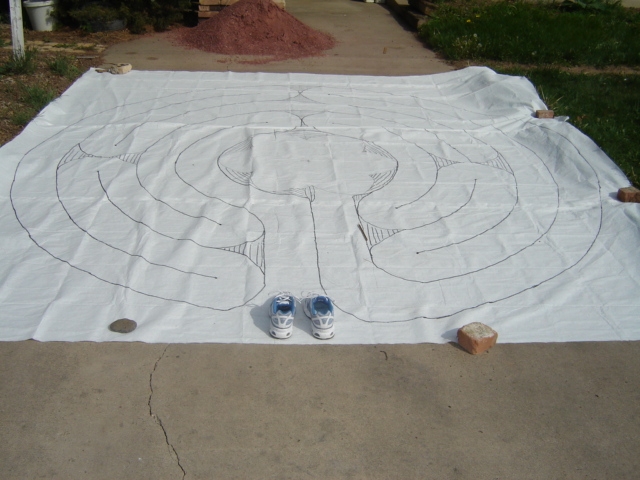
I actually bought two 8-foot by 12-foot dropcloths made of plastic and a tough paper. I sewed them together along the 12-foot side, and cut three and a half feet off the end to make a 12-foot square. I used the cut-off parts to make another smaller labyrinth which I'll describe after this one.
To make this pattern, measure out from the center 21 inches in eight directions and put pencil marks there, then connect the marks with pencil to make a 21-inch-radius circle. Mark out nine more inches from the circle in several directions, and draw another circle. Then another circle nine inches beyond that, until you have six concentric circles. Draw the turns next. See the section on how to draw labyrinths for directions.
Next go over the circles using a permanent marker. When you come to a turn, leave a gap. You'll notice that I made a mistake in one of the turns on my dropcloth labyrinth. I later went back and patched it by gluing a piece of white paper over it. I also mistakenly made the path that goes into the center to the side of the vertical axis, whereas it should be coming exactly up the middle.
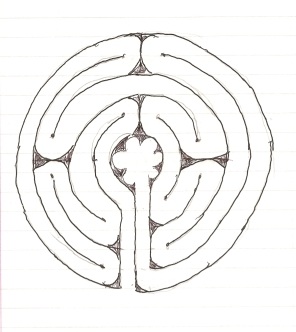
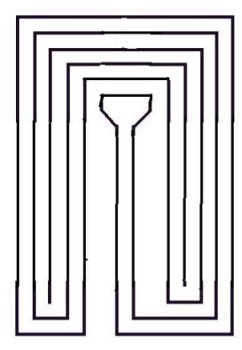
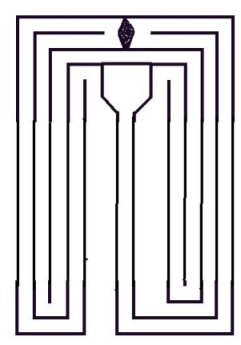
The Compressed Half Chartres Labyrinth
Return to contents
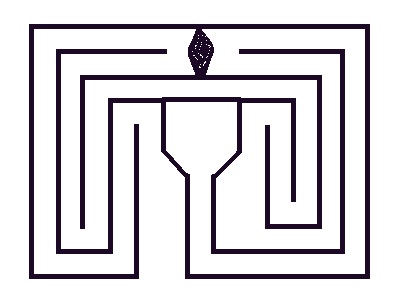
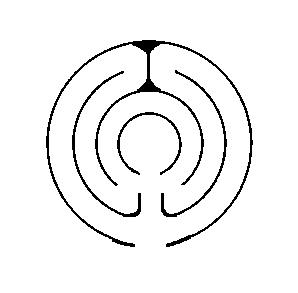
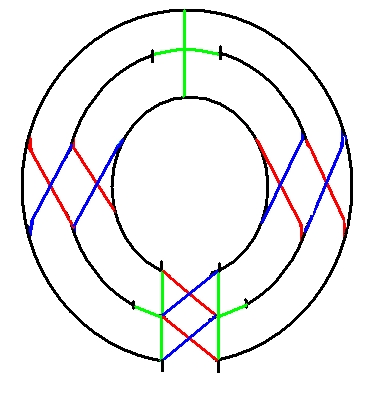
It was after looking at Fr. Paul's Church Pew Labyrinth that I realized that if you make the paths straight instead of curved, the left and right sides of the half Chartres labyrinth are identical. So it occurred to me that it could be compressed into a labyrinth that would fit into a samller space. The above image is the result. It is not a true labyrinth, in that there are two places where there are choices about which path to take. However, if you follow the arrows you will eliminate the choice. You will follow the red arrows first, then follow the green arrows as you retrace the pathways, replicating the other side of the half Chartres labyrinth.
On the way out, you will go against the direction of the arrows, using the green arrows first and the red arrows second.
As with the actual half Chartres, you can replicate about 91% of the full Chartres pattern by walking it twice. When you get to the green arrow in the lower right corner, don't follow it to the center the first time, but turn around and repeat the labyrinth before going into the center.
This labyrinth would fit into long narrow places like a hallway or a driveway, which might be too narrow for a wider labyrinth. But the longer you make it, the bigger the Chartres labyrinth it will replicate.
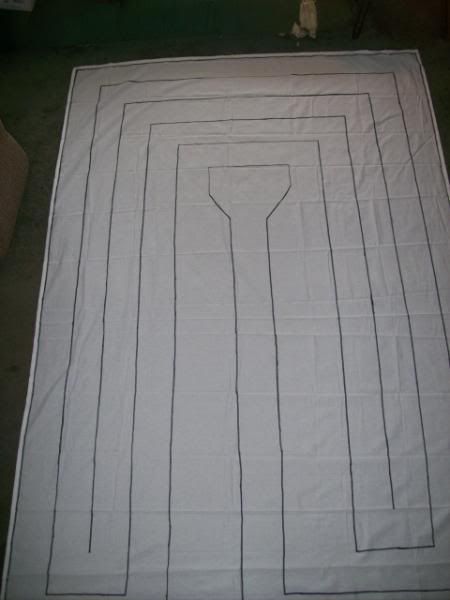
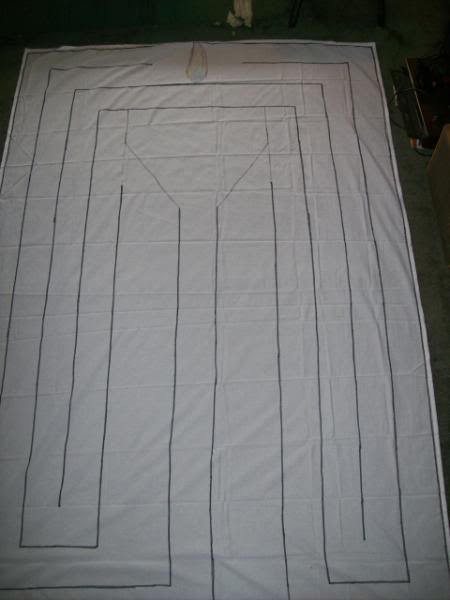
Here's what it looks like on a twin-sized bedsheet, which is five and a half by eight feet. The paths are ten inches wide. One of our cats is exploring it:
The Full Chartres Pattern on a Dropcloth or Bedsheet
Return to contents
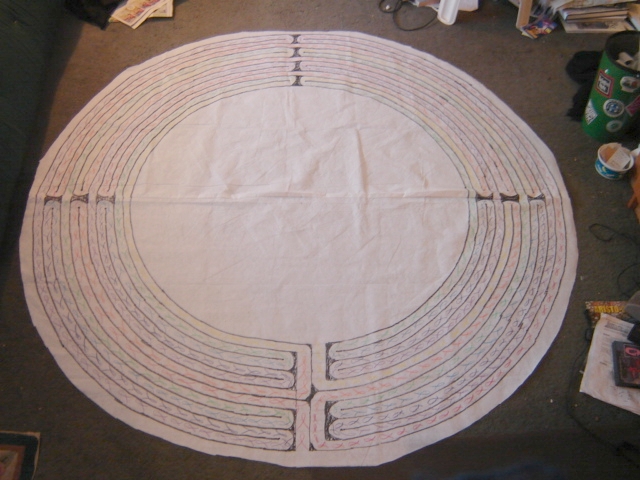
After hearing about my drop-cloth labyrinth, a friend of mine wanted an idea for a walkable Chartres labyrinth small enough to fit in a small living room. I experimented and came up with the next one. It is 6 feet by 6 feet, but could be made 5 feet by 5 feet, which could be drawn on a twin-sized bedsheet. If your space is larger, use a larger sheet. I decided to make the full Chartres pattern, with a center big enough to walk around, and very narrow paths that would be color coded to help keep the place visually during the walk. You walk around the center, not trying to keep your feet in the tiny path, but use it to visually guide your walk.
Start with a pencil circle with a radius of 22 inches, then add eleven more circles, each 1 1/8 inches beyond the one before. Add the turns for the Chartres labyrinth, and go over it with a permanent marker as described above. On this one also I made a mistake, not leaving a gap at one of the turns. I figure human beings aren't supposed to make perfect things (or Athena might turn you into a spider), so it was OK.
I used crayons in rainbow colors to mark the paths. I used a fish symbol to indicate the direction. The fish look kind of like footprints. The colors change each time you change directions. This makes it relatively easy to keep track of where you are as you walk the labyrinth. The paths are too small to keep your feet inside them, but you can follow the colors and the directions of the 'footprints' and keep your place. This actually works surprisingly well. You might like to make a similar one with a 12-foot diameter, with an inner circle with a radius of maybe 27 inches, and paths that are 3 inches wide. It's important to keep the inner circle big enough, because otherwise you have paths that are too short to walk.
I think this idea would make a great rug or quilt. If you think so too, you are welcome to use the idea, as long as you don't try to prevent anyone else from doing so.
You could also draw a classical labyrinth on a bedsheet or dropcloth. (See the How to draw labyrinths page for a diagram.) The key to making it walkable is to make the center at least three feet in diameter, making paths as narrow as necessary to fit on the cloth.
The Baltic Labyrinth
Return to contents

The Baltic labyrinth is a traditional design often found in turf labyrinths in Germany. It's nice for small spaces because you can walk to the center and then spiral out and repeat without having to retrace your way out. Therefore what is actually a small pattern can become a long walk. It's fairly easy to lay out with rope or string. You can read more about it on my string labyrinth page.
Here's a Baltic labyrinth that fits into a very small space and is very easy to lay out using string or rope:

And here's what it looks like laid out with rope on our floor. I used a 42-foot rope and a 21-foot rope.

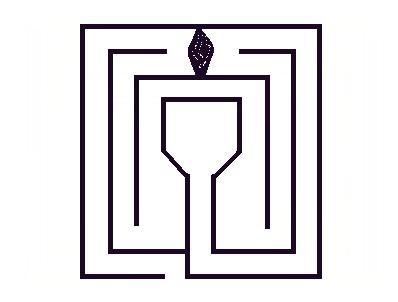
The Flaming Chalice
The basis for this labyrinth is one that could be drawn using a seed pattern of five vertical lines and a dot at each end:

The five-vertical-line-seed-pattern labyrinth has a unicursal wall as well as a unicursal path; it can be drawn in one line. You can draw other labyrinths of that sort by using any odd number of vertical lines with a dot at each end. This one is equivalent to the inner half of an eleven-circuit classical labyrinth. If you use three lines, you get a fairly well-known simple three-circuit labyrinth, which is equivalent to the inner half of the seven-circuit classical labyrinth. (Helen Curry claims copyright for the three-circuit version with circular paths.)
This pattern works well in a small space if you make the paths rectangular instead of circular:
Here it is on a twin-sized bedsheet:
I was looking for a somewhat simple pattern that would have paths wide enough to walk on and yet would fit into my living room. By inserting two turns into into the five-vertical-line-seed-pattern labyrinth, I came up with a pattern that has no quarter-turns, but does have a couple of half-turns. I thought this pattern was original, but it turns out the same pattern was published previously by Yvonne R. Jacobs.
You can see what it looks like on her page Luna Labyrinths. She calls it "Luna III". She has agreed that my Flaming Chalice variation is enough different that it could be thought of as a new design. Here's a square version of her design:
I drew the square version on a shower curtain that I'd picked up at Goodwill with the idea of making a labyrinth because it had concentric colored squares printed on it. Because I used the squares to guide the edges of my paths, my inner paths are wider than the outer ones. But since the paths are colored, walking the narrow outer paths is very easy. I really like this pattern for a small space, because the inner circuits are long and straight enough that you aren't tripping over your feet trying to turn too often. By making the outer paths narrow, you can get an interesting walk in a five-foot wide square.
The only unsatisfying thing about the square version is that the center is just the end of a path. By widening the center and raising it, I came up with the design at the top of this section. You can make the bottom part longer to make the design a square, or leave it as a rectangle to save space.
Here's a longer version, which works better in a small space:
And here it is on a twin-sized bedsheet. This is actually the back of the same sheet I drew the original five-vertical-line-seed-pattern labyrinth on. In walking, I find that I like the original one without the divisions better. But the flame does add a nice visual touch.

I really like this design, because it looks like the Flaming Chalice that is the symbol of Unitarian Universalism. It also reminds me of a menorah, an altar, and an ancient Greek torch. You are welcome to use it in any way you like.
Here's a simplified chalice design that may work better in a smaller space:
This simplified pattern is certainly not original, though the chalice interpretation is; it's one "shuffle" from the folded virtual labyrinth, and appears in the unfolded version over and over in the Chartres labyrinth.
The Bridge Labyrinth
Return to contents
The Bridge Labyrinth allows you to walk almost all of the complete Chartres labyrinth pattern in a small design of four circuits. It has become one of two of my very favorite labyrinth designs. Therefore I have made a separate page for it here: The Bridge Labyrinth.
Here's a photo of the Bridge Labyrinth on a flat twin bedsheet, 66" by 96" (5.5 feet by 8 feet.) This barely fits into our living room. Having it 8 feet long makes the paths long enough to walk comfortably. The paths are 6 inches wide.
Here's a smaller, 3-circuit Bridge Labyrinth that fits better into a small space. It is also explained on the Bridge Labyrinth page.
On the same page I describe what I call a Model Railroad Maze, because it's based on a classic model railroad layout for a small space. It also makes for a very satisfying walk in a small space, and you can use it to replicate the Chartres walk as well. You can see instructions for walking it here.
After a lot of experimenation, I find that I like both the Bridge Labyrinth and the Model Railroad Maze the best for use in a small space. They require a little bit of thinking, but not nearly as much as walking the Chartres labyrinth from memory, which I describe on the labyrinths you can do anywhere page. They give a longer, more interesting walk than the shorter patterns I describe. You can use a string of beads to help walk them. However, you may prefer the shorter patterns, because you can just let the paths guide you. My husband likes the Tarry Town pattern the best. You will see it on the string labyrinths page.
The Zipped Chartres Labyrinth
Return to contents
When you're working with a space as small as our living room, even four circuits are hard to fit. This labyrinth allows you to walk a very close approximation of the full Chartres pattern using only two circuits. On a twin bedsheet, this pattern would allow for a wider path and a larger center than the Bridge Labyrinth. You can see an explanation of how to walk it here: Zipped Chartres labyrinth
Ariadne's Clue
I describe this on my string labyrinths page, but it works so well in a small space that I thought I'd mention it here. You can use a ball of yarn to make the paths instead of the walls. You can lay it out in a random pattern, allowing it to cross over itself as much as you want. Try to make the turns wide and cross the previous paths at as close to a right angle as you can. Here's a design based on a love knot:


copyright 2006 by Karen Deal Robinson
Click on the labyrinth to return to the main labyrinth page.
Click on the mountaintop to see my other pages.

| 
