|
Snowman by LovlyGypsy

I have attached all the selections and the psp preset.
Download
Unzip to any file, open Explorer and go to the file you unziped to, click on the file named Angled.pbv, go to EDIT>CUT, double click Program Files, double click Jasc Software, double click Paint Shop Pro, double click the file named Presets, go to EDIT>PASTE, close Explorer.
Open PSP, go to FILE>NEW and use these settings...
Width: 400
Height: 450
Background color: Blue
If your Layer Palette isn't open you can open it by clicking the Toggle Layer Palette button
 , then click the create layer button , then click the create layer button
 and name this layer bottom. Go to SELECTIONS>LOAD FROM DISK and select bottom.sel, click the floodfill tool and name this layer bottom. Go to SELECTIONS>LOAD FROM DISK and select bottom.sel, click the floodfill tool
 , select white as your foreground color and flood fill the bottom, go to SELECTIONS>FLOAT, EFFECTS>3D EFFECTS>CUT OUT and use these settings... , select white as your foreground color and flood fill the bottom, go to SELECTIONS>FLOAT, EFFECTS>3D EFFECTS>CUT OUT and use these settings...
Vertical: 1
Horizontal: 1
Opacity: 41
Blur: 20
Shadow Color: Black
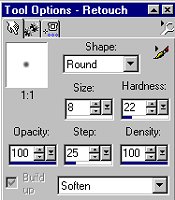
Deselect by going to SELECTIONS>SELECT NONE. Click the Retouch tool  , Shape: round, Size: 8, Hardness: 22, Opacity: 100, Step: 25, Density: 100, Soften. , Shape: round, Size: 8, Hardness: 22, Opacity: 100, Step: 25, Density: 100, Soften.
Here's what your tool options box will look like...
Now just go around the bottom's edge to get rid of the jaggies and it should look like this...

save now
Add another layer and name it middle. Go to SELECTIONS>LOAD FROM DISK and select middle.sel, click the floodfill tool, flood fill the middle with white, go to SELECTIONS>FLOAT, EFFECTS>3D EFFECTS>CUT OUT and use the same settings. Deselect. Click the retouch tool and go around the middle. It should look like this...

save now
Add another layer and name it head. Go to SELECTIONS>LOAD FROM DISK and select head.sel, click the floodfill tool, flood fill the head with white, go to SELECTIONS>FLOAT, EFFECTS>3D EFFECTS>CUT OUT and use the same settings. Deselect. Click the retouch tool and go around the head. It should look like this...

Save now
Click on the layer named middle, add a new layer and name it scarf1. Go to SELECTIONS>LOAD FROM DISK and select scarf1.sel, click the floodfill tool, flood fill the scarf any color you want I used #00CC00, go to SELECTIONS>FLOAT, EFFECTS>3D EFFECTS>CUT OUT and use the same settings. Deselect. Click the retouch tool and go around the scarf1. It should look like this...

Save now
Add a new layer and name it scarf2. Go to SELECTIONS>LOAD FROM DISK and select scarf2.sel, click the floodfill tool, flood fill with the same color, go to SELECTIONS>FLOAT, EFFECTS>3D EFFECTS>CUT OUT and use the same settings. Deselect. Click the retouch tool and go around the scarf2. It should look like this...

Save now
Click on the layer named head, add a new layer and name it hat1. Go to SELECTIONS>LOAD FROM DISK and select hat1.sel, click the floodfill tool, flood fill the hat1 with black, go to SELECTIONS>FLOAT, EFFECTS>3D EFFECTS>CUT OUT and use the same settings but change the Shadow color to a light gray, I used #C0C0C0. Deselect. Click the retouch tool and go around the hat1. It should look like this...

Save now
Add a new layer and name it hat2. Go to SELECTIONS>LOAD FROM DISK and select hat2.sel, click the floodfill tool, flood fill the hat2 with a yellow I used #FFFF80, go to SELECTIONS>FLOAT, EFFECTS>3D EFFECTS>CUT OUT and use the same settings but change the Shadow color back to black. Deselect. Click the retouch tool and go around the hat2. It should look like this...

Save now
Add a new layer and name it hat3. Go to SELECTIONS>LOAD FROM DISK and select hat3.sel, click the floodfill tool, flood fill the hat3 with black, go to SELECTIONS>FLOAT, EFFECTS>3D EFFECTS>CUT OUT and use the same settings but change the Shadow color back to light gray. Deselect. Click the retouch tool and go around the hat3. It should look like this...

Save now
Add a new layer and name it face&buttons, Go to SELECTIONS>LOAD FROM DISK and select face&buttons.sel, click the floodfill tool, flood fill with black. Go to EFFECTS>3D EFFECTS>INNER BEVEL click on the arrow beside Presets and select Angled, like this...

Deselect. Add a new layer and name it nose, Go to SELECTIONS>LOAD FROM DISK and select nose.sel, click the floodfill tool, flood fill with red I used #FF0000. Go to EFFECTS>3D EFFECTS>INNER BEVEL and just click ok. Deselect. It should look like this...

Save now
Add a new layer and name it broom1, Go to SELECTIONS>LOAD FROM DISK and select broom4.sel, click the floodfill tool, flood fill with a lighter brown I used #B66842. Deselect. On the same layer go to SELECTIONS>LOAD FROM DISK and select broom5.sel, click the floodfill tool, flood fill with a black. Deselect. On the same layer go to SELECTIONS>LOAD FROM DISK and select broom6.sel, click the floodfill tool, flood fill with a dark brown I used #7B2D07. Save now.
Add a new layer and name it broom2, Go to SELECTIONS>LOAD FROM DISK and select broom1.sel, click the floodfill tool, flood fill with a dark brown I used #7B2D07. Go to EFFECTS>3D EFFECTS>INNER BEVEL and just click ok. Deselect. On the same layer go to SELECTIONS>LOAD FROM DISK and select broom2.sel, click the floodfill tool, flood fill with a lighter brown I used #B66842. Go to SELECTIONS>FLOAT, EFFECTS>3D EFFECTS>CUTOUT use the same settings as before. Deselect. On the same layer go to SELECTIONS>LOAD FROM DISK and select broom3.sel, click the floodfill tool, flood fill with a yellow I used #FFCC33. Go to SELECTIONS>FLOAT, EFFECTS>3D EFFECTS>CUTOUT use the same settings as before. Deselect. Now mine looks like this...

Save now
Add a new layer and name it arms. Go to SELECTIONS>LOAD FROM DISK and select leftarm.sel, click the floodfill tool, flood fill with white. Go to SELECTIONS>FLOAT, EFFECTS>3D EFFECTS>CUTOUT use the same settings as before. Deselect. On the same layer go to SELECTIONS>LOAD FROM DISK and select rightarm.sel, click the floodfill tool, flood fill with white. Go to SELECTIONS>FLOAT, EFFECTS>3D EFFECTS>CUTOUT use the same settings as before. Deselect. Click the retouch tool and go around both arms. Now you can add drop shadows to any part you want. When your done, click on the layer named background, click the Delete Layer button [], click yes, go to LAYERS>MERGE>MERGE VISIBLE then you can resize it as needed and here's another one I made...

If you have any questions please feel free to email me...
LovlyGypsy@AOL.com
Copyright © 2000-2001 by LovlyGypsy,
all rights reserved
| I, LovlyGypsy,
Give my permission to Ldy
Archrr aka Artists for PSP to place any and all tutorials
that I have made on her site.. this 22nd day of February 2001.
These tutorials were made solely by me and permission is mine to
give. |
|

