|

How to make a Snow Globe
.
The DOWNLOAD file contains
the following files...
fairy4.tub
snowglL.tub
bg12.bmp
ivy.tub
butterf.tub
butterf3.tub
.
Download, unzip.
Open PSP open the tubes files and export each as a
picture tube.
Go to FILE>NEW use the following settings...
Width: 183
Height: 262
Background color: Transparent
Click ok.
Click the tube tool  and
pick...snowglL: 100% on the control palette. and
pick...snowglL: 100% on the control palette.
Now place a snowglobe in the middle like this...

Now click the magic wand  and
move your mouse to the white part and click. and
move your mouse to the white part and click.
This will make the white part selected.
Now go to FILE>OPEN and open the file bg12.bmp.
It looks like this...

Select the snowglobe by clicking on it's toolbars.
Click on the flood fill tool  select
Pattern on the control palette select
Pattern on the control palette
and click Options, click New Pattern Sorce and pick
the bg12.bmp and click ok.
Now flood fill the globe. You can close out
bg12.bmp.
Go to SELECTIONS>SELECT NONE.
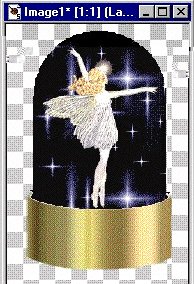
Now click the tube tool and pick...fairy4: 100% on
the control palette.
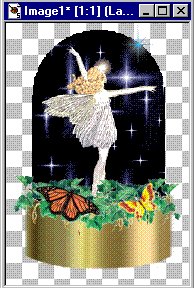
Now place the fairy in the middle like this...
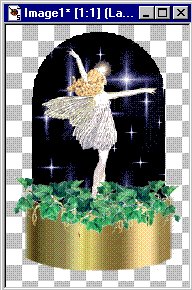
On the control palette pick...ivy: 55%.
Now place the ivy at the fairies feet like this...
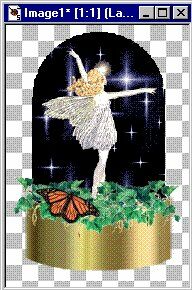
On the control palette pick...butterf3: 24%.
Now place a butterfly on the ivy on the left side
like this...
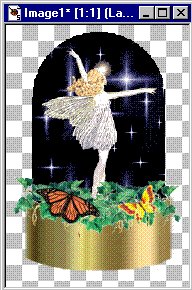
On the control palette pick...butterf: 49%.
Now place a butterfly on the ivy on the right side
like this...
On the control palette pick...sparkleB: 28% which I
sent in an earlier
lesson and place a sparkle on the top right side of
the sky like this...
Now click the selection tool  and
put a rectangle around and
put a rectangle around
the globe and single click inside the dotted lines.
Now go to IMAGE>EFFECTS>DROP SHADOW use the
following settings...
Color: Black
Opacity: 100
Blur: 7.5
Vertical: 1
Horizontal: 1
Click ok.
Go to SELECTIONS>SELECT NONE.
Click on the top box and pick a color you want your
text to be.
I picked a light yellow.
Click the text tool and click on the gold bottom
and pick a font.
I picked Black Chancery font, Bold, size 18.
Click ok.
Now go to IMAGE>EFFECTS>DROP SHADOW use the
following settings...
Color: Black
Opacity: 100
Blur: 3.3
Vertical: 1
Horizontal: 1
Click ok.
You can move your text around if you need to.
Go to SELECTIONS>SELECT NONE.
Go to FILE>SAVE AS give it a name and save it as
a JPEG file.
This is what it looks like now...

=o )
If you have any questions please just ask...
Copyright © 2000-2001 by LovlyGypsy,
all rights reserved
| I, LovlyGypsy,
Give my permission to Ldy
Archrr aka Artists for PSP to place any and all tutorials
that I have made on her site.. this 22nd day of February 2001.
These tutorials were made solely by me and permission is mine
to give. |
|

